
how to join pieces with 60 degree angles?
 01-14-2014, 11:19 PM
#1
Senior Member
Thread Starter

Join Date: Apr 2012
Posts: 764
i need to go to bed because this is almost making me cry.
strip pieced and then cut two chevron sides at 60 degrees. now i need to add pieces also cut at 60 degrees to top and bottom.
cannot for the life of me figure out how to do it.
help?
thanks!
aileen
strip pieced and then cut two chevron sides at 60 degrees. now i need to add pieces also cut at 60 degrees to top and bottom.
cannot for the life of me figure out how to do it.
help?
thanks!
aileen
 01-15-2014, 01:10 AM
#3
Power Poster
Join Date: Dec 2010
Location: Northern California mountains
Posts: 12,538
These are the dreaded Y seams. Once you do them, they are not that hard, although the solution is often to avoid them completely, as they are time consuming. there are you tube demos on Y seams
1. sew each piece to 1/4" from the end. Backstitch 1-2 stitches.
2. sew one side of inset from that 1/4" place.
3. fold everything else out of the way, sew the other side the same way. always start from that 1/4" point.
there are many patterns that call for Y seams. sometimes, the easiest way is to avoid the situation completely. This quilt was made with "half hexagon" units. that is, the pattern piece is half of the desired hexagon plus seam allowance on the cut. This is from a F&P show. With chevrons, the trick is a triangle that is half the finished size plus that seam allowance.
I did a demo at my guild's semi-annual retreat. Everyone was successful with their HH large scale Field of Diamonds. Each column was sewn together separately, then combined.
Last edited by QM; 01-15-2014 at 01:14 AM.
01-15-2014, 06:26 AM
#5
Power Poster
Join Date: Mar 2011
Location: Ontario, Canada
Posts: 41,481
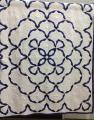
[ATTACH=CONFIG]456665[/ATTACH]I am guessing you are doing the table runner made with a border print? If it is a spot where I want it to match exactly, I use a pin but put it in the manner of the stitching line. Open it up and take a look and adjust if necessary. If you are piecing an OBW, the 60*pieces are pieced in rows. There is a great link to a video tutorial on QB.
Last edited by Tartan; 01-15-2014 at 06:29 AM.
01-15-2014, 06:30 AM
#6
Super Member
Join Date: Mar 2011
Location: Central NJ
Posts: 5,571
For me, it's easiest to find the center of each fabric first. This can be a bit tricky with bias edges so starch the daylights out of everything first. Fold the piece in half wrong sides together and finger press. This will give you a fold with right side of fabric out. Match up your centers on both pieces and pin there. Pin pieces together working your way out to both ends. You will probably end up with dog ears hanging out 1/4 in on both ends. It looks funky when pinned but then ends up correct when you sew together. Try on a couple of scrap pieces first.
01-15-2014, 06:47 AM
#8
Power Poster

Join Date: Dec 2009
Location: Outside St. Louis
Posts: 38,213
QB had an article about putting diamond shapes together. I don't know if that is the same as you need to know.
Go through the tutorial section on here and see if you can find help.
I avoid pattern and techniques that I think is too hard for me. Maybe try some scraps to see if you can get it to work.
Go through the tutorial section on here and see if you can find help.
I avoid pattern and techniques that I think is too hard for me. Maybe try some scraps to see if you can get it to work.
01-15-2014, 06:55 AM
#10
Super Member
Join Date: Mar 2010
Location: New Hampshire
Posts: 4,555
If your strip pieced unit is a parallelogram and the top and bottom pieces are half square triangles, let me know because I'm working on a chevron project and I can take pictures as I make another block.

Thread
Thread Starter
Forum
Replies
Last Post
xraytechluvs2quilt
Main
6
01-02-2011 12:37 AM
