
A story and some tips from J Miller esq ... : ->
 06-16-2012, 07:13 AM
#1
Super Member
Thread Starter
Join Date: Feb 2012
Posts: 8,091
OK, here's a little story and some tips. I hope you enjoy it.
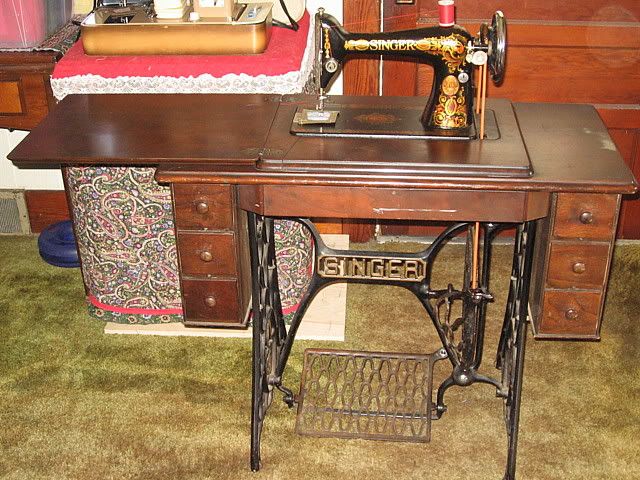
Sometime towards the end of last year I picked up a Singer 66 red eye treadle from GW here in Spfld. The poor baby had been de-treadled and converted to electricity some many summers ago.
When I got it the cord block, foot controller, and light was there, but the motor was gone. The plug for the motor was still in the wiring block with about 3" of severed wire extending from it.
So I decided to perform reconstructive surgery and return this machine to a treadle. (Note to those who might want to do this, treadle parts can be a PITA to find.)
First I'll pulled the light and wiring out and made one heck of a mess. The insulation on the wiring was crumbling like and old cookie. Bits of it everywhere. The old latex insulation does not last well. Under it was aluminum wire. Ugh, I hate aluminum wire.
The cord set, light, and foot controller were carefully put in zip lock back to keep the junk from spreading throughout the house. (Sometime later I rewired the cord set, light and foot controller and use the it along with an extra motor for testing machines.)
Now that I had the treadle and machine free of electrical debris I set about the task of restoring her to the proper method of propulsion.
I needed:
Spoked hand wheel
Treadle foot plate
Pitman shaft assembly
Big wheel and parts
Dress guard
Belt shifter, spring, and screw
Various nuts and bolts.
I went to the LSMG first, nothing.
Then I posted WTB adds in a couple other forums I was on before I joined this one, and got some of the parts.
But try as I might I could not find a genuine Singer pitman arm assembly or a spoked hand wheel or a belt shifter set up.
So I ended up ordering the spoked hand wheel from Sew-Classics.
The pitman arm assembly, belt shifter and spring and screw came from ...... Australia.
All these parts are Chinese reproductions. (More on those later)
The singer parts fit just fine for the most part. I had to make an adapter for the rear belt guide. Apparently there is more than one kind and the one I got was wrong for this treadle base. I made it fit. Then the dress guard set to close to the wheel so I had to use a spacer to make some clearance.
I had assembled the treadle parts by the time the Chinese parts came. With them came the head aches.
TIP 1: Chinese parts will not fit like the original American parts. Count on it.
The pitman shaft assembly was nicely made. It has a feature I haven't seen the originals, a spring loaded tension devise to keep the slack out from between the ball and seat part. The threads on the top of the shaft mated with the original bearing threads perfectly too.
However ( yep, here it comes ) the big nut on the bottom was a very loose fit in the treadle plate. Too small in diameter and too tall. So there was no way I could make it a tight fit like it needed to be.
I had to shorten the big nut and shim it with aluminum from a soda can to make it fit.
Works great though.
The next thing was the belt shifter. Oh lordy, this piece should never ever been allowed out of the factory.
The two halves of the mold it was cast from did not match, creating a big ridge all the way around it. Then the hole was not drilled right, and counter sink for the screw head was non-existent. I had to finish manufacturing that part. (Remember, they came from Australia. Sending them back would have cost more than the parts did.)
The belt shifter spring fit perfect, but the knot heads at the Chinese factory put the wrong threads on the screw. It was perfect in every way but the thread pitch. Arrrrgh!!!! I had to borrow the screw from my other treadle. Eventually I found one in a box of things at the local SMG's place.
With all that done it was time to assemble the new spoked hand wheel and put the belt on. Well, that's easier said than done. Sew-Classics product info has the statement: "Some fitting may be required." That's actually a fib as fitting is definitely required.
TIP 2: When the Chinese or any metric country tries to duplicate the American inch threads they either use our equipment or many times will attempt to use something metric that is similar. A lot of times they'll round up or down to the nearest millimeter when they make the part. This creates a lot of headaches when you try to fit an otherwise useable reproduction part to an original machine.
The Chinese hand wheel would only fit half way on the shaft of the 66 #2 machine. OK, so I'll make the hole bigger. Um, Joe, just how you gonna do that? I then tried the hand wheel on my 66 Treadle #1 and it barely went on, and bound up. I tried it on Rusty the rusted 99K. It fit there. Talk about tolerance variations.
How to fit it?? That was the 64 Dollar question.
I was standing in front of my messy work bench searching for something to use to polish out the shaft hole on the wheel when my eye landed on a shiny yellow 20 ga shot gun shell. Hmmm, yellow ones are too small. I finally found a nice new plastic red 12 gauge shell and put in in the hole. ALRIGHT! We can do this.
TIP 3: A loaded plastic 12 gauge shot gun shell wrapped in 600 grit wet or dry sand paper is a really good tool to use to polish out the ID on a reproduction hand wheel. Put some oil on it to keep the debris from getting every where. It has to be loaded because an empty hull will collapse. There is no danger of it going off, so don't worry about that. Once done, stick it back in the box and your DH won't know the difference
So it took me a couple hours to get that hand wheel fitted to my #2 treadle. I alternated stroking the shell in and out spinning the wheel around it. First one way, then take the wheel off, flip it around and do it some more. Test fitting it often on the #1 treadle so I didn't go too far. The #1 treadle has a slightly larger shaft than the #2, so once it fit the #1 I knew it would fit the #2 and could stop.
Once the hand wheel was on I put a new belt on it, oiled it up and we are in business.
TIP 4: Don't get in a hurry or impatient when you're looking for parts. I looked for months before I ordered the Chinese junque. About a month after I had the machine all done with the reproduction parts in it I had a real Singer spoked hand wheel, and I'd seen the other parts I needed on eBay. :>(
The originals are out there, don't bother with the reproductions. They aren't worth it when you have to fit them.
Joe

 06-16-2012, 07:55 AM
#4
Super Member
Join Date: Jan 2011
Location: Sierra Vista, AZ
Posts: 3,992
I am really impressed on how resourceful you are Joe. Good advice on not purchasing the reproduction parts. I purchased a 1919 Singer Redeye yesterday that had been electrified and mounted in a "modern" 1943 cabinet. It came with the original sales receipt from 1943. The wiring looks OK but I am going to fix the plug (I had to take it off to get the head off of the cabinet) and give her a brief test run to see if the motor works. I will be posting pics a little bit later.
06-16-2012, 09:54 AM
#6
Super Member

Join Date: Sep 2009
Location: Idaho
Posts: 6,442
A "loaded shotgun shell"??? Seriously? NOT a good plan!
Go find a dowel to use instead...much safer idea, and I don't care if you don't think it'll fire, Joe, and I don't think it would either as long as the firing cap isn't engaged in any way, but you have to know that someone is going to "tap" it with a hammer!
Go find a dowel to use instead...much safer idea, and I don't care if you don't think it'll fire, Joe, and I don't think it would either as long as the firing cap isn't engaged in any way, but you have to know that someone is going to "tap" it with a hammer!
06-16-2012, 10:26 AM
#7
Super Member
Thread Starter
Join Date: Feb 2012
Posts: 8,091
Well Charlee, I did not tell anyone else to do this, I said it was what I did and stated it would not go off doing what I did.
I do not "have to know that someone is going to "tap" it with a hammer! " If someone else is stupid enough to hit a loaded round on the primer with a hammer, they deserve the results.
I've been a shooter for many decades and do not take gun or ammunition safety lightly. But I do not believe in the paranoia some people attach to them either. Nor do I believe I'm responsible for some other fool who does something stupid. People are responsible for themselves regardless of what the liberal do-gooders want the rest of us to believe.
I related the story of what I did, using what I had available to me at the time. Nothing more.
I guess from now on I'll have to post a disclaimer at the top of each of my threads.
Joe
06-16-2012, 10:53 AM
#8
Super Member
Thread Starter
Join Date: Feb 2012
Posts: 8,091
TIP 3: A loaded plastic 12 gauge shot gun shell wrapped in 600 grit wet or dry sand paper is a really good tool to use to polish out the ID on a reproduction hand wheel. Put some oil on it to keep the debris from getting every where. It has to be loaded because an empty hull will collapse. There is no danger of it going off, so don't worry about that. Once done, stick it back in the box and your DH won't know the difference
So because I forget there are those that are afraid of guns, ammo, and anything to do with them I will attempt to avoid any mention of anything to do with the subject in the future.
PLEASE DISREGARD TIP #3 IN MY FIRST POST ABOVE.
Joe
06-16-2012, 10:59 AM
#9
Super Member
Join Date: Aug 2011
Location: Millville, NJ
Posts: 1,835
Sort of like describing how to rewire a motor without mentioning to unplug the motor first. You'd think it's common sense to unplug the thing before working on it but there's always someone out there that doesn't know any better. The person whacking on a shotgun shell with a hammer is about the same as the guy/ gal working on a motor with it plugged in. The dowel idea is probably better most people, though I'll give the shotshell a try.
I've been lucky with the replacement handwheels fitting the shafts, I have problems with not enough room for the washer. Guess I 'll have to grind or mill the wheel down, not how I care to spend my time. Oh well.
Jon
I've been lucky with the replacement handwheels fitting the shafts, I have problems with not enough room for the washer. Guess I 'll have to grind or mill the wheel down, not how I care to spend my time. Oh well.
Jon
06-16-2012, 11:04 AM
#10
Senior Member
Join Date: May 2012
Posts: 911
J you have me laughing , wish I would have thought about using a shot shell wa sit a 410 or 20, seems like a 12 would be to big...
O ya welcome to the world of chinese parts.... in there vintage reproduction parts, I have yet to see anything fit right out of the box and the box isn't even worth storing spare parts in..
O ya welcome to the world of chinese parts.... in there vintage reproduction parts, I have yet to see anything fit right out of the box and the box isn't even worth storing spare parts in..

Thread
Thread Starter
Forum
Replies
Last Post
CAS49OR
General Chit-Chat (non-quilting talk)
3
05-20-2014 09:50 PM
craftybear
Links and Resources
5
04-25-2011 10:47 AM
craftybear
Links and Resources
1
02-21-2011 08:29 PM
craftybear
Links and Resources
5
09-23-2010 11:57 AM
