
Best applique technique for a word quilt
 08-10-2016, 10:48 PM
#11
Member

Join Date: Feb 2013
Location: Coventry, UK
Posts: 70
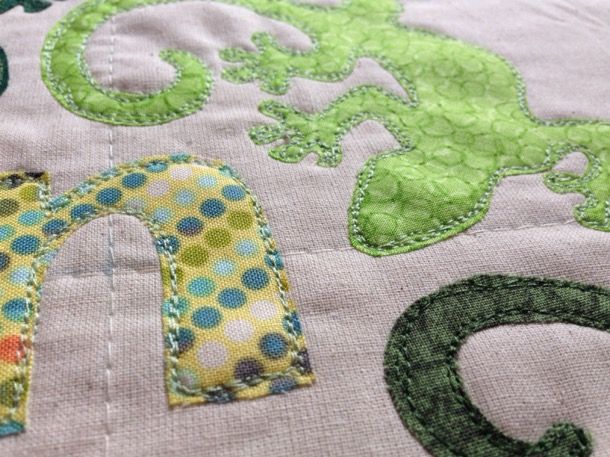
I find zig zag too cumbersome as you have to manoeuvre the whole quilt around when doing the appliqué.
I do free motion and just go around the letter three times to secure the shape.
The end result looks like this
I do free motion and just go around the letter three times to secure the shape.
The end result looks like this

 08-10-2016, 11:27 PM
#12
Super Member
Join Date: Jul 2014
Location: Illinois
Posts: 2,140
If you prefer to use your own lettering, it is easy enough to print the letters in reverse using MS Word. All you need to do is:
1. Create a text box for each line of text
2. Type your text. Set desired font & size.
3. Click your right mouse button while hovering over the text box. Select "Format Shape".
4. Choose "3-D Rotation" from menu -- or click the Pentagon icon, then "3-D Rotation"
5. Next to the "X:" type "180" for degrees
Your text will now print in reverse. Just set your paper underneath your fusible web. I tape both the paper & the fusible to the table with masking tape so they don't move while I'm working.
Note: The pre-printed fusible works fine as far as I've heard. I just like choosing the style & size of letters rather than having to make the pre-printed size/style fit my quilt.
As others have mentioned, a close blanket stitch would also secure the edge, but I assume your Bernina is like my vintage Singer & only does a straight stitch & a zigzag stitch. If you have the option of a blanket stitch, I'd go with that. Otherwise, to do a faux-satin stitch (just as with a real satin stitch), you will need to get some tear away stabilizer so you don't end up with gathers/puckers around your lettering. I like Pellon 806; they sell it at JAF. You apply the stabilizer to the back of your background fabric (the fusible web is on the back of your applique).
You had asked about quilting before. Since you said you were thinking about outlining the words, I'm assuming you do FMQ. I thought maybe outlining the words twice -- in 2 different colors, if you're daring -- or else just in a dull white to match the background, and then adding a sunshine around the "S" in 'shine' could look cute & tie everything together... but then again, I very much like more artsy quilts. Here's what I was thinking ... it's not much, but perhaps it will inspire you to come up with something better!
[ATTACH=CONFIG]555756[/ATTACH]
A simple cross hatch could also look nice. I can't help but imagine this with prairie points for the binding, but I know you said you're short on time. Can't wait to see how it turns out! Hope you have a chance to post pictures!
08-12-2016, 04:24 AM
#13
Senior Member
Thread Starter
Join Date: Jul 2013
Location: Montreal, Quebec, Canada
Posts: 459
If you prefer to use your own lettering, it is easy enough to print the letters in reverse using MS Word. All you need to do is:
1. Create a text box for each line of text
2. Type your text. Set desired font & size.
3. Click your right mouse button while hovering over the text box. Select "Format Shape".
4. Choose "3-D Rotation" from menu -- or click the Pentagon icon, then "3-D Rotation"
5. Next to the "X:" type "180" for degrees
Your text will now print in reverse. Just set your paper underneath your fusible web. I tape both the paper & the fusible to the table with masking tape so they don't move while I'm working.
Note: The pre-printed fusible works fine as far as I've heard. I just like choosing the style & size of letters rather than having to make the pre-printed size/style fit my quilt.
As others have mentioned, a close blanket stitch would also secure the edge, but I assume your Bernina is like my vintage Singer & only does a straight stitch & a zigzag stitch. If you have the option of a blanket stitch, I'd go with that. Otherwise, to do a faux-satin stitch (just as with a real satin stitch), you will need to get some tear away stabilizer so you don't end up with gathers/puckers around your lettering. I like Pellon 806; they sell it at JAF. You apply the stabilizer to the back of your background fabric (the fusible web is on the back of your applique).
You had asked about quilting before. Since you said you were thinking about outlining the words, I'm assuming you do FMQ. I thought maybe outlining the words twice -- in 2 different colors, if you're daring -- or else just in a dull white to match the background, and then adding a sunshine around the "S" in 'shine' could look cute & tie everything together... but then again, I very much like more artsy quilts. Here's what I was thinking ... it's not much, but perhaps it will inspire you to come up with something better!
[ATTACH=CONFIG]555756[/ATTACH]
A simple cross hatch could also look nice. I can't help but imagine this with prairie points for the binding, but I know you said you're short on time. Can't wait to see how it turns out! Hope you have a chance to post pictures!
1. Create a text box for each line of text
2. Type your text. Set desired font & size.
3. Click your right mouse button while hovering over the text box. Select "Format Shape".
4. Choose "3-D Rotation" from menu -- or click the Pentagon icon, then "3-D Rotation"
5. Next to the "X:" type "180" for degrees
Your text will now print in reverse. Just set your paper underneath your fusible web. I tape both the paper & the fusible to the table with masking tape so they don't move while I'm working.
Note: The pre-printed fusible works fine as far as I've heard. I just like choosing the style & size of letters rather than having to make the pre-printed size/style fit my quilt.
As others have mentioned, a close blanket stitch would also secure the edge, but I assume your Bernina is like my vintage Singer & only does a straight stitch & a zigzag stitch. If you have the option of a blanket stitch, I'd go with that. Otherwise, to do a faux-satin stitch (just as with a real satin stitch), you will need to get some tear away stabilizer so you don't end up with gathers/puckers around your lettering. I like Pellon 806; they sell it at JAF. You apply the stabilizer to the back of your background fabric (the fusible web is on the back of your applique).
You had asked about quilting before. Since you said you were thinking about outlining the words, I'm assuming you do FMQ. I thought maybe outlining the words twice -- in 2 different colors, if you're daring -- or else just in a dull white to match the background, and then adding a sunshine around the "S" in 'shine' could look cute & tie everything together... but then again, I very much like more artsy quilts. Here's what I was thinking ... it's not much, but perhaps it will inspire you to come up with something better!
[ATTACH=CONFIG]555756[/ATTACH]
A simple cross hatch could also look nice. I can't help but imagine this with prairie points for the binding, but I know you said you're short on time. Can't wait to see how it turns out! Hope you have a chance to post pictures!
08-12-2016, 04:28 AM
#14
Senior Member
Thread Starter
Join Date: Jul 2013
Location: Montreal, Quebec, Canada
Posts: 459
Beautiful work! So it makes a raw edge? How does it look like if you wash the quilt?

Thread
Thread Starter
Forum
Replies
Last Post
craftybear
Main
53
06-02-2011 01:55 AM
craftybear
Links and Resources
2
05-13-2011 08:50 AM
