
Elisabrat's Medallion Style Quilt Along!
 02-18-2014, 06:37 AM
#951
Super Member
Join Date: Jan 2011
Location: Wyoming in the summer, Florida in the winter
Posts: 7,583
sustraley, 1" strips all the way around your quilt. Measure and make sure your center measures 21 1/2". You really only need 3/4" strips but I think it would be easier to sew 1" and trim. 3 into 21 = 7 units per side and 9 units for the top and bottom. Had you gone with a 4 1/2" rectangle it would have fit with no strip added, 4 into 20= 5 units per side. If you want a wider strip you'll have to go to 2 1/2" and your center will measure 24 1/2"which then you'll need 8 units per side and 10 top and bottom. Brat was right on the 1 1/2" but you have to remember to divide that in half because your sewing that strip on each side....or you could just sew on 1 side and 1 top or bottom and go modernistic .
.
.
 02-18-2014, 06:49 AM
#952
Super Member
Join Date: Jan 2011
Location: Wyoming in the summer, Florida in the winter
Posts: 7,583
HINT:: Remember in post #787, I showed you the pile of 1/2sq. triangles that were cut off and I resewed them. I am going to use these so if you have them and didn't throw them away, get them pressed and trim to 2 1/2" squares.
 02-18-2014, 01:32 PM
#954
Super Member
Join Date: Oct 2013
Location: Centralia, WA, USA
Posts: 4,890
I've discovered I suck at HSTs so far. Seems simple enough until I try to get my points to match. They're no fun at all then. I'm still scratching my head over color choices for this round and I have to finalize my placement for the 4 big corner blocks mine is getting. It keeps the math simple for the border strips anyway. I'm aiming for something in the neighborhood of 4x4 ft or a few inches over when it's done.
Rodney
Rodney
02-19-2014, 06:35 AM
#955
Super Member
Join Date: Dec 2010
Location: Wisconsin
Posts: 2,122
Rodney, have you heard of the magic 8 cutting method for hst's? It makes 8 at a time and is so much easier than any other way I have tried.
http://chezstitches.blogspot.ca/2011/01/magic-8.html
http://chezstitches.blogspot.ca/2011/01/magic-8.html
02-19-2014, 07:08 AM
#956
Super Member
Join Date: Oct 2013
Location: Centralia, WA, USA
Posts: 4,890
I haven't tried that yet.
I also read Rhonda's tutorial here on cutting them from strips and saw there's another way where you sew around the outsides of your squares then cut on the diagonals to make 4 at a time. Any one of these should work to get the HSTs. I do like Rhonda's idea of using a template to trim out the blocks. I should be able to get perfectly sized blocks every time that way. I can make my own templates any size I need. That should remove a lot of my errors there. Rhonda also had another thread where she addresses some of the issues with sewing HSTs together into a block. I have major trouble with keeping the points lined up and I think Rhonda's advice may have solved that issue. I should be able to get some practice in later this morning and find out what I like best.
Thank you,
Rodney
02-19-2014, 05:09 PM
#957
Super Member

Join Date: Jul 2011
Location: Texas
Posts: 5,072
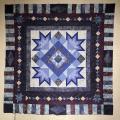
Picture 1: I decided to do the friendship star as my second border. But after I got the stars made they seemed to dark for this round.
Picture 2: So I picked a new fabric and put together the Entwined Border. I love LOVE IT!
Picture 3&4: now what to do with those Friendship Stars? Add them next....but blend them to border 2 by snowballing the corners with round 2fabric?
Or wait with them..... I didn't intend on this being big. I can honestly stop any time with it now. But I have the stars and should use them.....

Thread
Thread Starter
Forum
Replies
Last Post
Quilter 65
Pictures
18
06-06-2014 08:19 AM
Elisabrat
Member Swaps and Round/Row Robins
944
11-14-2013 07:00 AM
Elisabrat
Member Swaps and Round/Row Robins
745
08-01-2013 03:26 AM
