Go Back  Quiltingboard Forums >
  • Main
  • ‘Stained glass’ quilts >
  • ‘Stained glass’ quilts

  • ‘Stained glass’ quilts

    Thread Tools
     
    Old 05-29-2018, 03:24 AM
      #11  
    Super Member
     
    Join Date: Nov 2010
    Location: Milton DE
    Posts: 3,189
    Default My stain glass

    Here's two I've done...Brick wall is a Poppers pattern...the other from one of my books which is PP'd.
    There are many pp'd stain glass books out there to make it easy...
    Attached Thumbnails image.jpeg   image.jpeg  
    hobbykat1955 is offline  
    Old 05-29-2018, 06:36 AM
      #12  
    Super Member
     
    Macybaby's Avatar
     
    Join Date: Jul 2013
    Location: South Dakota
    Posts: 8,151
    Default

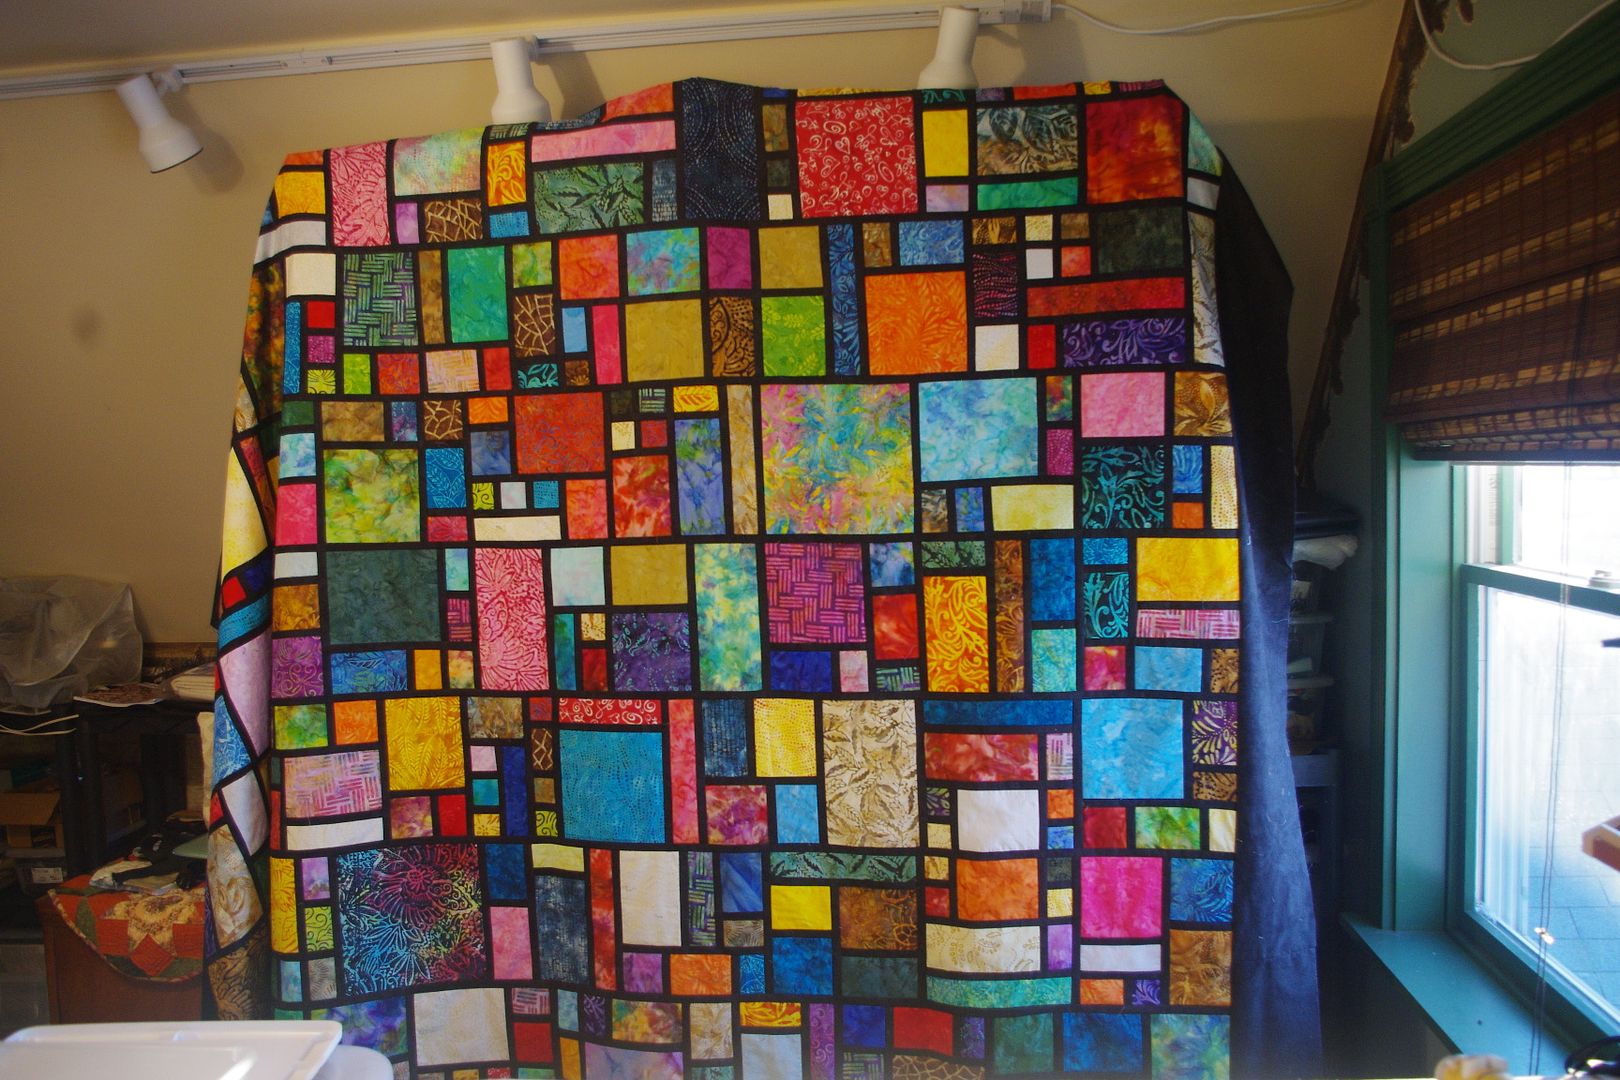
    this is mine, I used 1" sashing that finished at 1/2". By doing that, I was able to cut large sqaures and cut them apart and with the sashing and sewed back together, I was back at the original size. no need to figure the math so they would all fit back together correctly like using a different width of sashing. You do have to pay attention to which sides of each piece you need to put sashing on.


    Macybaby is offline  
    Old 05-29-2018, 07:23 AM
      #13  
    Super Member
     
    Join Date: Dec 2012
    Posts: 1,857
    Default

    Something like this pattern is made simply by using a narrow sashing. If you are trying to figure out sizes, use graph paper to plan it out (reminder to add your seam allowances). I did a wall hanging of a beach scene and simply added the 'stain glass leading' as an applique using a very narrow bias binding. I found using the double sided tape worked great on the tiny curvy spots.
    klswift is offline  
    Old 05-29-2018, 10:05 AM
      #14  
    Senior Member
    Thread Starter
     
    Join Date: Apr 2017
    Location: Buckinghamshire, England
    Posts: 628
    Default

    Thanks for all the ideas everyone - lots to think about!
    RJLinkletter is offline  
    Old 05-29-2018, 12:13 PM
      #15  
    Super Member
     
    Join Date: Oct 2013
    Location: Tulsa, Ok
    Posts: 4,582
    Default

    Originally Posted by Krisb
    1”wide to finish at 1/2”; 3/4” wide for 1/4” finished, no?
    Oops. Yes, you are so right, cut 3/4” to finish at 1/4”!
    Jeanne S is offline  
    Old 05-29-2018, 12:16 PM
      #16  
    Super Member
     
    ILoveToQuilt's Avatar
     
    Join Date: Mar 2010
    Location: New Hampshire & Maine
    Posts: 3,300
    Default

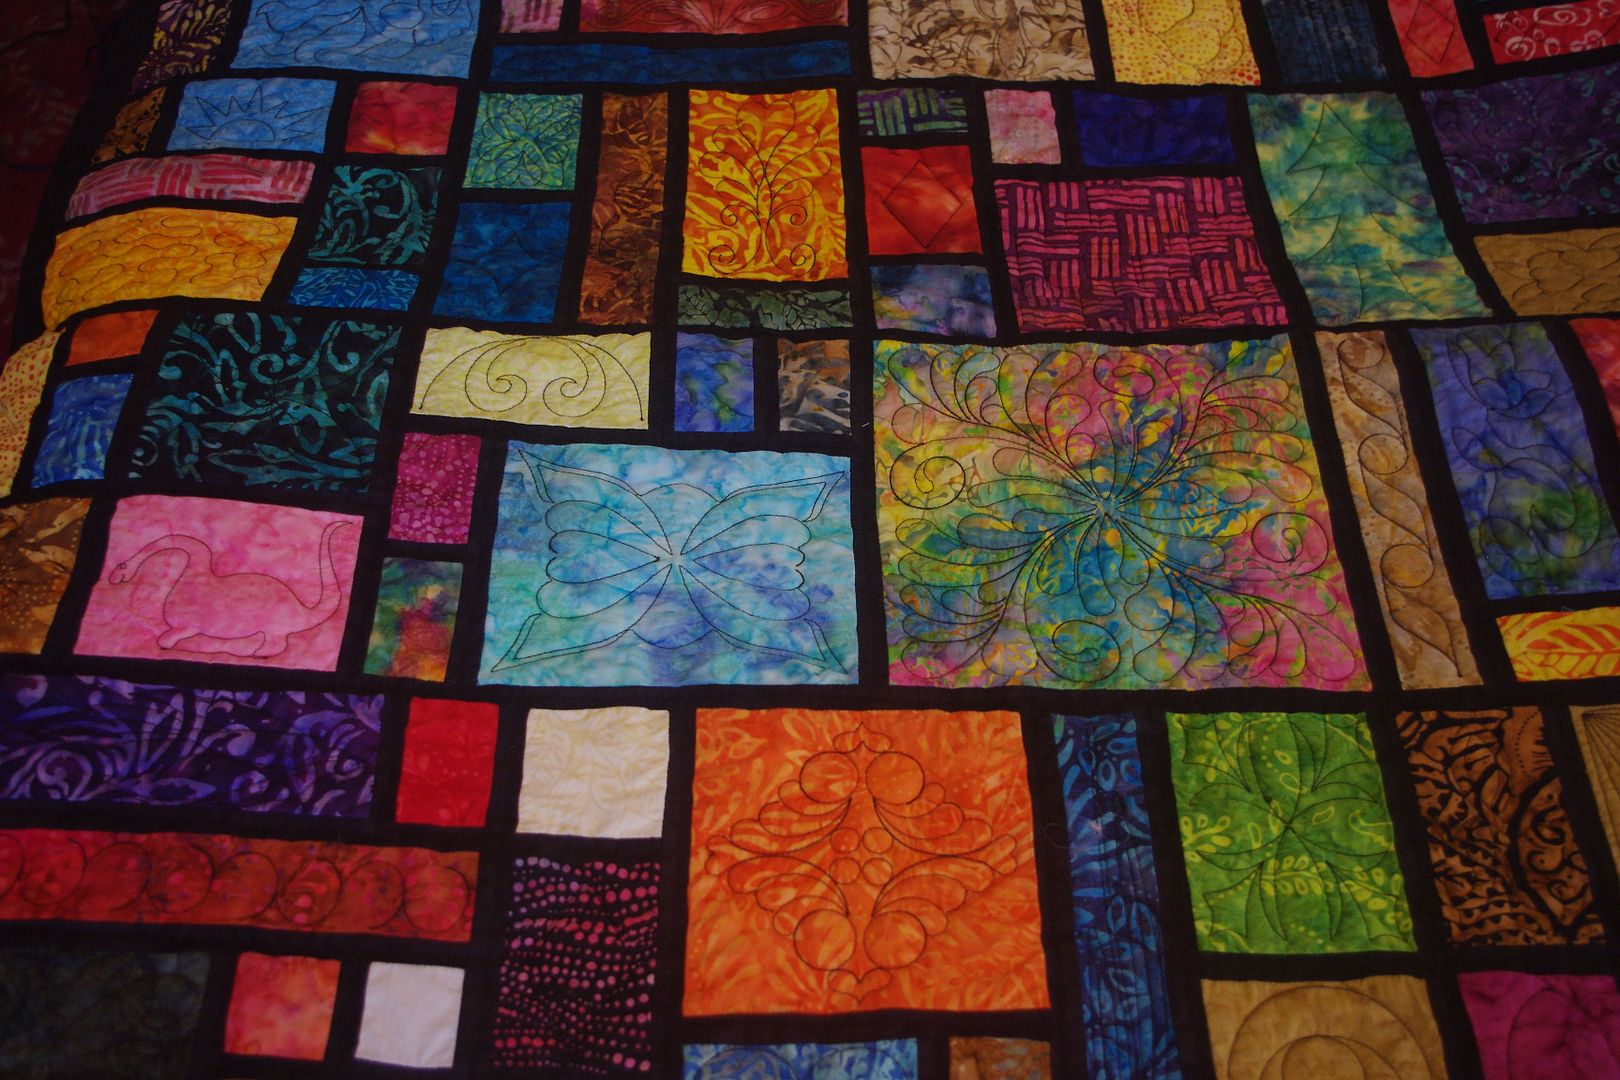
    You can also do a "reverse" stained glass. One large piece of black fabric (the size you want your quilt to be PLUS an extra allowance on all sides for sandwiching and quilting). You can then applique (any technique) your color blocks onto the black fabric. Carefully cut away excess leaving just a narrow bit of black. This technique works really well when doing stained glass pictures (think Tiffany windows, etc). Hope this makes sense.
    ILoveToQuilt is offline  
    Old 05-29-2018, 12:38 PM
      #17  
    Senior Member
     
    Join Date: Dec 2011
    Location: South East, PA
    Posts: 345
    Default

    I have done this technique... super simple! https://ludlowquiltandsew.co.uk/2014...quilt-pattern/
    scrappingfaye58 is offline  
    Old 05-29-2018, 02:13 PM
      #18  
    Super Member
     
    Join Date: Dec 2016
    Location: ND
    Posts: 2,817
    Default

    I just finished one and the pattern was free just go to Ludlow Stained Glass Quilt.
    sJens is offline  
    Old 05-29-2018, 08:35 PM
      #19  
    Senior Member
     
    Join Date: Mar 2011
    Location: western n.c.
    Posts: 645
    Default

    Originally Posted by RJLinkletter
    I really want to make a table runner like the link below. I have seen it on Pinterest and tracked it down to a site called 24blocks but cannot find a pattern or instructions anywhere. Does anyone know how I would go about making such a piece? Would it simply be a case of adding very thin black strips round each piece in a a patchwork style or would it be foundation pieced?

    https://www.pinterest.co.uk/pin/75435362485017633/
    http://www.robertkaufman.com/assets/...20Heritage.jpg has a pattern for a quilt you could go by and make narrower. I always just use graph paper to draw my patterns like this, which does take more time and I do not always get each step, and must rethink it.
    nightquilter is offline  
    Old 05-30-2018, 07:31 AM
      #20  
    Super Member
     
    Join Date: May 2013
    Location: Ballwin, MO
    Posts: 4,256
    Default

    I'm working on one now, a free pattern called Prairie Glass Squared by Jessica Levitt. She suggested not cutting the black strips to length until they were sewn to the pieces. It's been a fast and easy way to do it, and kind of addictive, like string piecing.
    Attached Thumbnails img_1958_fotor.jpg  
    joe'smom is offline  
    Related Topics
    Thread
    Thread Starter
    Forum
    Replies
    Last Post
    Orlinth
    Main
    10
    08-14-2015 08:57 PM
    Ozarkcastle
    General Chit-Chat (non-quilting talk)
    37
    06-30-2013 09:44 PM
    wmiller1733
    Pictures
    105
    07-15-2011 11:37 AM
    Flying_V_Goddess
    Main
    17
    01-12-2011 07:11 AM
    ktyknits
    Main
    68
    11-17-2010 03:57 AM

    Posting Rules
    You may not post new threads
    You may not post replies
    You may not post attachments
    You may not edit your posts

    BB code is On
    Smilies are On
    [IMG] code is On
    HTML code is On
    Trackbacks are Off
    Pingbacks are Off
    Refbacks are Off


    FREE Quilting Newsletter