
Pattern Help
 05-20-2019, 02:37 AM
#1
Super Member
Thread Starter

Join Date: Dec 2015
Location: Ontario, Canada
Posts: 4,349
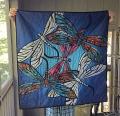
Does anyone know the name of this pattern?
Or, the best way to do it?
I was thinking sew over-sized rectangles together with the black strip to make a square and then use your plastic square on an angle to cut them, (some waste), but my husband says it would be better to make square of each fabric, slice it at the exact angle, add the black to one of them and then choose another opposite piece to sew on to make your square.
What do you think?
Watson
[ATTACH=CONFIG]613044[/ATTACH]
 05-20-2019, 02:53 AM
#2
Super Member

Join Date: Sep 2011
Location: Ohio
Posts: 2,932
05-20-2019, 04:47 AM
#3
Senior Member
Join Date: Jan 2011
Location: Richmond, VA
Posts: 601
I made a pattern like this once. I layered [what in this case would be 8] fabrics and cut using a paper pattern. Rearrange the pieces so each stack has 1 of each of the 8 different cuts. Piece together, use maybe a really thin bias tape, or non-bias, strip overlay to create the stained glass look, sash and viola! In my case I did not use the black strips, but used decorative stitches over the seams.
05-20-2019, 06:37 AM
#4
Super Member
Join Date: Aug 2018
Location: Greater Peoria, IL -- just moved!
Posts: 6,066
Those are basically Houndstooth or Windmill blocks with the addition of the black sashing between the blades.
When I made my houndstooth quilt I made slightly overlarge two strips of fabric and then skewed my ruler to make the angles. I used a piece of tape on my ruler for the shape I wanted. This would just add the narrow fabric in between, all straight line sewing but you do have to be a tiny bit careful with the slightly bias edges.
Later I found a specialty ruler on clearance that would do basically the same thing but slightly different proportions from my block.
I had planned to make a houndstooth way back in the early 80s, but it took awhile to collect the fabrics and be ready. Just when I was ready M'liss Rae Hawley came out with her first Fat Quarters book, and although I had never seen one in a show, at fair, or anywhere else -- there it was in the book! So I wasn't going to make it because everyone would assume I got the idea from the book. LOL, I was complaining about it to one of my friends at the quilt guild meeting and the lady in front of us was cracking up. Turns out it was M'liss who was the speaker at that meeting. Anyway, she wrote up some nice instructions.
05-20-2019, 07:20 AM
#5
Member
Join Date: Nov 2013
Location: Ohio
Posts: 42
Looks like a Stack and Whack. Use squares stacked up and cut at an angle. If you want them all the same angle, measure in the same on two opposite sides--i.e. 4" from right on the top and 3" from right on bottom. Use 1" black for separation and sew 1/4" to connect two different colors--no loss in size for block. Donna Jordon explains this much better in her Ribbons quilt tutorial on YouTube.
05-20-2019, 07:39 AM
#6
Super Member
Join Date: Jul 2010
Location: Flagstaff, Arizona
Posts: 9,475
I really like the looks of that quilt but I am so challenged when it comes to making a block with angles. Sure hope that someone on this board finds how to make this pattern with a plastic template and I would certainly purchase it. I will keep looking on this thread to see if someone has an answer.
05-20-2019, 09:53 AM
#7
Super Member
Join Date: Sep 2014
Location: Middlebury, IN
Posts: 1,484
Originally Posted by Watson

Does anyone know the name of this pattern?
Or, the best way to do it?
I was thinking sew over-sized rectangles together with the black strip to make a square and then use your plastic square on an angle to cut them, (some waste), but my husband says it would be better to make square of each fabric, slice it at the exact angle, add the black to one of them and then choose another opposite piece to sew on to make your square.
What do you think?
Watson
05-20-2019, 10:11 AM
#8
Power Poster
Join Date: Apr 2011
Location: Ontario, Canada
Posts: 17,715
Originally Posted by Watson
.........I was thinking sew over-sized rectangles together with the black strip to make a square and then use your plastic square on an angle to cut them, (some waste), but my husband says it would be better to make square of each fabric, slice it at the exact angle, add the black to one of them and then choose another opposite piece to sew on to make your square.............
Though I think your mind and mine must be the same as I think yours would be the easier for stitching and precise results. Trimming after the black strips are added, using a template would create total precision!
Yes there would be wastage, but I can accept that when it is giving me precision.
To make the trimming job even easier, I'd get the local glass shop to make me a plexi template.
05-20-2019, 10:38 AM
#9
Super Member
Join Date: Jan 2010
Location: Alberta, Canada
Posts: 1,042
https://youtu.be/QTUv-XTvHas
I made this quilt a long time ago. I took a class . We didn’t use the adhesive bias tape; we made our own. The adhesive tape would be easier, I think. It’s not exactly like the one in your picture, Watson but you could cut the angles any way you like.
I made this quilt a long time ago. I took a class . We didn’t use the adhesive bias tape; we made our own. The adhesive tape would be easier, I think. It’s not exactly like the one in your picture, Watson but you could cut the angles any way you like.
Last edited by JanieW; 05-20-2019 at 10:49 AM.
05-20-2019, 05:51 PM
#10
Super Member
Join Date: Aug 2011
Location: Asheville, previously Lake Vermilion, Tarpon Springs, Duluth, St Paul, Soudan
Posts: 1,651
Originally Posted by Jordan
I really like the looks of that quilt but I am so challenged when it comes to making a block with angles. Sure hope that someone on this board finds how to make this pattern with a plastic template and I would certainly purchase it. I will keep looking on this thread to see if someone has an answer.
http://www.craftbuds.com/whirligig-q...lock-tutorial/

Thread
Thread Starter
Forum
Replies
Last Post
stitchinbee
Main
6
03-10-2012 03:03 PM
jetnica
Main
9
07-12-2010 07:45 AM
