HST w/o having to draw a line
Subscribe
#1

Kassaundra , 08-04-2019 05:25 PM
Super Member
 12-25-2022
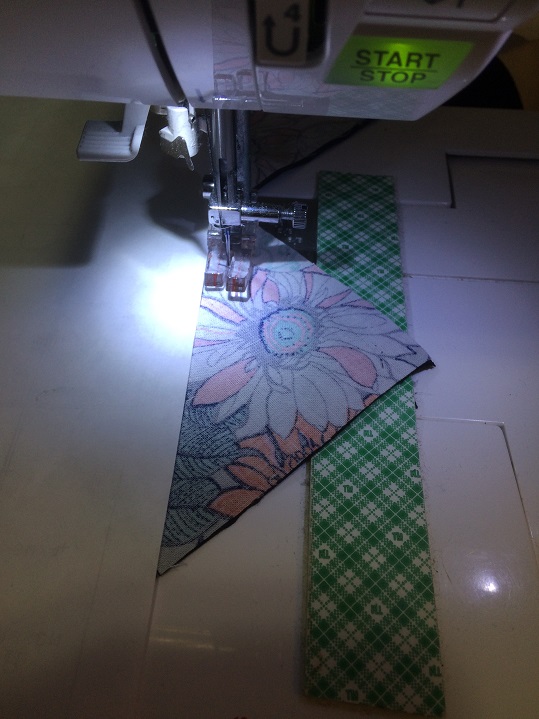
I was reading a different thread about a new to me way to make hst, but it did involve drawing a line on the square corner to corner. I got to thinking about ways to not have to take the time to draw corner to corner. I know there are lots of gizmos to do this with, lights and stickers on your machine and the like. My idea was just a simple piece of paper that is long enough to go from corner to corner. I wanted to try my idea immediately so I used what I had typing paper, but next time (and there will be a next time) I am going to use fine grit sand paper it won't be a slippery as the typing paper. I measured my feet and found one that had a 1/4 inch edge going to the left from the needle.
[ATTACH=CONFIG]615656[/ATTACH]
[ATTACH=CONFIG]615657[/ATTACH]
[ATTACH=CONFIG]615658[/ATTACH]
I started w/ 3.5 inch squares and ended up w/ these perfect 3 inch hst and just a tiny bit of trimming.
[ATTACH=CONFIG]615656[/ATTACH]
[ATTACH=CONFIG]615657[/ATTACH]
[ATTACH=CONFIG]615658[/ATTACH]
I started w/ 3.5 inch squares and ended up w/ these perfect 3 inch hst and just a tiny bit of trimming.


#2
nanna-up-north , 08-04-2019 05:29 PM
Super Member
Looks like a great plan. I posted some suggestions for HSTs awhile back. I struggle with them and don't like to take the time to draw that line either.
So, I bought the triangle for making HSTs and have been using the past couple of weeks. I love it. No more hoping to get the line right on the corners. No more cutting the 1/4" off when sewn. I do trim to make them perfect but I don't even have to oversize them.
So, I bought the triangle for making HSTs and have been using the past couple of weeks. I love it. No more hoping to get the line right on the corners. No more cutting the 1/4" off when sewn. I do trim to make them perfect but I don't even have to oversize them.
#3
Barb in Louisiana , 08-04-2019 07:30 PM
Super Member
I like that idea of using the paper or even sandpaper. I wonder how good an index card would be? I saw an HST trimmer by New Leaf Stitches https://www.amazon.com/Trimmers-New-.../dp/B06XGKVC5J
Has anyone tried this? It's pricey, but looks like it would save a heck of a lot of time. I'm wondering if I can figure out how to use one of the triangle rulers I already have. The only thing I will be missing is the slot to cut off the dog ears.
Has anyone tried this? It's pricey, but looks like it would save a heck of a lot of time. I'm wondering if I can figure out how to use one of the triangle rulers I already have. The only thing I will be missing is the slot to cut off the dog ears.
#4
Bobbinalong , 08-04-2019 10:35 PM
Junior Member
What a good idea. I love smart ways of doing things.
I did see a similar idea for sewing strips together using a length of card cut to the width of the finished measurement.
Say you are sewing 2.5" strips, sew the first pair together, then press open. With third strip placed R/S together put the strips under the needle with the new strip on the bottom, leaving the first seam uppermost. Now you place the card (2"wide) with the left edge butting against the first seam and you follow the R/H edge with your new stitching. Voila, you have sewn the second seam exactly 2" from the first.
Try a test piece first. You may need your card a tad wider if your thread and/or fabric is thicker and you 'lose' a little in the opening out of the seam, IYSWIM.
#5
Kassaundra , 08-05-2019 12:50 AM
Super Member
This is brilliant, I will have to try that.
Quote:
I did see a similar idea for sewing strips together using a length of card cut to the width of the finished measurement.
Say you are sewing 2.5" strips, sew the first pair together, then press open. With third strip placed R/S together put the strips under the needle with the new strip on the bottom, leaving the first seam uppermost. Now you place the card (2"wide) with the left edge butting against the first seam and you follow the R/H edge with your new stitching. Voila, you have sewn the second seam exactly 2" from the first.
Try a test piece first. You may need your card a tad wider if your thread and/or fabric is thicker and you 'lose' a little in the opening out of the seam, IYSWIM.
Originally Posted by Bobbinalong
What a good idea. I love smart ways of doing things.I did see a similar idea for sewing strips together using a length of card cut to the width of the finished measurement.
Say you are sewing 2.5" strips, sew the first pair together, then press open. With third strip placed R/S together put the strips under the needle with the new strip on the bottom, leaving the first seam uppermost. Now you place the card (2"wide) with the left edge butting against the first seam and you follow the R/H edge with your new stitching. Voila, you have sewn the second seam exactly 2" from the first.
Try a test piece first. You may need your card a tad wider if your thread and/or fabric is thicker and you 'lose' a little in the opening out of the seam, IYSWIM.
#6
I have a strip of blue painters tape on the bed of my machine (not covering the feed teeth or bobbin case of course) that's 1/4" from the needle. I align the opposite corners of the squares (right sides facing) with the edge of the tape and sew. Then I turn the square around and sew again, cutting between the two lines. Works for me.
#8

HST's are one of those thing that you love or hate and definitely. I am probably one of those people that love the challenge of making perfect HST's just because of the fact I get to use highschool geometry. I will try any method that comes along once but tend to come back to drawing lines and dissecting the lines.
#9
Blackberry , 08-05-2019 05:48 AM
Super Member
Check out Creative Grids Folded Corner Clipper. I have just started using it and I am making a snowball block quilt. It took me a while to get used to it but now I really like it. https://www.youtube.com/watch?v=KKQ9VS8e0lI
#10
Iceblossom , 08-05-2019 05:53 AM
Super Member
I started using the sew on the line technique a number of years ago. At first I sniffed at it and called it a "fabric wasteful" technique. But I was doing a block swap and had to admit it was a sweet way to go with the little cat ears we were making...
But as time went on and my vision progressively got worse, it is now my go-to method. Because of the way triangles work, on a small square (under 2" or so) there really isn't much waste.
I draw my lines as I do my cutting, everything is right there and ready to go. For me it is the fast way!
But as time went on and my vision progressively got worse, it is now my go-to method. Because of the way triangles work, on a small square (under 2" or so) there really isn't much waste.
I draw my lines as I do my cutting, everything is right there and ready to go. For me it is the fast way!