
narrow borders
 11-28-2011, 05:21 AM
#1
Junior Member
Thread Starter

Join Date: Mar 2011
Location: Maine
Posts: 142
What is the trick to making a very narrow border between the quilt edge and the outside border? I can not seem to get the nice and even. I'm talking a 1/4 exposed border to divide the quilt from the border with a color accent. How do I get it to look nice?
 11-28-2011, 05:26 AM
#3
Super Member

Join Date: Jun 2010
Location: Flagstaff, AZ
Posts: 2,078
I like to make a little flange and just put in in the seam between the border and the quilt. It's easy to get it even this way, and adds a little dimension to the quilt top. To do this I cut a 1" wide strip, fold it in half, lay along the raw edge and enclose it in my 1/4 inch seam. That leaves a 1/4 inch flange.
11-28-2011, 05:27 AM
#4
Banned
Join Date: Mar 2010
Location: Sturbridge, Ma
Posts: 3,992
i make a narrow flange rather than pieced border. Easier to get even and serves the same purpose to divide.
it is important to really slow down when sewing the narrow border with lots of pins in order to keep the seam line straight.
it is important to really slow down when sewing the narrow border with lots of pins in order to keep the seam line straight.
Last edited by Holice; 11-28-2011 at 05:28 AM. Reason: to add
 11-28-2011, 06:02 AM
#6
Super Member

Join Date: Jan 2009
Posts: 4,688
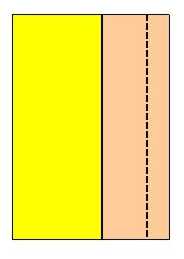
A narrow, even, perfectly straight strip is quite easy if you use the last seam line sewn as the next seam's sewing guide. (quilt top is yellow, narrow inner border is tan, and wide outer border is green)
With right sides together, sew the first seam of the strip to the adjacent fabric in the usual way; place right sides together and sew 1/4 inch from the right edge..
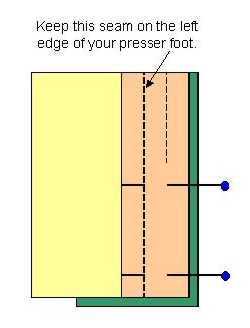
Press the seam towards the quilt top (you need to be able to see it clearly). Next, place the outer border fabric so that it lies face up underneath the narrow one and pin. The backside of the quilt top will be facing you and what was the bottom will now be on the top. Line your �" presser foot up with its left edge against the seam you just made in step one. Use that seam line as your guide all the way down the strip (forget about the seam allowance). Your goal is a perfect seam-to-seam distance, not a perfect seam allowance.
Finished backside.
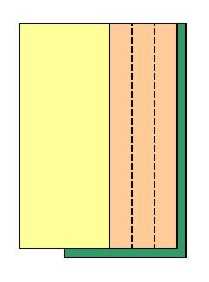
Finished front after trimming.

This is easy, accurate, and very effective in a variety of applications. You can go as narrow as 1/8 inch very precisely or as wide as your sewing guide (that's the bar thingie that came with your machine for grid quilting) allows.
This is something I learned from Joen Wolfrom's books and I've used it in several quilts. It works beautifully and is very, very easy!
With right sides together, sew the first seam of the strip to the adjacent fabric in the usual way; place right sides together and sew 1/4 inch from the right edge..
Press the seam towards the quilt top (you need to be able to see it clearly). Next, place the outer border fabric so that it lies face up underneath the narrow one and pin. The backside of the quilt top will be facing you and what was the bottom will now be on the top. Line your �" presser foot up with its left edge against the seam you just made in step one. Use that seam line as your guide all the way down the strip (forget about the seam allowance). Your goal is a perfect seam-to-seam distance, not a perfect seam allowance.
Finished backside.
Finished front after trimming.
This is easy, accurate, and very effective in a variety of applications. You can go as narrow as 1/8 inch very precisely or as wide as your sewing guide (that's the bar thingie that came with your machine for grid quilting) allows.
This is something I learned from Joen Wolfrom's books and I've used it in several quilts. It works beautifully and is very, very easy!
Last edited by ghostrider; 11-28-2011 at 06:04 AM.
11-28-2011, 06:09 AM
#7
Senior Member
Join Date: Apr 2010
Location: Lived in San Diego now retired in Eagar, AZ.
Posts: 887
I make what is called a 'flange' border....done by jinny beyer as a 'zinger'.... cut 1 inch wide, sew all strips together and then fold in half. do not press at this point. now match the raw edges to your quilt raw edge, stacking all edges together. use a 1/4 inch foot, but sew just beyond the 1/4 inch measurement (scant 1/4).... now apply the next border and turn the entire thing over so that you can see the previous stitching and this time stay ON the 1/4 inch mark. that's why you flipped it...so you can see the first stitch line and stay inside, toward the quilt with your 1/4 inch mark... can you sew all 4 layers together at once? certainly, but i have found the difference in accuracy to be worth doing it this way. it is easy to waver away from that straight line when you can't see the little 1/2 inch folded flange...if you can see it, it will be straight. How to treat the corners?..... the flange corners are so small that they really don't show so i sew each border on separately and just overlap, clipping off after finishing each side ... it will not show that they are not really joined. and they are small enough not to hurt anything... the raw edges are secure so they're fine. Machine quilting? if you are going to machine quilt your quilt, the flanges can present a bit of a problem to someone using a pantograph where they are not watching the top of the quilt all the time. So I have started setting my machine to a very large stitch length, then loosen the top tension by 1 number, use a contrasting thread (this is where I get out the old spools...baste with rotten thread if possible.... ) and topstitch the edge of the flange...now it will go thru the longarm/FMQ process perfectly and you only have to pick out the edge stitch when it comes back from the quilter. then you will have a tiny bit of 3D effect, the color relief you were looking for and it will be straight and easy to do... I put them in most of my quilts as I love the textural difference they make. It was one of my favorite things i learned from Jinny Beyer's Color Confidence for Quiltersby Jinny Beyer(Oct 1992)... one of the best quilt books around for colorplay and how to achieve it...for my money...i have had it since it came out new and it is still one of the books i refer back to periodically just for a refresher...
11-28-2011, 06:36 AM
#8
Super Member
Join Date: Apr 2010
Location: Illinois
Posts: 9,312
I do alot of narrow borders. My two biggest tips ... STARCH and a 1/4 inch foot. I use starch concentrate full strenght , and immerse the fabric in the starch , hang dry , press, then cut the strips. I would not attempt a narrow boarder with out my starch! It REALLY makes a difference.
If you can not get the concentrate , use spray , but allow it to dry , then spray again, dry, then press and cut.
If you can not get the concentrate , use spray , but allow it to dry , then spray again, dry, then press and cut.
 11-28-2011, 07:03 AM
#10
Super Member

Join Date: Apr 2007
Location: Phoenix, AZ
Posts: 2,943
Since I don't like flanges [I think they are 'dust catchers'] and piping doesn't work as well visually on some quilts .... I Best Press all material. Then using my 1/4" flange foot add the narrow piece to the outer border. That way the borders can be added to the quilt as one piece ... again, I use my 1/4" flange foot.
I have loved the results this way. Easier to put all borders together then treat as one and join to the center portion of the quilt.
ali
I have loved the results this way. Easier to put all borders together then treat as one and join to the center portion of the quilt.
ali

Thread
Thread Starter
Forum
Replies
Last Post
