
Need help with this Star Quilt
 10-01-2015, 07:35 AM
#1
Senior Member
Thread Starter

Join Date: Feb 2008
Location: Bakersfield, CA
Posts: 333
[ATTACH=CONFIG]532195[/ATTACH]
It's been forever since I've been here - I've just been busy. However, when I needed help, this is the first place I thought to come to since everyone is always so kind and knowledgeable.
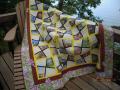
I'm making the attached star quilt. First - does it seem unbalanced to you? (I need some honest answers.) I was thinking maybe I need to switch one of the lower blocks to the top. Maybe the bottom second from the right to the top second from the left? Or have I just been looking at it too long?
And then I don't know what to do about the borders - this is a 53 inch square. I know I need a black slashing around it - maybe 2 1/2 (same as the slashing between blocks )or should it be wider 5 1/2? And then some type of pieced border? It would be nice to make it into a queen size.
Thanks for your help and ideas.
It's been forever since I've been here - I've just been busy. However, when I needed help, this is the first place I thought to come to since everyone is always so kind and knowledgeable.
I'm making the attached star quilt. First - does it seem unbalanced to you? (I need some honest answers.) I was thinking maybe I need to switch one of the lower blocks to the top. Maybe the bottom second from the right to the top second from the left? Or have I just been looking at it too long?
And then I don't know what to do about the borders - this is a 53 inch square. I know I need a black slashing around it - maybe 2 1/2 (same as the slashing between blocks )or should it be wider 5 1/2? And then some type of pieced border? It would be nice to make it into a queen size.
Thanks for your help and ideas.
 10-01-2015, 07:50 AM
#2
Power Poster
Join Date: Mar 2011
Location: Ontario, Canada
Posts: 41,610
Very pretty! The only change I might do is remove one of the simpler stars from the top row and put one of the more intricate ones in its place. Since you want to make it queen size, I think a wide black border with the Flying Geese in all your colours would look good. I might do the Flying Geese in the manner where they go in a serpentine design.
10-01-2015, 08:00 AM
#3
Super Member

Join Date: May 2010
Posts: 1,658
This is so pretty! add that black stopper border just to the design wall and step back. The only thing that catches my eye are the two blocks with the brighter points: purple and red, and purple and white. Maybe on either side of the feathered star? Opposite sides of the star? I really think tho, that its just perfect the way it is. I like Tartans idea of the flying geese too! I would add a smallish black border before the geese. It serves two purposes: One to give your eye a rest and to be able to see the star points. and 2. if you put the geese right up next to the stars, you have many seams to deal with. The border will eliminate all that. Can't wait to see what you decide!
10-01-2015, 08:03 AM
#4
Power Poster
Join Date: Jun 2011
Location: Southern California
Posts: 19,127
This is very pretty. I might put the larger blocks in the corner. Always take a photo BEFORE moving the blocks. I like Tartan idea. If you have a wide black border, be sure to have a stencil or the ability to do some specially quilting in it.
10-01-2015, 09:13 AM
#5
Super Member

Join Date: Nov 2010
Location: Southern New Jersey USA
Posts: 1,473
Lovely blocks! I agree that you're should swap either the right most bottom row or the one next to it, as you suggested, into second from left on top row to balance the values. The top has more "dark" and the bottom more "light" as it is laid out now.
Last edited by bjchad; 10-01-2015 at 09:14 AM. Reason: Correct mistakes
10-01-2015, 10:50 AM
#6
Super Member
Join Date: Sep 2011
Location: West Texas
Posts: 2,073
On the top row, to me, the first two blocks look a lot alike and could be separated. The 3rd and 4th friendship style blocks also could be separated.
Your quilt is stunning! Love the black background and the rich colors.
Your quilt is stunning! Love the black background and the rich colors.
10-01-2015, 11:59 AM
#7
Power Poster
Join Date: May 2008
Location: MN
Posts: 25,197
I like the colors and the individual blocks.
Ten of the twelve blocks have black corners - you might consider changing the corners on the two that have colored corners to black?
I did a re-arrangement of your blocks - not totally thrilled with what I did - but you can look at it and see what you think. I also colored the corners on those two blocks black.
If you have a color printer - you can print out your picture and do cut and paste.
 10-01-2015, 01:53 PM
#10
Senior Member
Thread Starter
Join Date: Feb 2008
Location: Bakersfield, CA
Posts: 333
I like the colors and the individual blocks.
Ten of the twelve blocks have black corners - you might consider changing the corners on the two that have colored corners to black?
I did a re-arrangement of your blocks - not totally thrilled with what I did - but you can look at it and see what you think. I also colored the corners on those two blocks black.
If you have a color printer - you can print out your picture and do cut and paste.
Ten of the twelve blocks have black corners - you might consider changing the corners on the two that have colored corners to black?
I did a re-arrangement of your blocks - not totally thrilled with what I did - but you can look at it and see what you think. I also colored the corners on those two blocks black.
If you have a color printer - you can print out your picture and do cut and paste.
This looks so much better. I did think about changing out those corners to black, but seeing it makes such a difference.
There have been so good ideas here - and now I'm going to start working on re-arranging these blocks.
Thanks so much.

Thread
Thread Starter
Forum
Replies
Last Post
leatheflea
Pictures
194
10-08-2011 10:38 AM
