Quilt with Singer Patchwork 7285Q?
 10-06-2023, 10:19 AM
#1
Member
Thread Starter
Join Date: Jan 2019
Location: California
Posts: 6
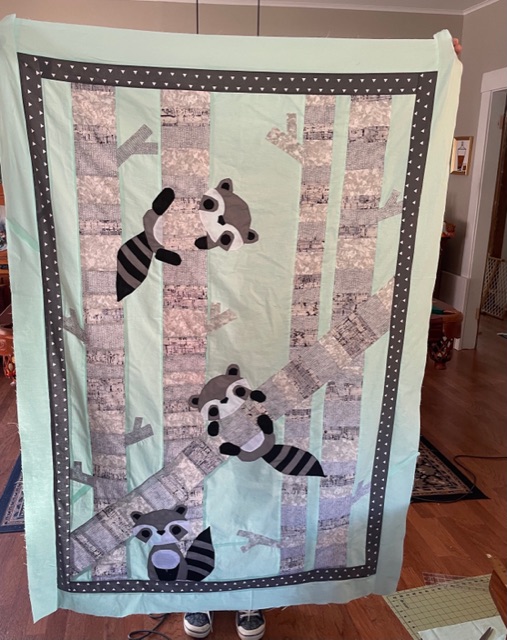
I'm making a blanket for a new grandchild. I ordered a foundation paper piecing raccoon pattern, but realized that it was far too complex for my first attempt. I switched from a block design to a scene with stylized birch trees and appliqué raccoons. I have a couple questions that I hope this group can help with. I found the prefect color “raccoon” themed fabric for the backing except I could only get it in flannel. Can I use a flannel back on a quilt cotton top? Also will it be possible to quilt this crib size blanket using a Singer Patchwork 7285Q machine?
 10-06-2023, 10:47 AM
#2
Power Poster
Join Date: Apr 2011
Location: Ontario, Canada
Posts: 18,358
Welcome to the Quilting Board, JakRabbit!
Absolutely!! ... flannel backs are often used for kids quilts. Adults too!
Best to wash all your fabrics (if you haven't already), as they will shrink at different proportions. For me, I tend to wash flannels more than once, and try to get the shrinkage under control before I start cutting.
I don't know your machine, but I am sure you can quilt with it.
Most any machine you can. Even the old treadles.
Good Luck!
10-06-2023, 10:49 AM
#3
Super Member

Join Date: May 2011
Location: SW Washington USA
Posts: 4,888
welcome to the board! your machine has a very small throat area but if you roll the quilt up, start in the middle and work toward the edges and do straight line quilting you should be fine for your first project.
That said a Walking Foot is an attachment that helps make the three layers move evenly, you may not have access to that.
Our foremothers all did machine quilting as soon as machines were available, without walking foot
I have backed small quilts with flannel, but it will shrink more than quilting cotton. If you haven't cut anything yet, swish it all in hot water, wring out, and throw in a hot dryer, that will help.
Best wishes on your first quilt!
10-06-2023, 11:04 AM
#4
Super Member
Join Date: Aug 2018
Location: Peoria, IL -- Midwest Transplant
Posts: 7,314
Another poster seconding and thirding the previous recommendations. Of course you can back a quilt with flannel. Definitely pre-wash the flannel preferably with hot water and a hot dry.
All of my first quilting by machine projects were done on a vintage machine. No walking foot and a small throat space. It it doable with your machine, especially with a crib sized project. With straight grid or mild curves, I left the feed dogs engaged and did not do any free motion or using the darning plate or whatever. Some people get better results with rolling up the project tightly and I started that way, but as time and my confidence level went up, I started being looser with the project and just stuffing it in with the smaller portion inside the throat. With your model of machine having the extra room on the outside will help support the project. As with everything, practice helps. First make sure you have your tension and all that right using scraps before working on the actual project. And/or use some old sheets or whatever from your closet or the thrift store and get used to pushing larger pieces.
You haven't mentioned the batting -- when I started back in the dark ages it was basting with thread or we used the big diaper sized safety pins. Now we have specialty pins if you go that direction. A lot of the posters on these boards use the Elmer's Glue method for basting. I prefer the spray baste but that adds expense and some getting used to the spray baste. I think most people use way too much at first so sometimes you have to let the quilt sandwich dry a bit before you can quilt it or even give it away! We have a number of threads on basting concepts here.
10-06-2023, 02:05 PM
#5
Member
Thread Starter
Join Date: Jan 2019
Location: California
Posts: 6
Welcome to the Quilting Board, JakRabbit!
Absolutely!! ... flannel backs are often used for kids quilts. Adults too!
Best to wash all your fabrics (if you haven't already), as they will shrink at different proportions. For me, I tend to wash flannels more than once, and try to get the shrinkage under control before I start cutting.
I don't know your machine, but I am sure you can quilt with it.
Most any machine you can. Even the old treadles.
Good Luck!
Absolutely!! ... flannel backs are often used for kids quilts. Adults too!
Best to wash all your fabrics (if you haven't already), as they will shrink at different proportions. For me, I tend to wash flannels more than once, and try to get the shrinkage under control before I start cutting.
I don't know your machine, but I am sure you can quilt with it.
Most any machine you can. Even the old treadles.
Good Luck!
10-06-2023, 03:08 PM
#6
Power Poster
Join Date: Apr 2011
Location: Ontario, Canada
Posts: 18,358
Thank you! Measure it before and after, just so you can see how much it might shrink. How much, can vary quite a bit, and why I wash my flannels more than once ... hot water and hot dryer.
Good Luck!!... and before long you will be doing that PP raccoon!
(honestly PPing really isn't all that hard!)
Good Luck!!... and before long you will be doing that PP raccoon!
(honestly PPing really isn't all that hard!)
10-06-2023, 06:34 PM
#7
Member
Thread Starter
Join Date: Jan 2019
Location: California
Posts: 6
Another poster seconding and thirding the previous recommendations. Of course you can back a quilt with flannel. Definitely pre-wash the flannel preferably with hot water and a hot dry.
All of my first quilting by machine projects were done on a vintage machine. No walking foot and a small throat space. It it doable with your machine, especially with a crib sized project. With straight grid or mild curves, I left the feed dogs engaged and did not do any free motion or using the darning plate or whatever. Some people get better results with rolling up the project tightly and I started that way, but as time and my confidence level went up, I started being looser with the project and just stuffing it in with the smaller portion inside the throat. With your model of machine having the extra room on the outside will help support the project. As with everything, practice helps. First make sure you have your tension and all that right using scraps before working on the actual project. And/or use some old sheets or whatever from your closet or the thrift store and get used to pushing larger pieces.
You haven't mentioned the batting -- when I started back in the dark ages it was basting with thread or we used the big diaper sized safety pins. Now we have specialty pins if you go that direction. A lot of the posters on these boards use the Elmer's Glue method for basting. I prefer the spray baste but that adds expense and some getting used to the spray baste. I think most people use way too much at first so sometimes you have to let the quilt sandwich dry a bit before you can quilt it or even give it away! We have a number of threads on basting concepts here.
All of my first quilting by machine projects were done on a vintage machine. No walking foot and a small throat space. It it doable with your machine, especially with a crib sized project. With straight grid or mild curves, I left the feed dogs engaged and did not do any free motion or using the darning plate or whatever. Some people get better results with rolling up the project tightly and I started that way, but as time and my confidence level went up, I started being looser with the project and just stuffing it in with the smaller portion inside the throat. With your model of machine having the extra room on the outside will help support the project. As with everything, practice helps. First make sure you have your tension and all that right using scraps before working on the actual project. And/or use some old sheets or whatever from your closet or the thrift store and get used to pushing larger pieces.
You haven't mentioned the batting -- when I started back in the dark ages it was basting with thread or we used the big diaper sized safety pins. Now we have specialty pins if you go that direction. A lot of the posters on these boards use the Elmer's Glue method for basting. I prefer the spray baste but that adds expense and some getting used to the spray baste. I think most people use way too much at first so sometimes you have to let the quilt sandwich dry a bit before you can quilt it or even give it away! We have a number of threads on basting concepts here.
10-07-2023, 05:38 AM
#8
Super Member
Join Date: Aug 2018
Location: Peoria, IL -- Midwest Transplant
Posts: 7,314
You will want to use a larger needle size than your piecing needle, probably somewhere between a 14 and an 18. I started a test of types of needles (denim, topstitch, etc.) but I didn't find much difference between the different types and then went on a sewing break of a year+ while selling our house and moving so I'm not remembering much of that..
As for stitch length, that's more of a personal decision. For me it a combination of the fabric and batting and personal taste, I can't really give you a stich length other than "longer than you piecing stitch". You do have to watch out for when you get large portions of the top bunched up that you are still moving well and keeping your stitch size reasonably consistent.
First project is usually a bear... again, practice and the more you do will help. So do your best and cut yourself some slack if things are less than perfect. We are so close to our work that we are aware of every little bobble but the child (and probably the parents of the child) won't be aware of any imperfections
10-07-2023, 01:57 PM
#9
Member
Thread Starter
Join Date: Jan 2019
Location: California
Posts: 6
I’ve washed and dried the flannel backing and soaked the cotton batting per the product directions. Will it be a problem that I didn’t prewash the fabrics used for the quilt top? Should I wash and dry it now before proceeding