
Vintage Six Point Star (60 degree diamond) block/Help!
 03-05-2013, 01:59 PM
#11
Super Member
Join Date: Jun 2011
Location: northwest Ohio
Posts: 1,202
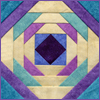
Here's a small diagram I did in EQ for you. You do not want to make separate stars and then sew them together. The key to the design is that each star shares its white spaces with the stars around it. Can you see the tumbling blocks in the design? I would approach this as tumbling blocks and mark it off in groups of three. Create each tumbling block in the right colors and then sew them together to form the stars. I'd start with a blank grid and color them with colored pencils and take my cues from there.
Sound reasonable?
Sound reasonable?
 03-05-2013, 02:09 PM
#12
Super Member

Join Date: May 2010
Posts: 1,658
Elf, if you look at that quilt on Pinerest, you will see that the white diamonds actually 'touch' two blocks. They snuggle together. So, you will not be adding more white background, they will be sharing that white and the next piece will be the color of the star next to it. Y seams are not the easiest to start with for sure, but not impossible. It would help if you had someone to show you how face to face. Hard to describe on paper/text!
This site has the layout, but she is hand piecing hers...but you can see how the white diamonds snuggle in...
http://darlingadventures.com/?p=394
I looked for about 15 mins, but could not find a tutorial on this pattern done by machine.
This site has the layout, but she is hand piecing hers...but you can see how the white diamonds snuggle in...
http://darlingadventures.com/?p=394
I looked for about 15 mins, but could not find a tutorial on this pattern done by machine.
03-05-2013, 10:13 PM
#13
Member
Thread Starter
Join Date: Dec 2008
Posts: 34
Here's a small diagram I did in EQ for you. You do not want to make separate stars and then sew them together. The key to the design is that each star shares its white spaces with the stars around it. Can you see the tumbling blocks in the design? I would approach this as tumbling blocks and mark it off in groups of three. Create each tumbling block in the right colors and then sew them together to form the stars. I'd start with a blank grid and color them with colored pencils and take my cues from there.
Sound reasonable?
Sound reasonable?
05-06-2013, 11:49 AM
#15
Junior Member
Join Date: Aug 2010
Posts: 188
That is a lamoyne star and you can do it without any y seams. Check out debbie kratovil the naked quilter ( not really _ and she calls her a texas star. It is real easy to cut a piece. Each point of the star has two different sized triangles that are sewn to the lower end of the point then pieced together.
05-07-2013, 07:17 AM
#16
Senior Member
Join Date: Feb 2012
Posts: 433
i am working on a version of this called "kentucky star. The stars are set together with hexagons. so you make all your stars, using the y-seam method, then you cut out large white ( in your case) hexagons and set those in with y-seams.
09-10-2014, 08:29 AM
#17
Senior Member

Join Date: Jun 2014
Posts: 529
Bumping this thread, since I need to start thinking about how to put all of this together. Here's the quilt I need to re-create.
[ATTACH=CONFIG]491012[/ATTACH]
This has been my favorite quilt for 15 years. I didn't make it, it came from The Company Store. It's threadbare in places and I can't put it on my bed anymore. I decided to use the fabric from the Twilight quilt kit and copy the 6 point diamond star, and for a couple of weeks I've been puzzling over how to best assemble it.
09-10-2014, 10:09 AM
#18
Super Member

Join Date: Oct 2011
Location: Ottawa, Ontario, Canada
Posts: 1,111
That's a slightly different pattern than the original picture you attached. You don't want white diamonds. You want ot make all your 6 pointed stars, and join them with white hexagons I would make all the stars, lay it out, and carefully join them using the hexagons. One step at a time, and not in "blocks" - simple start in one section of the quilt and it will grown out from them with each hexagon & star you add.
09-10-2014, 03:15 PM
#19
Power Poster
Join Date: Jun 2011
Location: Southern California
Posts: 19,127
Sorry, but I avoid anything with 60 degrees angles because you have to piece it perfectly. Almost looks like the 3D cube which I would then do English paper piecing to get the accuracy you want. There are new techniques that make this paper piecing go really fast.
Last edited by ManiacQuilter2; 09-10-2014 at 03:18 PM.

Thread
Thread Starter
Forum
Replies
Last Post
