
Border on!

 01-12-2019, 07:42 AM
#32
Junior Member
Join Date: Apr 2012
Location: North Andover MA
Posts: 255
. I didn�t have to miter the corners but since all the angled pieces were sewn at 45*, I thought miters would look best. I found a good YouTube video that made it easier. The instructor said to pin the extra length matching the raw side edges of the extensions, iron in the 45* fold, open it back up ( leaving the pins in) and draw a sewing line in on the fold to sew on. It worked well and was easy.
01-12-2019, 08:14 AM
#33
Senior Member

Join Date: Sep 2009
Location: Brighton, MI
Posts: 355
Tartan, thanks for the instructions!! I still can't visualize how it's going to work, but I think if I sew up a few squares, I'll figure it out!! What is that 45* tool called that you have in your picture?
01-12-2019, 08:33 AM
#34
Power Poster
Thread Starter
Join Date: Mar 2011
Location: Ontario, Canada
Posts: 41,538
This handy little ruler made by Omnigrid, was gifted to me by a quilter friend about 10 years ago before she died. I don't know if it is still available but I think of her every time I use it.[ATTACH=CONFIG]606635[/ATTACH]
01-12-2019, 09:31 AM
#35
Power Poster
Thread Starter
Join Date: Mar 2011
Location: Ontario, Canada
Posts: 41,538
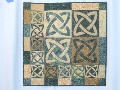
The blocks are all made the same but you rotate them every other one. Here is the first one with the second block rotated and you can start to see the pattern.[ATTACH=CONFIG]606645[/ATTACH]

Thread
Thread Starter
Forum
Replies
Last Post
