
Shadow Trapunto
 05-02-2012, 10:39 AM
#1
Super Member
Thread Starter

Join Date: Jun 2010
Location: Flagstaff, AZ
Posts: 2,082
With inspiration and help from Geta Grama at http://www.cadouri-din-inima.blogspot.com/ , A DVD from Karen McTavish, and some wonderful info from Leah Day's site at http://www.daystyledesigns.com/rever...owtrapunto.htm , I managed to complete my first Shadow Trapunto piece. This is just a small, experimental wall hanging I made to learn the technique, but it turned out good enough to keep, I think. After ruining a couple of pieces of organza because I couldn't manage to get it trimmed without accidentally clipping the organza, I tried Leah Day's "reverse shadow trapunto" technique and it worked like a charm! (Now I see why Geta has a special organza that she likes to use; mine was too flimsy for her technique.)
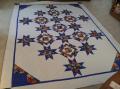
This piece is made by first drawing my trapunto design on the BACK of the toile fabric, layering black felt on the front, stitching the trapunto design using water soluble thread, trimming CAREFULLY, then layering organza over the top and sandwiching as usual, and finally stitching around the trapunto and FMQing.
So, here it is... it measures about 12" wide and 18" high.
[ATTACH=CONFIG]332404[/ATTACH]
And here's a closeup so you can see some of the FMQ detail a little better.
[ATTACH=CONFIG]332405[/ATTACH]
Last edited by azwendyg; 05-02-2012 at 10:43 AM.

 05-02-2012, 01:08 PM
#3
Super Member
Thread Starter
Join Date: Jun 2010
Location: Flagstaff, AZ
Posts: 2,082
fivepaws~Making this little sample piece was quite an adventure. I had never worked with organza, and had only done a small trapunto piece once before. I think Geta may be using a stiffer organza than I could find; her's doesn't look limp in her pictures...Mine was very flimsy and gave me a lot of trouble when I was trying to trim it so I had to resort to using a reverse trapunto technique instead to get the result I wanted. When I finally figured it out, things went pretty well, but there are a couple of "failed attempts" in my studio trash can right now.
 05-02-2012, 03:04 PM
#5
Super Member
Join Date: Nov 2010
Location: SoCal
Posts: 1,813
Turned out very well! Hadn't heard of the reverse trapunto technique, but with the print you used, it probably would not have shown thru too well if you had done it the other way.
I was looking at Karen McTavish's book last week and she used COTTON LAWN for her top piece on some of her quilts. Thought "that is what the ladies on the board were talking about"! She did backing, batting, felt or whatever for the color, then used cotton lawn for the top. Guess it is thinner than regular cotton.
I was looking at Karen McTavish's book last week and she used COTTON LAWN for her top piece on some of her quilts. Thought "that is what the ladies on the board were talking about"! She did backing, batting, felt or whatever for the color, then used cotton lawn for the top. Guess it is thinner than regular cotton.


Thread
Thread Starter
Forum
Replies
Last Post
