
Harriet's Journey BOM

 05-11-2021, 06:02 PM
#393
Super Member
Join Date: May 2013
Location: Ballwin, MO
Posts: 4,613
I looked through all of my sewing drawers and couldn't find a glue stick. I did try it with some liquid glue baste-it, but the arc piece always came up short, and I'd have 1/4" of wedge sticking off the end of the arc.
05-12-2021, 02:11 AM
#394
Super Member
Join Date: Aug 2010
Posts: 2,431
05-12-2021, 03:13 AM
#395
Super Member

Join Date: Jul 2013
Location: Georgia
Posts: 8,258
joe'smom, I cut my pieces larger and then trim down. If you are getting one side longer, then you're either stretching to much or not enough. If you clip the seam first, it gets real easy to over stretch, and if you don't clip enough it can be really easy to not stretch enough. I always put the "outer circle edge down and the inner circle edge on top.
It really helps if you are sewing on a straight stitch foot so you don't have a lot of feed dog trying to hold the fabric straight when you need to be turning it. I also like to shorten up my stitch length - as the smaller stitches make going around the curve easier.
It really helps if you are sewing on a straight stitch foot so you don't have a lot of feed dog trying to hold the fabric straight when you need to be turning it. I also like to shorten up my stitch length - as the smaller stitches make going around the curve easier.
05-13-2021, 02:26 AM
#397
Super Member
Join Date: Aug 2010
Posts: 2,431
I started my May blocks the other day, and I love B-3, Christmas Eve! Was there ever a larger sized block with this pattern in one of Jennifer's books? It would look lovely in a Christmas quilt.
As for B-10, I cut everything out and then discovered the dreaded Y seams. So I recut those blocks to avoid them - cut 8 rectangles, 1.5" x 2.5", of focus fabric, and 8 1.5" squares of background. Sew diagonally at one end, 4 slanting one way and 4 the other. I hope this makes sense! I don't like my finished product so may redo as the resulting star is a bit too low volume. Will post a photo after I redo.
As for B-10, I cut everything out and then discovered the dreaded Y seams. So I recut those blocks to avoid them - cut 8 rectangles, 1.5" x 2.5", of focus fabric, and 8 1.5" squares of background. Sew diagonally at one end, 4 slanting one way and 4 the other. I hope this makes sense! I don't like my finished product so may redo as the resulting star is a bit too low volume. Will post a photo after I redo.
05-13-2021, 03:59 AM
#398
Super Member
Thread Starter
Join Date: Jul 2010
Location: England, U.K.
Posts: 1,589
I started my May blocks the other day, and I love B-3, Christmas Eve! Was there ever a larger sized block with this pattern in one of Jennifer's books? It would look lovely in a Christmas quilt.
As for B-10, I cut everything out and then discovered the dreaded Y seams. So I recut those blocks to avoid them - cut 8 rectangles, 1.5" x 2.5", of focus fabric, and 8 1.5" squares of background. Sew diagonally at one end, 4 slanting one way and 4 the other. I hope this makes sense! I don't like my finished product so may redo as the resulting star is a bit too low volume. Will post a photo after I redo.
As for B-10, I cut everything out and then discovered the dreaded Y seams. So I recut those blocks to avoid them - cut 8 rectangles, 1.5" x 2.5", of focus fabric, and 8 1.5" squares of background. Sew diagonally at one end, 4 slanting one way and 4 the other. I hope this makes sense! I don't like my finished product so may redo as the resulting star is a bit too low volume. Will post a photo after I redo.
https://www.youtube.com/watch?v=-DBztmnqK-M
Well done on any applique ladies, I have chickened out of doing any I am afraid !!
Take care everyone x
05-13-2021, 04:57 PM
#399
Super Member
Join Date: May 2013
Location: Ballwin, MO
Posts: 4,613
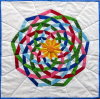
I finally found a method for the curved seams that works passably well for me. I remembered I had this pattern called 'Cherries Jubilee' from Elisa's Backporch Designs, which consists of these curved seams. It had detailed directions for her preferred method, which is no glue or pins and the wedge on top (I had seen a youtube that didn't use pins or glue, but she had her arc on top). She sews very slowly stitch by stitch, keeping the wedge in place with a tweezer while pulling the arc to where it needs to be on the wedge. Combined with the clipping of the arc and smaller stitches, I was able to get the units done with much less fuss than before. Phew!
Unfortunately, I forgot that I have to be quite scant in my seam when sewing blocks together, as I tend to come up small, so this block is 1/4" smaller than it should be; but I figure I can split the difference on both sides and still use it. I certainly wouldn't want to re-do this one!
Now on to those 'Y' seams. Dotty, thank you for that link to the 'Y' seam tutorial. It was very helpful.
