
So, I jumped headfirst into a rescue...
 10-26-2020, 12:43 PM
#1
Senior Member
Thread Starter

Join Date: Jun 2011
Location: Massachusetts
Posts: 775
My co-worker mentioned he saw a 'black Singer' in a 'box' while he was running to an estate sale at lunch. (Of course, I'd let him know a while back if he ever spotted an old machine, I'd love to know, heh!) I asked a few more questions, but he really doesn't know sewing machines -he's a car guy.  Anyway I asked what they had on it for a price, he said "$60". My ears went up and I had to go see.
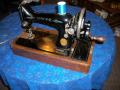
Well, she's a little 99K electric (born May 1953 in Scotland) and in *very messy* condition. Not a lot of rust -we're in the desert, but super dirty, gunked up dried up oil and crackling dry electric cables... only the machine and top of the carrying case. Hrm. Well, I told them it would need a lot of work, and offered them $30, and when they didn't balk she came home with me. I know there are parts out there, and by gosh, I kind of want to get my hands on a fixer upper!
So, I've been watching AndyTube (I do hope his break is short-term! His videos are wonderful!) and being as gentle and brave as I can, been taking her apart to clean and fix. As you can see from the first picture and the one of the bobbin area, I have a bit to do - that's about as dirty as she is all over. The other picture is of her surface, which also is dry, and has some cracking/crazing in the paint. Could I beg a few questions?
So far I've dusted her off with a gentle brush then a damp cloth to remove dirt. I've gotten the bobbin area apart except for the bobbin case...which really needs to come out. Cleaned removed metal parts with tri-flow to ungunk them, then just warm water/dry them. Again, it's the desert, so the parts will dry pretty quickly again.
What do you do with more 'complex' machine parts - like the bobbin ejector assembly -there must be gunk in the middle of that part...do you soak it in some solution/cleaner? Do I dare take all the screws out of it? I do have to figure out how to pull the oil wick 'coil' out, or at lest be able to replace the felt.
What would you do with the finish, assuming I will not take on removing the current clearcoat and paint? I'm not super worried about her perfect paint -she's already got some bare spots. I just want to do what I can with the skills I have to prevent further damage in the time I use her.
Do any of you have a favorite place you'd buy a replacement base for a machine like this? I probably won't have someone make an entire set-in table, just a base for now so I can see if she works.
So far I've not come across any screws that won't give, it just seems to be a matter of taking my time and doing a thorough clean/reassembly/oiling. Of course, I haven't even looked into what it will take to get the motor going, and wires replaced. Well, I've taken apart a laptop and replaced the motherboard. How much worse could this be?!
Anyway I asked what they had on it for a price, he said "$60". My ears went up and I had to go see.Well, she's a little 99K electric (born May 1953 in Scotland) and in *very messy* condition. Not a lot of rust -we're in the desert, but super dirty, gunked up dried up oil and crackling dry electric cables... only the machine and top of the carrying case. Hrm. Well, I told them it would need a lot of work, and offered them $30, and when they didn't balk she came home with me. I know there are parts out there, and by gosh, I kind of want to get my hands on a fixer upper!
So, I've been watching AndyTube (I do hope his break is short-term! His videos are wonderful!) and being as gentle and brave as I can, been taking her apart to clean and fix. As you can see from the first picture and the one of the bobbin area, I have a bit to do - that's about as dirty as she is all over. The other picture is of her surface, which also is dry, and has some cracking/crazing in the paint. Could I beg a few questions?
So far I've dusted her off with a gentle brush then a damp cloth to remove dirt. I've gotten the bobbin area apart except for the bobbin case...which really needs to come out. Cleaned removed metal parts with tri-flow to ungunk them, then just warm water/dry them. Again, it's the desert, so the parts will dry pretty quickly again.
What do you do with more 'complex' machine parts - like the bobbin ejector assembly -there must be gunk in the middle of that part...do you soak it in some solution/cleaner? Do I dare take all the screws out of it? I do have to figure out how to pull the oil wick 'coil' out, or at lest be able to replace the felt.
What would you do with the finish, assuming I will not take on removing the current clearcoat and paint? I'm not super worried about her perfect paint -she's already got some bare spots. I just want to do what I can with the skills I have to prevent further damage in the time I use her.
Do any of you have a favorite place you'd buy a replacement base for a machine like this? I probably won't have someone make an entire set-in table, just a base for now so I can see if she works.
So far I've not come across any screws that won't give, it just seems to be a matter of taking my time and doing a thorough clean/reassembly/oiling. Of course, I haven't even looked into what it will take to get the motor going, and wires replaced. Well, I've taken apart a laptop and replaced the motherboard. How much worse could this be?!
 10-26-2020, 01:39 PM
#2
Super Member
Join Date: Sep 2015
Posts: 1,965
You don't need to fully disasseble anything on this machine, maybe in exceptional cases with lots of rust and grime. Your machine doesn't look too bad at all. Slide the bobbin cover completely off, there is a lift up lever that lifts up and towards you, it releases the bobbin case. It will come out with a bit of turning and tweaking the hand wheel. You will reach all parts by poking from top, side and bottom. Unscrew the needle plate as well. You might have to take the hand wheel off to get it properly lubricated, it needs a good amount of oil and it's hard to get enough oil to the outer parts. If you do, smear a good layer of oil on the turning rod as well as the inner of the hand wheel.
For cleaning, use oil, spray can oils (carefully), cotton swabs, tooth picks, rags, ect. Put some kitchen paper under the machine and add oil to all the oil points. You can polish up the presser and needle bar with the right kind of polish (like QuickGlo). Be gentle on the finish, if it is in relatively good condition you can polish it with resin type car polish (liquid types), it lifts up dirt, shine, and leaves a protective film. Some use renaissance wax on their machines. The thin oils and degreasers can cause hickups, so make sure you get a good quality oil reach iinners of joints, hinges and turning parts. Make sure you leave the red felt bit and don't damage it, it's an oil wick for the race and hook.
Any chips or damage in the lacquer you repair by simple touch ups. you can do it simply with nail polish, or you can do it more thoroughly with filling in the missing spot, sand down, finish with the finest grade sanding paper that leaves a shine. A repair likethat can be flawless and invisible.
You can't really test sew this machine until you have a bottm case for it, there are tutorials on how to make your own on the web, and various places to buy simple and even luxury version of them. The original Singer wooden cases were of quite high quality and nicely made. MAke s
For flaky shellac coating take a look at the sticky thread on top of this forum, on repairing japanning. I'm not sure how to tackle that my self.
Last edited by Mickey2; 10-26-2020 at 01:45 PM.
10-28-2020, 06:39 AM
#4
Super Member

Join Date: Mar 2015
Location: Denver, CO
Posts: 4,669
...What do you do with more 'complex' machine parts - like the bobbin ejector assembly -there must be gunk in the middle of that part...do you soak it in some solution/cleaner? Do I dare take all the screws out of it? I do have to figure out how to pull the oil wick 'coil' out, or at lest be able to replace the felt.
What would you do with the finish, assuming I will not take on removing the current clearcoat and paint? I'm not super worried about her perfect paint -she's already got some bare spots. I just want to do what I can with the skills I have to prevent further damage in the time I use her....
What would you do with the finish, assuming I will not take on removing the current clearcoat and paint? I'm not super worried about her perfect paint -she's already got some bare spots. I just want to do what I can with the skills I have to prevent further damage in the time I use her....
For the finish the sticky here - Cleaning and repairing the Shellac clear coat on Vintage sewing machine heads
Janey - Neat people never make the exciting discoveries I do.
Not affiliated with off-site link(s)
10-28-2020, 06:52 AM
#5
Super Member
Join Date: May 2016
Location: near Topeka kansas
Posts: 4,524
if you happen across a cabinet or portable case without a head and it is for a Singer don't jump on it. Your 99 is 3/4 size and won't fit many cabinets. You may want to measure it's length, just in case you happen upon one.Then you can look for others.
10-28-2020, 08:48 AM
#6
Senior Member
Thread Starter
Join Date: Jun 2011
Location: Massachusetts
Posts: 775
Thanks for the words of advice, all! Yes, thanks, I do know it's the 3/4 size...and being a quilter, (hah!) I've already measured her with my tape! I wish I had woodworking skills myself, but I have seen a few (~$100-150+) for sale on Etsy. I didn't spend much on the machine itself so I can put a few into the case or cabinet. What's frustrating is I'm pretty sure I *owned* a cabinet for this model earlier in my life when I *didn't* have the machine...and somewhere in all the moves I let it go. That's just life though, isn't it? I'm sure I'll find something or buy something soon. I don't want to wait forever to use it!
Thanks for the wick references - that felt is really crunchy/hard with old oil, and I'm hesitant to mess with it without some pointers!
I'm excited to get started, she's absolutely beautiful to me, and I love the feel of the solid parts it's made from.
Thanks for the wick references - that felt is really crunchy/hard with old oil, and I'm hesitant to mess with it without some pointers!
I'm excited to get started, she's absolutely beautiful to me, and I love the feel of the solid parts it's made from.
10-28-2020, 06:38 PM
#7
Super Member
Join Date: Jun 2010
Location: The Deep South near Cajun Country, USA
Posts: 5,442
Glenn Cleveland posted a thread about restoring older machines and the best part....he did lots of pictures. It's a lot to read but is great information. Cleaning and repairing the Shellac clear coat on Vintage sewing machine heads
10-30-2020, 09:32 PM
#9
Senior Member
Thread Starter
Join Date: Jun 2011
Location: Massachusetts
Posts: 775
 I hope you're having fun with it!
10-31-2020, 04:12 AM
I hope you're having fun with it!
10-31-2020, 04:12 AM
#10
Super Member
Join Date: Sep 2015
Posts: 1,965
How are you doing? The wick looks pretty good in the picture, but if you want a new replacement, it can be done. I think the old one was wool felt, I'm not entirely sure.
I haven't had much problems with the plastic Apollo bobbins, other than breaking them during a winding messup. I tend to buy metal ones though.
A new base is a bit of a project, either buying or making. I'm keeping an eye on this thread.
Best of luck
I haven't had much problems with the plastic Apollo bobbins, other than breaking them during a winding messup. I tend to buy metal ones though.
A new base is a bit of a project, either buying or making. I'm keeping an eye on this thread.
Best of luck
