
Drunkard’s Path
 08-01-2025, 04:28 AM
#11
Super Member

Join Date: Oct 2019
Location: Corpus Christi, Texas
Posts: 2,814
My post ran into trouble when posting. I'll try again.
There are 2 pieces to be joined. One is Pizza, one is Crust.
1. Fold Crust along seamline to find center. Clip -less than SA! Then estimate center on each half to clip again.
2. Fold Pizza to find its center in order to match center on Crust. Pin. The pin each end. After that, ease pieces to place additional pins as needed.
3. It looks curled. go with that. Stitch Crust side against machine, not flat, but slightly raised to feed into presser foot.
4. I press open.
 08-01-2025, 05:17 AM
#12
Super Member
Join Date: Sep 2011
Location: Carroll, Iowa
Posts: 3,980
I made a couple of these drunkard path lap quilts and this is what I found helpful to me. Make the ends perfectly straight with each other and use a bit of Elmer's GLue to set them so you don't need a straight pin. I also pressed a fold line on both pieces so I have them perfectly centered with each other. I did use a straight pin at the center but other wise I didn't use pins. Plus go slow while stitching. True I still made mistakes but I learned a lot and this was my 1st curved project and it won't be the last. I'm no longer afraid of curves as I had been in the past. I had my template for at least 10 years before trying them out. I used the 3.5 and 7.0 templates for my quilts.
08-01-2025, 06:55 AM
#13
Member
Thread Starter
Join Date: May 2025
Posts: 23
I just watched Ebony Loves video and it’s quite different from everything else that I’ve seen. I will say that Ebony’s video is the least daunting of the methods I’ve researched. I already have that presser foot so I think I’ll give her method a try. Thank you very much.
 09-03-2025, 11:18 AM
#20
Member
Thread Starter
Join Date: May 2025
Posts: 23
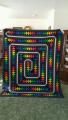
I've completed my first of two quilts. I'm loving the block and have had no issues. I made my own template and design with directions I found on Pinterest. I did buy templates, but I didn't have one to make an 8" block which is what I was shooting for. I used the center fold & pin and then four more pins per block. Not too bad. All curves were cut by hand and the straight edges were cut with a rotary. The end trimming to size was also done with a rotary cutter. I did glue the very ends which kept me from needing tweezers. It made the ends stiff enough that I could hold them until it got close and I was close enough that they didn't move.
The picture is actually from the side and all of the blocks are not trimmed. Should be a nice sized throw once I'm finished.

The picture is actually from the side and all of the blocks are not trimmed. Should be a nice sized throw once I'm finished.
