
Design Wall
 12-18-2012, 04:07 PM
#11
Junior Member
Join Date: Nov 2012
Location: Kansas City
Posts: 158
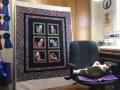
I got 2 sheets of 4x8 feet insulation at the hardware store and pinned flannel backed tablecloths to them with the flannel side out of course. They are just propped up against the wall behind a portable table. The tablecloths don't cover the insulation completely but I'm ok with that. The reason for the insulation is that it's very light. I would give credit to the person I copied this idea from if I knew who it was.
I'd like something fancier someday, like the hinged ones I saw here not too long ago but for now this is fine for me.
Joan
I'd like something fancier someday, like the hinged ones I saw here not too long ago but for now this is fine for me.
Joan
 12-18-2012, 05:28 PM
#12
Super Member
Join Date: Aug 2010
Location: Piedmont Virginia in the Foothills of the Blue Ridge Mtns.
Posts: 8,562
My design wall is 2 (blue) Tyvek insulation foamcore boards, 4' wide x 8' tall from Lowe's. I covered each in Warm and Natural cotton batting, turned to the back and taped down with duct tape.
The boards are attached to the wall with anchor bolts in each corner and one in the middle of each side. (I will be living in this house for a long while, so am not worried about putting the holes in the walls; they can be fairly easily repaired when/if the time comes.)
This gives me an 8' x 8' space to work with. If you work with larger than 96" wide quilts, I'd suggest buying 3 boards -- they are usually less than $20 each -- and cutting one in half lengthwise for an 8' x 10' space.
Jan in VA
12-18-2012, 05:38 PM
#13
Power Poster

Join Date: Oct 2010
Location: Waco, Texas
Posts: 15,138
You don't actually have to build or frame anything. You can use a flannel sheet or flannel backed tablecloth and just staple it or tack it to the wall along the top edge. I have a Wonder Wall. It's similar to a flannel backed table cloth but it sticks better and has grommets along one edge that make it easy to hang from picture hangers.
 12-18-2012, 06:49 PM
#15
Super Member
Join Date: Jul 2010
Location: Ohio
Posts: 2,148
I use a flannel backed cheap table cloth from wallmart- biggest size they carry. I hang it up when needed and take it down whn not needed. Also it workes great if laying quilt on bed/floor to lay out. After you have layed out peices then you can roll up the table cloth and take it to the sewing room and pieces do not really move. I was taught that you should place the pieces that you are laying out as to how it is to be used. When making a bed quilt it should be layed flat since that is how it will be seen. If making a wall hanging then it shoiuld be layed out hanging on wall.
 12-19-2012, 04:40 AM
#17
Senior Member
Thread Starter
Join Date: Nov 2012
Location: Maryland
Posts: 539
PaperPrincess, Thank you for helping me with the search feature. I think that will help me a lot in the future!
After looking at so many pictures and reading so many ideas, I'm sure I'll have no problem getting DH to make me a lovely design wall. Thanks everyone!
After looking at so many pictures and reading so many ideas, I'm sure I'll have no problem getting DH to make me a lovely design wall. Thanks everyone!
12-19-2012, 10:23 PM
#18
Super Member
Join Date: May 2011
Posts: 4,688
My design wall is 2 (blue) Tyvek insulation foamcore boards, 4' wide x 8' tall from Lowe's (my room doesn't have the wall space for anything more) . DSIL made a frame to hold the two pieces together. I the whole thing with Warm and Natural cotton batting, turned to the back and glued it with Elmers glue. DSIL then screwed it into the wall at the studs.
I like having the insulation since I can stick the pins in it straight if I need extra holding power.
I used the floppy flannel sheet before this and it was a true pain compared to what I have now.
I like having the insulation since I can stick the pins in it straight if I need extra holding power.
I used the floppy flannel sheet before this and it was a true pain compared to what I have now.
12-20-2012, 05:39 AM
#19
Super Member
Join Date: Mar 2012
Location: Thornton, Colorado
Posts: 1,023
I have a permanent design wall attached to the wall at one end of my studio. This was made of four interlocking Styrofoam panels two by six feet each. I used a wide flannel backing and stapled (tape is fine, too) it to the back before putting it up. As if one design wall is not enough, I copied this idea from a quilt retreat. Use three styrofoam panels or foam boards cut to the desired width and height to fit your needs. Tape the first seam on one side and tape the second seam on the reverse side so that the panels act as a folding room divider screen. I covered mine with an old bed flannel sheet on one side while the screen was folded. The reason is that it is fine when it is open but the flannel needs a place to go over the folded seam before the screen is put away for storage. I have it in front of the sewing machine while I am sewing blocks in proper sequence or trying out design layouts if the first wall is being used for another project. I discovered I can lay it out on a table top if I need to arrange and rearrange blocks a thousand times...far better than going up and down the ladder for a large project or better than doing it on the floor . This wall is lightweight and it can be moved anywhere and stored easily. Didn't cost much to make.
. This wall is lightweight and it can be moved anywhere and stored easily. Didn't cost much to make.
Last edited by quilttiger; 12-20-2012 at 05:41 AM. Reason: typo
12-20-2012, 05:57 AM
#20
Super Member
Join Date: May 2012
Location: Central Wisconsin
Posts: 4,391
Wow! I just got a lot of good ideas for design walls. And the light bulb lit up! I have two sets of the old fashioned quilting frames. I could put them together with the bolts as I usually do, put a quilt on to hold it squared up, and cover that with flannel. If I need to put pins in, the quilt behind would hold them. Some people also spray theirs with adhesive to make it a little sticky. When there is nothing on the wall, I could take the flannel off and have the quilt on display. What do you think?

Thread
Thread Starter
Forum
Replies
Last Post
Chester the bunny
Main
10
10-28-2011 03:13 PM
craftybear
Links and Resources
6
08-22-2011 05:12 PM
craftybear
Main
35
05-20-2011 01:45 PM
craftybear
Links and Resources
5
05-18-2011 07:04 AM
