
4 sided placemats?
 07-08-2011, 04:56 PM
#41
Senior Member

Join Date: Oct 2010
Location: Ulladulla, Australia
Posts: 592
I wish luck and please hurry with the pics:) i also am a little lost with the sewing section, i would love to make a set for my daughter she just moved house with her 2 little girls this would be fun for them to set the table:) Meanwhile i will attempt at making one today sometime:)
Have a great day
Have a great day
Last edited by QuiltnNan; 04-20-2019 at 04:04 PM.
 07-08-2011, 04:57 PM
#42
Senior Member
Join Date: Oct 2010
Location: Ulladulla, Australia
Posts: 592
I have tried the link but it's no longer available :(
Originally Posted by dosnanas
Earlier posting gave this site http://dunnvillequiltguild.com/uploads/2010_January.pdf
07-08-2011, 07:54 PM
#43
Senior Member
Join Date: Dec 2009
Location: Oregon City, OR
Posts: 876
I have the pattern and directions, but I haven't tried it yet. I wonder if you could make it round to use as a table topper or center piece or even square. Lots of possibilities there. I would offer copies, but not sure of the copywrite.

 07-08-2011, 11:59 PM
#46
Senior Member
Join Date: Oct 2010
Location: Ulladulla, Australia
Posts: 592
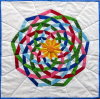
this is what i found while surfing the web:)You cut one thickness of four different kinds of fabric into an oval of the size you want. I took four squares and folded them in halves and then quarters and cut the rounded off shape all at once so they'd all be the exact same shape. Or you could measure out rectangles to the size you want and then trace the rounded corners with a plate or something if you're not comfortable free-handing it.
Now lay them out. Place one piece right side up. Take two more pieces and fold them each in half, right sides outward, and lay them on top of the piece on the table, so their folded sides meet in the middle. Now lay the fourth piece on top, right side down. All pieces should now be touching right side to right side.
Now pin them together all around the outside edge, only pinning two pieces together, not all four. See how it's kind of making a taco shape when you hold up the top piece pinned to the two center pieces? Turn it over and pin the other sides together. Then, just start at the center pin and sew around the half oval to about 1" to 1-1/2" from the center pin on that side. Then do it on the other end, again leaving that gap, but almost meeting up to where you started (this leaves a hole in the center to turn it right-side out). Then turn it over and sew around the outside edges on that side in the same manner.
Turn it right-side out, tuck in the seam edges from the hole (I'd probably press with an iron) and then slip stitch or top stich that hole shut. If it was me, I'd top stitch all the way around each piece to help keep the seams straight and to lie flat better. Then it's all one piece, and you just flip half of it over until you get the side you want to use.
http://www.homesteadingtoday.com/sho...d.php?t=346786
middle
[ATTACH=CONFIG]223391[/ATTACH]
top
[ATTACH=CONFIG]223392[/ATTACH]
I added the photos to the instruction above hope it makes sense
[ATTACH=CONFIG]223395[/ATTACH]
 07-09-2011, 10:20 AM
#49
Member
Join Date: Jun 2011
Posts: 79
Originally Posted by qbquilts
I found a link. http://feeddogsdown.blogspot.com/201...placemats.html
07-10-2011, 12:22 PM
#50
Member
Join Date: Feb 2010
Location: Jay, FL
Posts: 24
Capucine: thank you, thank you, thank you. I have spent half the day sewing and ripping trying to follow the two tutes I had and couldn't get it. Your explanation turned on the lights!!!! I was ready to give up and make two two-sided placemats. These are specials for my grandnieces.

Thread
Thread Starter
Forum
Replies
Last Post
craftybear
Links and Resources
6
12-04-2010 10:17 AM
