
Is this idea just too crazy?
 01-04-2015, 12:05 PM
#41
Super Member
Join Date: Nov 2006
Location: Central PA
Posts: 1,920
I recently made a Hunter's Star quilt. The star points were raw edge and called for stitching 1/8" around the point. The star points were stitched in contrasting thread. This process would be faster and if there is a little fraying, so be it. The idea of doing a blanket or buttonhole stitch by machine would also work. Stitching by hand would be tedious. I think also that I would make all of the centers the same and I would also use a narrow sashing.
I am sure your aunt will be glad to see you have taken her blocks to completion. Good luck.
I am sure your aunt will be glad to see you have taken her blocks to completion. Good luck.
 01-04-2015, 12:09 PM
#42
Super Member
Join Date: Aug 2013
Location: Florida
Posts: 5,920
I'm with Mike's Girl. I think the term "fragile" means you should add stabilizer to the blades. Then you can use whatever method you choose to on the attachment. I like the idea of the buttonhole stitch.
01-04-2015, 12:16 PM
#43
Super Member
Join Date: Sep 2010
Location: Live Oak, Texas
Posts: 6,133
My DM made a lot of them and always starched them so stiff I was afraid the would break if I bent them. She always did the buttonhole stitch by hand. on them. I use a fusible on mine and do the buttonhole on my machine. On ones as old as yours you could do a satin stitch to keep it from fraying but I would fuse it down first.
01-04-2015, 03:37 PM
#45
Senior Member
Join Date: Oct 2013
Posts: 888
If you want a finished edge, do the Eleanor Burns thing and cut a piece of lightweight fusible web larger than the Dresden Plate unit. Lay the web bumpy side up on your table and center the Dresden Plate unit on top, right side down. Pin to secure and stitch all the way around. Trim the edge to within 1/8" and then cut a slit in the middle of the back of the web and turn right side out, shaping the points for each one. Fuse the Dresden Plate unit to your background square.
You now have a finished edge which you can stitch down with a straight, zig-zag, button hole or blind hem stitch, by machine or by hand.
You now have a finished edge which you can stitch down with a straight, zig-zag, button hole or blind hem stitch, by machine or by hand.
01-04-2015, 04:27 PM
#47
Super Member
Thread Starter
Join Date: Aug 2011
Location: Asheville, previously Lake Vermilion, Tarpon Springs, Duluth, St Paul, Soudan
Posts: 1,651
Thanks for all the suggestions. Here are the decisions I have made so far. Will be facing the blocks with a lightweight sew in interfacing, just to avoid the "hard" feeling that results from iron-on and safely enclose those edges. The first try worked quite well. Traded the background for an almost peacock blue; keeping the gold centers. Will audition the options of gold or black buttonhole stitch or satin stitching. Recycling the original background into the backing. Will keep you posted.
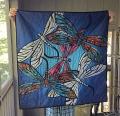
Oh, here is the block faced and turned against the new background. Of course, between and artificial light and the ipad camera, the colors aren't true, and one blade mysteriously flipped the point to the back
[ATTACH=CONFIG]504743[/ATTACH]
Oh, here is the block faced and turned against the new background. Of course, between and artificial light and the ipad camera, the colors aren't true, and one blade mysteriously flipped the point to the back
[ATTACH=CONFIG]504743[/ATTACH]
Last edited by Krisb; 01-04-2015 at 04:31 PM.
01-04-2015, 09:06 PM
#48
Super Member
Join Date: Feb 2011
Location: Lumby, British Columbia
Posts: 2,769
I have been working on blocks that were originally made by my aunt. She went into the nursing home in 1968, so they are at least that old. After some work, I have the blocks laying flat. And thr background squares cut. Here's what they look like now:
[ATTACH=CONFIG]504569[/ATTACH]
There doesn't seem to be enough contrast between the background and the blades. Also, the edges are so fragile and frayed that I don't think I can turn them under. Could do raw edge, or could try a offbeat idea. What trim did people use a lot of in the 50's and 60's? Rick rack. Is it insane to cover the outer edges with rainbow rick rack?
01-04-2015, 10:55 PM
#49
Super Member

Join Date: Nov 2009
Location: Missouri
Posts: 2,485
I would not use rick rack, it always shrinks and the points that aren't stitched down will curl. I would stabilize with one of the fusible web product and do a button hold stitch. Most older items like the were done this way, but usually by hand, but doing by machine is just as nice.

Thread
Thread Starter
Forum
Replies
Last Post
abc123xyz
General Chit-Chat (non-quilting talk)
42
11-30-2013 09:35 AM
PurpleBecca
Pictures
52
05-05-2010 12:35 PM
