
Any tips for lining up critical top fabric and backing fabric blocks?
 01-02-2016, 10:30 PM
#1
Senior Member
Thread Starter

Join Date: Dec 2012
Location: Australia
Posts: 732
Hmmmm, I'm up to sandwiching and basting and I'm breaking out in a sweat just thinking about it. I have some blocks incorporated into my backing running down the middle length and I want to line them up with certain blocks on the top so they get the same quilting effect on them. Does anyone have any tips on how I can line my blocks up?
Would it be alright to lay my sandwich out and not tape or clip the layers down initially so I could bunch the 3 layers up in my hand so I can feel the seams of bottom and top blocks so I could snug them together and then pin them? Once I've done my middle length/line of matching blocks I could then do my usual basting process? What do you think?
Would it be alright to lay my sandwich out and not tape or clip the layers down initially so I could bunch the 3 layers up in my hand so I can feel the seams of bottom and top blocks so I could snug them together and then pin them? Once I've done my middle length/line of matching blocks I could then do my usual basting process? What do you think?
 01-02-2016, 10:46 PM
#3
Super Member
Join Date: Jun 2010
Location: England Alton Towers
Posts: 6,673
I've thought of doing this many times, will follow the thread as I as yet have not managed it. I tried pins but they are very difficult to get through wadding/batting in a straight line. Whether something like a u shaped staple would work as they are shorter and don't move as much.raid a tool box some can be 1" long. But these in the back top and bottom stretch backing fabric and fasten down ensuring you can see staple all the time. Cover smooth and push staples through batting. Now put on top positioning staples first then rest of quilt. Top.
this works in my head not sure about practically.
this works in my head not sure about practically.
01-03-2016, 05:28 AM
#5
Super Member

Join Date: Apr 2011
Location: Texas
Posts: 5,547
This is a thread that I will be following carefully also. Thanks for posting the question. I've never made a back out of anything except all the same fabric but have wanted to piece a back with other fabrics at times. I've never been sure how to line them up so they are "even" on the back (seams straight & not wonky).
01-03-2016, 06:12 AM
#6
Power Poster
Join Date: Dec 2010
Location: Michigan
Posts: 11,276
I used thumb tacks. Thumb tacks are flat allowing them to lay against the table top. Put the tacks thru the backing at the points you want to match. You might have to put a small piece of masking tape over the head to keep in in place as you handle it. Tape the backing down to the pinning surface as usual and CAREFULLY smooth on the backing. You can now match up the thumb tacks with the top, again, be very careful. Use lots of pins in the matching areas. I would pin the top as opposed to glue basting as the pins will secure the top to the bottom. Glue basting secures the top and backing to the surface of the batting and if the center of the batting shifts a bit, you will loose the alignment.
This will get you very close, but SITD will probably not be perfect.
This will get you very close, but SITD will probably not be perfect.
01-03-2016, 06:36 AM
#7
Power Poster
Join Date: Jun 2011
Location: Southern California
Posts: 19,127
How large is your quilt?? If it is a large quilt, it will be difficult because you want to make sure the quilt is smooth and flat. I like the idea of using thumbtacks but you have to be so careful.
01-03-2016, 06:46 AM
#8
Super Member
Join Date: Mar 2010
Location: greater NorthEast
Posts: 3,004
i think you've got the right idea! ...i would use clamps/clothespins to hold the outside together & try folding it to find the area you want to work on, ...you're right about snugging it up & using pins..that way you could still manipulate it without putting holes in the fabric Give it a go!
01-03-2016, 07:07 AM
#9
Super Member

Join Date: Jan 2009
Posts: 4,688
The way I learned lining up back and front is fairly easy for things like placing pieced back details where you want them.
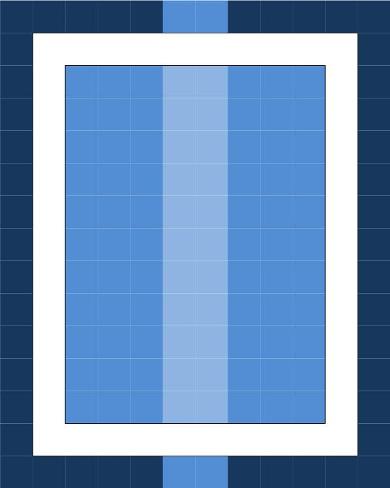
For lining up vertical center rows, for example, I make sure the top and back are squared up with their centers in the true center and the backing is exactly the same width larger than the top on all sides. I then cut the batting so it is exactly the same width larger than the top on all sides and exactly smaller than the back on all sides. I generally go with a 2" ring (each layer is 4" larger than the one on top of it), but as long as it's consistent it'll work. The three layers can be centered by measuring the exposed edges of the backing and batting.
It's a bit harder for something like placing a panel/single block/detail exactly where you want it on the back, but if your measurements from all sides are accurate, it works quite well.
The three layers stacked:
01-03-2016, 07:17 AM
#10
Power Poster
Join Date: Mar 2011
Location: Ontario, Canada
Posts: 41,610
I saw a tutorial somewhere where she taped down a large X on her basting table. She used the bamboo skewers to make the X over the whole surface of a large table. The skewers lined up the back, put down the batt and you can feel where they are to line up the front. I have not tried it but it may help get them lined up.

Thread
Thread Starter
Forum
Replies
Last Post
gmteach
General Chit-Chat (non-quilting talk)
1
04-21-2014 10:28 AM
