
3D tutorial


 05-30-2019, 06:44 AM
#15
Super Member
Join Date: Dec 2010
Location: Clarksville, In
Posts: 1,840
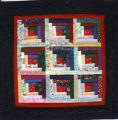
ube..as you can see I wasn't brave enough to try scraps....may do that in the future, but couldn't wait to see if I understood correctly. You did a great tute! Thanks again!
[ATTACH=CONFIG]613411[/ATTACH]
[ATTACH=CONFIG]613411[/ATTACH]
05-30-2019, 06:19 PM
#16
Super Member
Join Date: May 2012
Location: Central Wisconsin
Posts: 4,391
This gives a different twist to the pattern. Now make the small triangles the same dark blue. That makes that wall a solid. I like that very much.
06-03-2019, 01:09 PM
#18
Super Member
Join Date: Dec 2010
Location: Clarksville, In
Posts: 1,840
 07-18-2019, 02:26 AM
#20
Senior Member
Join Date: Oct 2016
Location: Cervantes Western Australia
Posts: 485
[ATTACH=CONFIG]614925[/ATTACH]I followed your tutorial, Ube . It is a wall hanging . I didn't know if an all over pattern would affect the look so I followed the seams with small free hand quilting in the black triangles .

Thread
Thread Starter
Forum
Replies
Last Post
craftybear
Links and Resources
1
10-25-2011 03:58 PM
craftybear
Links and Resources
0
06-18-2011 10:12 AM
craftybear
Links and Resources
0
06-17-2011 09:50 AM
craftybear
Links and Resources
6
01-19-2011 04:44 AM
