
Tutorial for Mini Design Board
 11-25-2013, 01:01 PM
#1
Super Member
Thread Starter
Join Date: Feb 2013
Location: North Florida
Posts: 2,156
I can't have a design wall because of my cats, but I love these mini design boards for blocks. So cute and easy to stash away so the cats can't get to them. Thought some of you folks might be able to use this as well.
Part 1 – tutorial for the mini design board
http://beeinmybonnetco.blogspot.com/...-tutorial.html
Part 2 - tutorial for binding for the mini design board
http://beeinmybonnetco.blogspot.com/...ialpart-2.html
Part 1 – tutorial for the mini design board
http://beeinmybonnetco.blogspot.com/...-tutorial.html
Part 2 - tutorial for binding for the mini design board
http://beeinmybonnetco.blogspot.com/...ialpart-2.html
 11-25-2013, 01:12 PM
#2
Senior Member
Join Date: Oct 2012
Location: NW IL
Posts: 493
Nice, I use the foam board I gotten at the dollar stores for a dollar to use for pining cut out twisters to keep their place. Easy to store with my cutting mats when not using it, but I never thought of making a designer board from it! Thanks!
11-26-2013, 04:21 AM
#3
Super Member
Join Date: Dec 2011
Location: Horse Country, FL
Posts: 7,341
Thanks. I was awake in the middle of the night thinking about a design board that could be easily hidden. Right now I'm using the flannel backed table padding that is bought from a roll. The trouble is where to put the thing when company comes. So this idea has merit. Thanks!
11-27-2013, 08:43 PM
#4
Junior Member

Join Date: Jan 2013
Posts: 122
I bought a business executive's desktop planning calendar that is thick card and already folded in half. Folded over, it's A3 size and you can just make out the black line borders from the card through the fleece. I have seen some that use sandpaper but it's hard to buy it this size now so I just used some polar fleece that I already had. I measured the inside to the fold of the card only covering one half, wrapped it under then over and left an extra 2 inches for the frame so it covered all the back and wrapped to the inner side by 2 in. I stitched the sides to make a pillow slip type cover for it out of polar fleece. On the left inside, I cut out a square so that the fleece made a frame around the edges. That way, any blocks I was working on won't slip when it's shut. The right inside is all fleece that I'd glued down and that's the working area (A3 size). I made a velcro closure strap then I stitched it all inside out then slid the cover in place and glued down with Bostick glue stick - not even hotfix. No need to bind and sooo quick and easy I don't know why I didn't think of it before! The longest time was doing the applique for the front which, of course, I cut out backwards which is why the Bs and Ks are upside down! Don't need pins and nothing slips when it's closed/carried and I use it mostly on landscape so that the lid is away from me and doesn't get in my way. I just forgot to put on a handle.....sigh....[ATTACH=CONFIG]448970[/ATTACH].[ATTACH=CONFIG]448968[/ATTACH][ATTACH=CONFIG]448969[/ATTACH]
12-01-2013, 04:12 AM
#5
Super Member
Thread Starter
Join Date: Feb 2013
Location: North Florida
Posts: 2,156
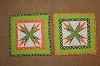
Just wanted to let you know I used these two tutorials and it was fun to make smaller design boards. I made a 14 x 15 and 16 x 20 from a 20 x 30 foam board. They took about three hours to complete. I would suggest you make sure you have plenty of glue sticks before you start. I used about 8 regular size sticks for these two boards.
Here's a picture of my 16 x 20 board.
[ATTACH=CONFIG]449402[/ATTACH]
Here's a picture of my 16 x 20 board.
[ATTACH=CONFIG]449402[/ATTACH]

Thread
Thread Starter
Forum
Replies
Last Post
DonnaC
Pictures
22
07-04-2015 01:48 PM
nance-ell
General Chit-Chat (non-quilting talk)
38
11-06-2011 06:33 PM
