
need help with two inch squares
 01-18-2014, 05:56 AM
#1
Junior Member
Thread Starter
Join Date: Aug 2007
Location: Hiding in Maine
Posts: 206
Years ago I saw a posting about sewing two inch squares. Something about laying out your squares fusing them to something and sewing them in rows instead of sewing each little tiny square. I Hope someone remembers this and can direct me to the link.

 01-18-2014, 06:23 AM
#4
Senior Member
Join Date: Feb 2008
Location: Muscatine, Iowa
Posts: 781
I wont be giving you a answer about fusing. I had tons/bunches of 2'' sqs also. I just sewed them into a 4 patch, and sewed triangles on the 4 sides. Put them on point. It turned out nice. Sorry for not the correct answer.
01-18-2014, 06:26 AM
#5
Super Member
Join Date: Jun 2010
Location: Tampa, FL USA
Posts: 3,115
I think what you are describing are the pre-printed interfacings. There are several sources for them, but this is one page that has the interfacings – scroll down a little to see the panels that are grids with squares:
http://www.ericas.com/quilting/printedinterfacing.htm
And this is the page with the patterns and books:
http://www.ericas.com/quilting/scraptherapy.htm
Here is another source:
http://hummingbird-highway.com/patte...p-grid-2-pack/
Here is a description of how to use the interfacing:
The ScrapTherapy Small Scrap Grid makes sewing 2" scraps easy and accurate. Use the grid lines to arrange the scraps, then fuse the scraps to the light weight interfacing, then fold on the lines and sew the seam allowance.
Hope this helps!
01-18-2014, 06:29 AM
#7
Super Member
Join Date: Jan 2012
Posts: 4,783
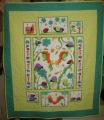
I did exactly what you are talking about when I made watercolor wall hangings. It's an awesome way to handle small squares. Lay some out onto the gridded fusible, fuse with an iron, and repeat until the entire quilt top is fused. Fold and sew each seam in one direction (horizontally or vertically). The top gets really funny looking when it's been shrunk all in one dimension! Then you need to clip with scissors on the backside at each intersection so you will be able to fold and sew again in the other direction. That's all there is to it. It's really a great way to go!

 01-18-2014, 07:57 AM
#10
Super Member
Join Date: Mar 2011
Location: Central NJ
Posts: 5,571
I used that process - without the interfacing - for a watercolor quilt a number of years ago. I did not want the bulk of the interfacing as I was hand quilting. I don't know that not using the fusible interfacing was any less tedious than using it. The quilt turned out really well - even if I do say so myself - but definitely a tricky process turning the various pieces to get the effect that you want.

Thread
Thread Starter
Forum
Replies
Last Post
janecat
Main
1
12-02-2015 09:23 PM
ragqueen03
Main
14
01-07-2015 03:03 PM
Sharyn
Main
9
11-16-2013 09:27 AM
