
Lotus Motor & Face Plate Question
 10-16-2014, 12:55 PM
#11
Super Member
Thread Starter
Join Date: Aug 2010
Location: Kansas City, Missouri
Posts: 1,040
Originally Posted by J Miller

Blackberry,
CD is right about the screw and eye on the bottom of the faceplate being a replacement guide for the one that should be there. Normally the guide is a small wire like affair riveted to the face place. Looks like at some time yours got broken so someone improvised a replacement. I have 66s from the -1 to the -18 and they are all the same. I can take a pic for you if you want.
On your motor, the rectangular piece of metal that is screwed vertically to the motor mount bracket should be spot welded to the body of the motor in one of the two unpainted places. There should be two of these on the motor but it looks as if they were broken off at some point. Probably cos someone overtightened the belt, or dropped the machine on it's back. At any rate, there are other motors that have dual screw holes for the mounting bracket. I can take pics of this too if you want me to.
Joe
 10-16-2014, 03:27 PM
#13
Super Member
Join Date: Feb 2012
Posts: 8,091
OK here we go with pics:
Motor, two angles:


You can see how the rectangular piece is attached to the motor housing.
It might could be silver soldered back on, but you'll need to completely
disassemble the motor to do it.
Face Plate, two angles:
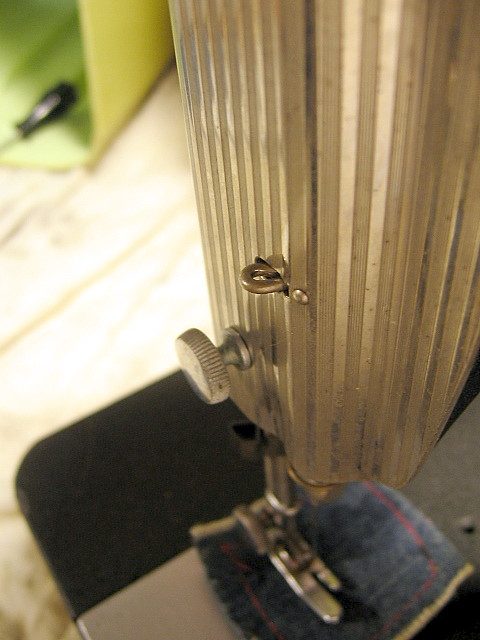

This face plate has a different design pattern than yours,
but the thread guide is the same as yours would have been.
Hope this helps a bit.
Joe
Motor, two angles:
You can see how the rectangular piece is attached to the motor housing.
It might could be silver soldered back on, but you'll need to completely
disassemble the motor to do it.
Face Plate, two angles:
This face plate has a different design pattern than yours,
but the thread guide is the same as yours would have been.
Hope this helps a bit.
Joe
10-17-2014, 05:39 AM
#14
Super Member
Thread Starter
Join Date: Aug 2010
Location: Kansas City, Missouri
Posts: 1,040
Originally Posted by J Miller
OK here we go with pics:
Motor, two angles:
You can see how the rectangular piece is attached to the motor housing.
It might could be silver soldered back on, but you'll need to completely
disassemble the motor to do it.
Face Plate, two angles:
This face plate has a different design pattern than yours,
but the thread guide is the same as yours would have been.
Hope this helps a bit.
Joe
10-17-2014, 06:16 AM
#15
Super Member

Join Date: Feb 2014
Location: Mendocino County CA
Posts: 1,976
I can't see why you couldn't find another motor. They are pretty common and I think you oculd use another brand as long as it has a way to attach to the machine. A quick search on eBay brought up this one if you want a Belgelcor. http://www.ebay.com/itm/BELGELCOR-BE...item4addcb2eb0
10-17-2014, 06:24 AM
#16
Super Member
Join Date: Feb 2012
Posts: 8,091
Blackberry, New motors with that set up are readily available. Sew-Classic normally has them in stock. They show to be temporarily out. { http://www.shop.sew-classic.com/Moto...s-SCE35L09.htm }
Or any machine shop or you even can cut a rectangle out of a piece of steel flat stock then drill and tap it to the proper thread size and weld, braze, or silver solder it on the housing. That would be a lot of work but it could be done.
Used motors can be a source of a replacement too. Lots of OSMGs have a stock of used motors. Lots of us have a stock like that too.
Joe
10-17-2014, 06:38 AM
#17
Super Member
Join Date: Feb 2012
Posts: 8,091
Blackberry,
The one Christy put the link in too will need rewired and thoroughly cleaned. Since new motors are available, I'd do that before I'd bust my keester on an old motor.
JMHO
Give me a while to dig through my motor pile, I might have one I'd be willing to trade for your Belgelcor carcass.
Joe
The one Christy put the link in too will need rewired and thoroughly cleaned. Since new motors are available, I'd do that before I'd bust my keester on an old motor.
JMHO
Give me a while to dig through my motor pile, I might have one I'd be willing to trade for your Belgelcor carcass.
Joe


Thread
Thread Starter
Forum
Replies
Last Post
Beautiful_Sound
For Vintage & Antique Machine Enthusiasts
10
10-30-2015 08:36 PM
miriam
For Vintage & Antique Machine Enthusiasts
45
04-09-2014 11:52 PM
Stitchnripper
Pictures
12
03-27-2012 09:58 AM
