
Free Motion Quilting and High Loft Batting
 09-14-2019, 04:41 PM
#1
Member
Thread Starter
Join Date: Dec 2018
Posts: 62
Hi all,
I thought you might be interested in my adventures in FMQ with a high loft batting. I wanted to use the high loft because I want a "trapunto" like effect without all the cutting. So I made the quilt top, sandwiched, and FMQd. And quickly came to a shredding, skipped stitch, maddening halt.
I got so very frustrated and I thought maybe there was something wrong with my machine. So I packed it up, went to my friendly neighborhood sewing store (where I bought my machine) and chatted with the owner (C). C sat down at the same model to use as a control and we tried it out using my needle, thread, and a sample I brought with me. We discovered that the problems occur when going "backwards" - i.e. pulling the quilt towards me. This pulls the thread away from the needle and out of the protective groove resulting in more of the thread exposed to the thick batting and thus shredding. Her advice? Stick with "stitch in the ditch" and regular sewing.
So I went home and did some thinking and, after much trial and error, I found the secret formula. If you are still with me and curious, the secret sauce is:
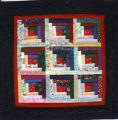
See pic.
[ATTACH=CONFIG]617393[/ATTACH]
I got the puffy look I was going for and I'm now cruising through this quilt. Just because someone says it can't be done doesn't mean they are right. It took a lot of trial and ripping but I was persistent and got it!!!
Happy stitching
jojk
"You rip what you sew"
I thought you might be interested in my adventures in FMQ with a high loft batting. I wanted to use the high loft because I want a "trapunto" like effect without all the cutting. So I made the quilt top, sandwiched, and FMQd. And quickly came to a shredding, skipped stitch, maddening halt.
I got so very frustrated and I thought maybe there was something wrong with my machine. So I packed it up, went to my friendly neighborhood sewing store (where I bought my machine) and chatted with the owner (C). C sat down at the same model to use as a control and we tried it out using my needle, thread, and a sample I brought with me. We discovered that the problems occur when going "backwards" - i.e. pulling the quilt towards me. This pulls the thread away from the needle and out of the protective groove resulting in more of the thread exposed to the thick batting and thus shredding. Her advice? Stick with "stitch in the ditch" and regular sewing.
So I went home and did some thinking and, after much trial and error, I found the secret formula. If you are still with me and curious, the secret sauce is:
- Stich in the ditch around the basic design. This locks down an area to be quilted and minimizes horizontal movement of the fabrics and batting.
- Use the smallest eyed needle appropriate for your thread. This minimizes the flapping back and forth in the eye.
- Non stick / Teflon needle. I bought them for another project and decided on a whim to give them a try. Woo boy what a difference.
- Use the smallest holed stich plate. Again, minimal movement.
- Use the floating foot as far down as your machine will allow. Same reasoning.
- Go very fast.
- Standard precautions of sharp needle and clean machine.
- Try not to get frustrated when the thread shreds because it will. But the above will keep it to a minimum.
See pic.
[ATTACH=CONFIG]617393[/ATTACH]
I got the puffy look I was going for and I'm now cruising through this quilt. Just because someone says it can't be done doesn't mean they are right. It took a lot of trial and ripping but I was persistent and got it!!!
Happy stitching
jojk
"You rip what you sew"
Last edited by Jojk; 09-14-2019 at 04:43 PM. Reason: left out an ingredient


Thread
Thread Starter
Forum
Replies
Last Post
