
It's Virtual Quilt Day!! Today - Sunday, April 21, 2013
 04-22-2013, 05:42 AM
#81
Super Member
Join Date: Feb 2013
Location: North Florida
Posts: 2,156
Oh, I'm so sorry I missed this. I was quilting a lot this weekend. I have almost finished up my wedding gift quilt. I have 3/4 of a side to finish hand sewing the binding to the back and it will be done and ready to take pictures. I'm going to make a 14" pillow cover with some leftover fabric to go with the quilt.
 04-22-2013, 07:04 AM
#82
Senior Member
Join Date: Feb 2013
Location: NE California - no where near the Bay Area!
Posts: 346
Originally Posted by maviskw

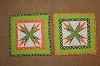
Ranchwife, could you show us how you finish the seam on the back. They look beautiful; as if you crawled inside and sewed them RST. How'd you do that?
 04-22-2013, 07:53 AM
#84
Power Poster
Join Date: Jul 2008
Location: East Oklahoma - pining for Massachusetts
Posts: 10,477
Sorry I did not get back to say how I made out. I made some nice progress on my wall hanging. It was a UFO for some time and I am glad to be getting so close to the end of the project. Ordinarily I would show a picture too, but I want it to be completely done when I let you see it. All the pictures sure are pretty. It gives a lot of inspiration for others.
 04-22-2013, 09:31 AM
#86
Super Member
Join Date: Jun 2010
Location: England Alton Towers
Posts: 6,674
I was having quilting problems but woke up had a go fine. No problem at all. Must have been tired after 6hours sewing. Almost finished the quilt will post when I have.
When is the next day I love them it makes you focus before the day to get ready and then a whole day sewing.
When is the next day I love them it makes you focus before the day to get ready and then a whole day sewing.
04-22-2013, 12:22 PM
#87
Super Member
Join Date: May 2012
Location: Central Wisconsin
Posts: 4,391
Originally Posted by Ranchwife
I used the instructions on this video - http://youtu.be/I_qyb7XxY4k. I followed their directions except for not using 1/2 inch seam allowances. I also marked the fold line on the back by marking a line 7/8 inches from my outermost SID, pressing the fabric, then glue basting it. I then SID to seal up that seam. I am having problems with doing this because I have to leave 1 inch on the top and bottom of the block so I can join the rows. I need to figure out how to do this so it looks good and doesn't leave unstitched regions. See this post for pics and more explanation on the problems I'm talking about. I'm almost to decide that hand stitching the blocks together on the back might be the best way to go, and just SID the rows together.
 04-22-2013, 04:27 PM
#89
Super Member
Join Date: Feb 2012
Location: New Orleans, La
Posts: 1,768
Ranchwife, how beautiful and so perfect. Thanks for the referral on the you tube video. I'm bookmarking it for later reference. I'm just getting started. I watched grandkids till 4:30, Cleaned up, then cooked for hubby. Watered by veg garden, and now reading threads. I don't get to put a lot of effort into quilting during the day. Mostly weekends when I don't have the boys. And also the weather is so beautiful, I love being outside.

Thread
Thread Starter
Forum
Replies
Last Post
athenagwis
Main
30
03-16-2013 06:09 PM
