
Making zipper pouches
 12-06-2019, 12:13 PM
#11
Super Member
Join Date: Feb 2013
Location: North Florida
Posts: 2,156
I would also suggest boxing the bottom of the bag. That will help it stand up. You will need some extra fabric for this step so I always cut my fabric pieces at least 1.5" inches bigger when I'm boxing the bottom. Here is a link to an easy Youtube tutorial for boxing bottoms. https://www.youtube.com/watch?v=gJhlgKqjb0o If you are lining the bag you will also box the lining.
 12-06-2019, 02:07 PM
#12
Junior Member
Thread Starter
Join Date: Jan 2018
Posts: 253
Thank you everyone for your responses. I will keep my Joann coupon next time I get one and purchase some of the headliner foam. I will also continue to experiment with some other stabalizers so I can see what they do. I was just looking for a more economical idea.
IrishgirlfromNJ I do box most all of my pouches now unless I want something small and flat to put in my purse.
By the way, I must mention that I am an Irish girl, formally from NJ, and later from Florida too. Only, I lived in Southern Florida and multiple places in NJ (the last being in Hunterdon County) which is a beautiful area of NJ. I had a lovely 150+ year old home there on 12 acres with a barn converted into two lovely apartments. Hate to think what that would go for today. It would probably make me cry. I still dream about that place all these years later.
12-06-2019, 08:02 PM
#13
Super Member

Join Date: Mar 2011
Location: Canada
Posts: 1,386
[ATTACH=CONFIG]620548[/ATTACH]This is a very small zippered bag, will stand alone when closed, lays flat when opened - fits nicely into your purse, and can be folded up. The one pictured does not have a lining in it. Size is 8 1/2 x 11 Inches tall, you will need a 22 inch zipper. Just sew the zipper on, starting at the bottom inside point of the reversed "S" shape.
The left side at the top of the page, called part of the reversed "S" is 3 1/2 inches from the top edge of the paper to the zipper closure and the left side part of the reversed edge is 3 1/4 inches from the outside top edge over to the zipper closure at the indent.
The bottom right side of the "S" is 3" from the edge of the paper to the zipper start, and 3 1/2 inches from the zipper indent to the bottom of the page . I hope these measurements help you make a pattern for the cute bag.
 12-07-2019, 06:39 AM
#16
Super Member
Join Date: Mar 2011
Location: Canada
Posts: 1,386
I am going to go and make one to post. Do not get a zipper yet, it has been a long time since I made one, I need to let you know that the size I posted is correct. I shall be back with a picture in just a few minutes. It is 6:38 am right now.
12-07-2019, 07:31 AM
#17
Super Member
Join Date: Mar 2011
Location: Canada
Posts: 1,386
[ATTACH=CONFIG]620585[/ATTACH][ATTACH=CONFIG]620586[/ATTACH][ATTACH=CONFIG]620589[/ATTACH][ATTACH=CONFIG]620588[/ATTACH]
I used an invisible Zipper. Zipper should be 20" in length, not 22 as in my previous post (which I corrected).
pic #1, shows to sew zipper opened up, with zipper sewn on the right side of fabric, slowly move the zipper along the edge of the fabric, sewing to the end, then make a small snip "V" into the fabric, and stitch the end of the zipper as you will have to turn the zipper to the other side when finished.
pic #2. shows the other side of the zipper being sewn along the other edge of your fabric.
pic #3. shows the finished small pouch
pic#4. shows my 22 inch zipper being the wrong size - should be 20 inches., I will cut off the end of the zipper I do not need. It is now 7:14, so shows it does not take long to make a small pouch. I would line the next one I make, to finish off the raw edges, you could also zigzag the edges to stop any fraying.
Please note the first post shows the reversed side of the bag, when you cut it out, you need to have the reverse side facing you, so you will use the blank side of your copy as your correct side of the fabric. Therefore the "s" should be just like you would print it....
The small pouch is 5 x 7 inches when finished, and very easy to fold up and put into your purse, or bag. Makes an inexpensive nice gift for a small child or friend and family. Hope you find my instructions easy to understand, and thanks for looking. Have a great weekend.
12-07-2019, 10:22 AM
#18
Super Member

Join Date: Apr 2011
Location: Texas
Posts: 5,546
So my question for this very interesting pouch is how do things stay in it if lies flat when opened? Is their a pattern/size for the "s" (bag itself)? Thanks for taking the time to make one & tell us how to do it.
12-07-2019, 12:33 PM
#19
Junior Member
Join Date: Aug 2010
Posts: 146
I make cosmetic bags for a charity---and I use fleece remnants between 2 layers of cotton. then I quilt the fabric before putting it together. Mine do not stand up---maybe someone can suggest something. Good luck!
Last edited by QuiltnNan; 12-07-2019 at 03:24 PM. Reason: shouting/all caps
12-07-2019, 02:18 PM
#20
Super Member
Join Date: Mar 2011
Location: Canada
Posts: 1,386
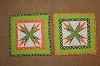
Just made another one, not finished clipping all the extra threads, pic 1 shows the bag being partially opened, and forming a tube, so you can retrieve an item from the bag.
Pic 2 shows the bag opened fully and laying flat on my cutting board nothing has fallen out.
Pic 3 shows the bag standing on its' own, with the zipper closed.
I do not have a pattern, you only need to print out the my first black and white picture and add on about a 1/8 inch, which you will trim, once you have sewn in the zipper. If you are putting on a plastic zipper, I would allow another inch or so, then sew along at the end and trim off any extra on the zipper.
I hope this helps you with your questions.

Thread
Thread Starter
Forum
Replies
Last Post
