
Organizing the Sunshine/Shadow design
 01-14-2022, 04:00 PM
#1
Junior Member
Thread Starter
Join Date: Feb 2012
Location: GA
Posts: 267
Hey Y'all,
I'm working on a quilt for my great-niece's graduation. Her mom, my niece, sent me a box of clothing + coordinating fabrics to fill in. FYI - it's mostly corduroy - which I plan to treat like denim & use a heavy needle. Any other advise for working with corduroy is welcome. Should I prewash the corduroy filler fabrics? Will a standard 1/4 SA work or should it be bumped to 3/8 or 1/2"?
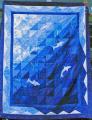
But my main question is assembly organization. I have a game plan via EQ design similar to Sunshine and Shadow. The outer areas/corners will be the filler/non-clothing fabrics and then the center area will be more scrappy via the clothing. Trying to keep lights/darks separated. (EQ design is shown.) My question is WHAT is the best way to sew these rows - one by one? How can I keep the colors/piece organized without loosing my mind? A numbering system???
I hope I'm making my question/concerns clear. =)
Thank you in advance!
Donna Mc
I'm working on a quilt for my great-niece's graduation. Her mom, my niece, sent me a box of clothing + coordinating fabrics to fill in. FYI - it's mostly corduroy - which I plan to treat like denim & use a heavy needle. Any other advise for working with corduroy is welcome. Should I prewash the corduroy filler fabrics? Will a standard 1/4 SA work or should it be bumped to 3/8 or 1/2"?
But my main question is assembly organization. I have a game plan via EQ design similar to Sunshine and Shadow. The outer areas/corners will be the filler/non-clothing fabrics and then the center area will be more scrappy via the clothing. Trying to keep lights/darks separated. (EQ design is shown.) My question is WHAT is the best way to sew these rows - one by one? How can I keep the colors/piece organized without loosing my mind? A numbering system???
I hope I'm making my question/concerns clear. =)
Thank you in advance!
Donna Mc
 01-14-2022, 04:37 PM
#2
Senior Member
Join Date: Aug 2020
Posts: 469
Big challenge you've taken on! Good for you! It's always good to stretch yourself...
I would lay out all the rows and then stitch one by one - take a picture of the actual fabrics as they are laid out, - it will be very helpful. Hopefully you have room to lay it out?
I am making this quilt:
Over & Down Under Quilt Pattern by All Through the Night - Craft Warehouse
and it is very important to keep on track. So far I have five rows sewn and pieced to each other, but I still spend a lot of time checking each piece to make sure it's the right one....
01-14-2022, 07:32 PM
#3
Senior Member
Join Date: Jun 2021
Location: British Columbia
Posts: 930
I think Elaine is probably right, but when I did an Around the World quilt, I actually used a small cutting mat (about 12"x18") I had and carried blocks of blocks over to the machine and pieced it that way. I don't remember the specifics but I think the larger blocks I ended up sewing together were grids of about 4x3 or 5x4 blocks (individual pieces). I haven't looked at it in years (it was an early project and is still just a quilt top in a box somewhere) but I seem to remember everything ended up in order. :-)
01-14-2022, 07:38 PM
#4
Power Poster
Join Date: Jul 2013
Location: Houston, TX
Posts: 10,737
I agree with using a camera to help you keep things straight. I always take lots of pics of my blocks when i'm assembling them. For me, it easier than a numbering system.
Working with corduroy. That's always a challenge. First be aware that corduroy has nap that will look different when it runs different ways. This may or may not matter to you. I've never pieced with corduroy and have no idea what seam allowance will work. I can tell you that it pills a lot and you'll probably have to clean at least the bobbin area of the machine more than you usually would.
Working with corduroy. That's always a challenge. First be aware that corduroy has nap that will look different when it runs different ways. This may or may not matter to you. I've never pieced with corduroy and have no idea what seam allowance will work. I can tell you that it pills a lot and you'll probably have to clean at least the bobbin area of the machine more than you usually would.
01-15-2022, 04:36 AM
#5
Super Member
Join Date: Aug 2009
Location: Illinois
Posts: 1,866
I made a throw from recycled corduroy slacks. As Cash's Mom reminded us, corduroy has a nap so you may want to keep that in mind when laying this out. I just checked and I used 1/4" seams. It has not been a problem. Since this was recycled corduroy, perhaps it became more sturdy with the repeated laundry but I've had no problem with it fraying, etc. Yes, I believe I would launder that, if nothing else than to get rid of some of the linting if any,
I machine quilted in the ditch so the nap would stay fluffed and then tied in the center of the block. I remember tying that one with black thread--took it out as it looked like giant spiders!
This throw has a batt and flannel backing. Wonderful when my feet get cold in bed on a winter's night!
I machine quilted in the ditch so the nap would stay fluffed and then tied in the center of the block. I remember tying that one with black thread--took it out as it looked like giant spiders!
This throw has a batt and flannel backing. Wonderful when my feet get cold in bed on a winter's night!
01-15-2022, 07:16 AM
#6
Super Member
Join Date: Aug 2018
Location: Peoria, IL -- Midwest Transplant
Posts: 7,314
I don't have pictures but decades ago I made a Trip around the World from light weight corduroy, back then it was called pin wale or baby wale and I used 3 each printed and solid corduroys. I decided to keep the nap all the same direction and put in a pin the correct direction. They came out but it helped... Sewing with the corduroy was not a problem, but I was using half inch seams. Don't think I needed them but that's how I did it. It was very heavy but it was for a heavy winter quilt. Backed it with a coffee brown chocolate satin sheet on one side. I saw it maybe 30 years after I made it?? It was still looking good 
For organization, many people find that they can stack each row or column as laid out. Take a long heavy thread and big needle, double thrad and knot it with a big knot at the bottom. Starting at one end (people usually start at the bottom and go up), slip each piece in order on the thread, when you get to the top one, knot off the row, label it and do the next one. When you sew, you just take them off the thread one by one, attaching them as you go. Chain sewing will keep them in order for the next step. Some people are better at this than others, I need labels for each row.
For me, typically I label each block which doesn't work so well on something like your project, but I think the thread technique would do great. From long habit I label my blocks alpha across and numbers down, So A-1 connects to A-2, and when that row is done it, A row connects to B row. It doesn't happen often, but if there is ever a K-9 block, I use dog (canine) fabric.
 01-15-2022, 08:01 AM
#7
Junior Member
Join Date: Feb 2021
Location: My own private Idaho
Posts: 182
For me, typically I label each block which doesn't work so well on something like your project, but I think the thread technique would do great. From long habit I label my blocks alpha across and numbers down, So A-1 connects to A-2, and when that row is done it, A row connects to B row. It doesn't happen often, but if there is ever a K-9 block, I use dog (canine) fabric.
Happy sewing!
01-15-2022, 08:14 AM
#8
Super Member
Join Date: Aug 2018
Location: Peoria, IL -- Midwest Transplant
Posts: 7,314
Unfortunately, I have a rather small house with no available floor or wall space for layout. My biggest space for layout has been my queen sized bed so it gives me certain challenges...
When I label my blocks, I fold a sheet of typing paper into the same number of rows and columns as the quilt, or roughly 1" square. I write out the grid on the paper before cutting off each row as I go and putting them on the blocks with small safety pins.
I position the label in the upper left corner of the block so that I get the proper orientation. It is amazing to me how often I could take a block off a design wall or pieces laid out right next to me at the sewing machine and sew the wrong side!
I have a project ahead of me that is long planned and coming closer to happening. I will be buying a set of nice smaller brass safety pins. I have Alpha/Number beads -- the type you use for friendship bracelets. I have a nice divided craft storage box (like with divisions for floss or little things) I need to get some of those jeweler circle/loop things. And then I'll make reusable numbered sets. It seems like a lot of work organizing but not really, the sets will be kept together but you need them together anyway to use them, and they can come off together when you are done.
01-15-2022, 08:54 AM
#9
Member
Join Date: Dec 2018
Location: central Kentucky
Posts: 39
You might try the webbing method to sew your blocks together. Lay out your quilt then, chain piecing, sew blocks 1 and 2 together for each row. Do not cut them apart! Stack the blocks in column 3 with first row (row A) block on top. Do the same for each column. Sew block A3 to A2, block B3 to B2, etc down the column. Don't cut anything apart. Do the same for each column. When you're done, the whole quilt will be webbed together. Then sew row A to row B, etc., nesting seams, still without cutting any connections. Hope this makes sense!
01-15-2022, 10:59 AM
#10
Super Member
Join Date: Apr 2018
Location: NW MN lake country
Posts: 3,800
Do you have enough fabric to make strip sets? If you do, I hope this explanation makes sense to you. The center horizontal and vertical row would have to be individually pieced, but the remaining four corner sections could be made by cutting segments of fabric from the strip sets that have been sewn into a continuous tube like you do when you make a bargello design. Even short strip sets that yield only a few cuts would work. This would keep your colors in order and you'd be sewing larger pieces together rather than all those small squares. Clear as mud? If this sounds workable to you and I can help explain it better, let me know and I'll try and help any way I can. Regarding corduroy, it frays badly even from handling and since it is a looser weave, the seams can easily pull out, so I'd recommend larger (1/2") seams, especially if the item will be washed. Good luck.
