
Please help newbie salvage quilt top. Thanks!!
 10-29-2014, 06:35 AM
#41
Super Member
Thread Starter
Join Date: Sep 2014
Location: Victorian Sweatshop Forum
Posts: 1,271
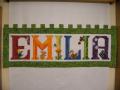
Here's the top, all redone. I love it!! I'm pinning it after this posts. I'll put up pics when it's quilted. I'm going to FMQ with light blue thread. (Funny, originally I was going to stagger the rectangles then I changed my mind. I should have stuck to the plan!)
.
.
 10-29-2014, 06:45 AM
#42
Super Member
Join Date: Sep 2011
Location: Illinois
Posts: 5,621
 10-29-2014, 07:25 AM
#45
Power Poster
Join Date: Mar 2013
Location: Corpus Christi, Tx.
Posts: 16,105
I believe the only part that is throwing you off and an easy fix is the last beige strip between the blue and floral. I would rip that last strip and trim the beige ever so slightly, reattach. That should bring everything into place. Don't trim the blue. It's just that little beige strip. Am looking at it again and I would lay it on a flat surface and see what is out of kilter. May be your outer strips need to be flipped/alternated. It's just a little our of kilter. Cute quilt. When line them up I would use pins.
10-29-2014, 08:36 AM
#47
Super Member

Join Date: Jul 2010
Location: canterbury uk
Posts: 1,036
Brilliant looks amazing well done x
 10-29-2014, 10:57 AM
#49
Senior Member
Join Date: Mar 2010
Location: Pueblo, Co
Posts: 663
If it really bothers you. it can be fixed. The whole quilt doesn't have to be taken apart. I do see that on the left side that horizontal row is a little higher than the row next to it. On the right, it's lower. Measure the small sashing strips in each row. If all measure the same, then half of the problem is solved. Remove the stitches on the left side of first sashing, from the bottom to a 1/4 above the rose print block. Using your ruler, make a mark on the back side of the sashing using the second rose print block as a guide to line it up. Continue for each square.
Do the same in reverse to other side. When sewing rows always sew one row from the top down and the next row from bottom to the top. I hope I have explained this clearly. I really like your quilt, it is very pretty.
Do the same in reverse to other side. When sewing rows always sew one row from the top down and the next row from bottom to the top. I hope I have explained this clearly. I really like your quilt, it is very pretty.
10-29-2014, 11:29 AM
#50
Power Poster
Join Date: Feb 2011
Location: Lowell, MA
Posts: 14,083
To be honest, it looks like you planned for staggered strips. Just go with it, quilt it and I seriously doubt anyone will notice. I like the pattern, you should be proud of your design. Don't beat yourself up, I was cutting strips for a family reunion quilt, and when I started to do the piecing, I hadn't cut them wide enough, so I just clipped them together, and I'll use them in another quilt. I didn't have enough of the background fabric in any case, so the white backgrounds were different fabrics and nobody noticed, besides it was a scrappy quilt to begin with.

Thread
Thread Starter
Forum
Replies
Last Post
