
Suggestions for these corners?


 01-25-2018, 06:17 PM
#34
Super Member
Join Date: Mar 2011
Location: Pratt Kansas
Posts: 1,222
If you want the corners to end with a single on point square-the same as the rest of the border:
On the sides, you have the correct number of on point squares, but you need to begin & end with a half of a block (HST on point)
On the top & bottom, increase your on point squares by one, and then on the ends, at a right angle to the last square, add the other half square.
If you don't like splitting the square:
Increase the sides by one on point square, and add a small white border to bring the center unit up to the correct width. On the top and bottom, increase by one on point square, but you'll have to reduce the width of the white next to the center.
01-25-2018, 09:17 PM
#37
Super Member
Join Date: Dec 2010
Location: Dallas area, Texas, USA
Posts: 3,050
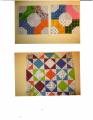
I was trying to visualize GEMRM's idea of putting the diamonds in the corners, and this is my crude rendition, but I like the effect, and the simplicity of the change would be a big advantage.
01-26-2018, 05:51 AM
#40
Power Poster
Join Date: May 2009
Location: NY
Posts: 10,590
Jillmc, So glad I could help. Your redo looks great. I hadn't considered making the square a 4P but it looks perfect and didn't seem to require too much unsewing. Additionally it didn't use any more of the light value fabric you indicated you didn't have much of.
Can't wait to see how you finish. You have inspired me to move my feathered star quilt up the bucket list! Want to finish several WIP first. I am determined to get some long term projects buttoned up before starting something new.
Can't wait to see how you finish. You have inspired me to move my feathered star quilt up the bucket list! Want to finish several WIP first. I am determined to get some long term projects buttoned up before starting something new.

Thread
Thread Starter
Forum
Replies
Last Post
AngieS
Links and Resources
11
10-07-2011 04:58 PM
AngieS
General Chit-Chat (non-quilting talk)
17
06-15-2011 04:09 AM
reneebobby
Links and Resources
16
04-13-2010 09:20 AM
