
Border near disaster
 10-31-2019, 05:00 AM
#11
Power Poster
Join Date: May 2008
Location: MN
Posts: 24,476
You did not say - is the border too long for the side - or is the side too long for the border?
Either way, if one eases in an inch over a long span, it would be fairly inconspicuous. Then you could attempt to shrink the longer span to be "smooth" with the shorter span.
I would fold both components into eighths, then match those points, and then sew the pieces back together, easing in the fullness. Most machines feed the bottom layer a bit "faster" than the top layer, so the "longer" piece should be on the bottom.
 10-31-2019, 05:38 AM
#12
Super Member
Thread Starter
Join Date: Apr 2010
Location: Northeastern Indiana
Posts: 2,800
Wowser, such good suggestions. Some of the measurements of the offending border are a little off. That neutral square in the border is supposed to be one inch, and some are not. I must have made that section first when I was not measuring. I thought I had reworked everything. But I found a section in the middle that was a little off. I don't know who said this...maybe bear, all these off's add up. When you make the strips it is easy to control the between length, but then when you sew the strips together there is another adjustment.
I have not measured the center.
I have not measured the center.
10-31-2019, 05:48 AM
#13
Power Poster
Join Date: May 2008
Location: MN
Posts: 24,476
The more pieces involved, the more "opportunities" for getting off.
Even 1/64th of an inch variance of seam depth - over eight seams (1/64 x 16 ) is 1/2 inch. ((the 16 - one loses (or gains) from both pieces of fabric that were sewn together))
So - taking the few minutes to do the three strip test - using the ruler, fabrics, thread, and machine you plan to use - to make sure that one's cutting and sewing are producing the expected result is worth the time (and bother)
10-31-2019, 08:58 AM
#14
Super Member
Join Date: Jul 2010
Location: Flagstaff, Arizona
Posts: 9,475
So sorry this is happening to you. I have watched your progress on this quilt and it is so beautiful. What about starting with each corner with the twine border and in the center of each border add a plain piece of white fabric. Just a thought but I think you are doing wonderful work.
 11-01-2019, 02:41 AM
#18
Super Member
Join Date: Aug 2009
Location: Illinois
Posts: 1,809
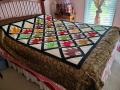
Is it just the angle of the photo or is there something with the top row of white triangles in that strip? The border at the top makes it look like the angles are sharp but the bottom border looks like one leg is longer than the other and you don't have the same triangle as the one above. Like I said, may be the picture but noticed that and wondering if that's what's throwing you a curve.
11-01-2019, 05:22 AM
#19
Senior Member
Join Date: Jan 2010
Location: Rustburg, VA
Posts: 613
11-01-2019, 05:33 AM
#20
Super Member
Thread Starter
Join Date: Apr 2010
Location: Northeastern Indiana
Posts: 2,800
Have worked most of yesterday and last night...no baseball game to distract me. I took it down to an Amish lady, a well known piecer. Came to the conclusion that the whole thing is wrong, and I totally agree.
When anyone tries this border, each seam must be pressed and measured. And Bear is right, each 1/64th adds up to way too much over the course of the 13 or 15 units that it takes. I am having to change needle settings depending on which seam I'm on.
But I am determined to get it right. Stay tuned. Marcia

Thread
Thread Starter
Forum
Replies
Last Post
