
Colorado get-together?
 03-09-2020, 09:13 AM
#161
Super Member

Join Date: Mar 2015
Location: Denver, CO
Posts: 4,348
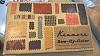
She also brought a complete Kenmore Sew By Color box. It contains several common accessories that are color coded, making the use of each item easy to match with the corresponding color coded set of instructions.

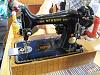
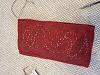
Lastly, Dianne brought a Dexter hand operated sewing device. It makes a chain stitch. The operator needs to feed or pull the fabric as it sews, since it doesn't have feed dogs. It also has a thread cutter which brings the thread to the bottom to lock the stitch. She also has the instructions and plastic case that the Dexter came in.

to be continued ...


Lastly, Dianne brought a Dexter hand operated sewing device. It makes a chain stitch. The operator needs to feed or pull the fabric as it sews, since it doesn't have feed dogs. It also has a thread cutter which brings the thread to the bottom to lock the stitch. She also has the instructions and plastic case that the Dexter came in.


to be continued ...
 03-09-2020, 09:22 AM
#162
Super Member
Join Date: Mar 2015
Location: Denver, CO
Posts: 4,348
Courtney told us about being called by a local woman who collects sewing machines, inviting him to take a look at some that she had. She had a Pheasant model 27 and an inlaid model 12, both of which interested Courtney. He brought pictures of both machines to show us on his tablet.

Courtney also showed us a picture from his phone of his Kenmore 158-xx in a neat MCM cabinet.

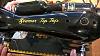
James brought a Sewmor machine that he recently acquired. It's a nice shiny black with decals that are also in very good shape. It came in an imitation alligator skin case. The machine operates fine mechanically, but needs to have some of the wiring replaced, as the insulation has become brittle and cracked, exposing the wires.
In between the show-and-tell, the group discussed spray basting vs. pin basting. People had a variety of opinions and experiences to share about this. There are varying preferences.
It was a beautiful Colorado day, being 52 degrees as we walked in the door to Perkins and in the 60s by the time we left, with blue skies and sunshine.
We will meet again next month and will post those meeting notes here. Thank you to all who read about our get togethers.


Courtney also showed us a picture from his phone of his Kenmore 158-xx in a neat MCM cabinet.

James brought a Sewmor machine that he recently acquired. It's a nice shiny black with decals that are also in very good shape. It came in an imitation alligator skin case. The machine operates fine mechanically, but needs to have some of the wiring replaced, as the insulation has become brittle and cracked, exposing the wires.


In between the show-and-tell, the group discussed spray basting vs. pin basting. People had a variety of opinions and experiences to share about this. There are varying preferences.
It was a beautiful Colorado day, being 52 degrees as we walked in the door to Perkins and in the 60s by the time we left, with blue skies and sunshine.
We will meet again next month and will post those meeting notes here. Thank you to all who read about our get togethers.
04-06-2020, 06:20 AM
#163
Super Member
Join Date: Mar 2015
Location: Denver, CO
Posts: 4,348
It's Saturday, the first one of the month when we normally have our Colorado get together. But everything is different this month. Perkins is closed, as part of the non-essential business closures here. If it were open, everyone would be doing social-distancing. And if not for the distancing, how do you eat pancakes through a mask? It can't be done. We might have even used this as an excuse to avoid a terrible spring snowstorm. But it's expected to be a gorgeous sixty-degree day here.
So we're doing something different and creative with the beautiful day. Several days ago, we emailed our members with the thought that it might be an opportunity to have a virtual get-together, with people remotely contributing descriptions and pictures of what they've been working on. It allows people to stay home in comfort and safety. It also allows participation by people who have been unable to physically attend for one reason or another. But we will miss actually seeing people and we look forward to times when our normal meetings may resume.
The idea was well received and despite our temporary new format, this get-together is well attended. We have people from near and far. We have people that have never attended before. So let the virtual meeting come to order and begin!
Leon
Leon, from Kansas, sent this email.
How fun. Count this Kansan in.
Seb
Seb, our newest member and longest distance attendee is from France. We want to warmly welcome him.
In Seb's own words:
I hope you're well and safe!
I read your post about making a virtual Get-Together and I thought I would like to contribute if I may and if I'm not too late.
I've chosen a Singer 191B, while it is a very common machine here, I don't think it is very common on your side of the Atlantic.
The 191B is nothing special, it is merely an evolution of the class 15. It has the vertical oscillating hook but the tension system is facing the operator and there is a variation on the take-up lever. The feed dogs drop when you turn the knob on the botton spool pin. Other than that, like the later 15s it has the reverse stitch. Unlike the 15s there is a plastic part on the hook assembly (see picture).
The one I'm sending you the pictures of is an early model, probably from the early 60s (red S logo). It was made in the French factory of Bonnières-sur-Seine so the dating is impossible since the records were lost.
There are some subsequent later models of the 191B with an oblong stitch length selector and a painted faceplate instead of the chrome striated one.
The early models like mine are to be found in tan or black with the eye and trapezoid decals.
That's it for the 191B.
A bient�t!
Seb
Pictures that Seb sent are shown below:
Paula
Paula, located some distance south of Denver, is working on a new bag and sent a picture. Paula explained:
It's a pattern called Boardwalk Bucket. I'll be sewing on my Juki. I'm still in my tiny little sewing room with no space. I'm hoping to get it done this weekend.
The picture, with her helper, is shown below:
Carol
Carol attended our virtual get-together and offered this:
My daughter's birthday is next week. She has taken up beading so I am making this needle book for her. Also some dryer balls but I think everyone knows what those look like. I plan to put a lot of French knots on this.
Carol
Carol's picture is below:
Dorothy
Dorothy, who is the only sewing professional of our group, wrote:
Hello!
This sounds like a deal! I am remoting to work as I can. I do go in when needed. We maintain a 6' difference at all times.
I have been interested in showing an early design system so I will take photos and have a brief description. I look forward to input from All!
I will be sewing masks custom for my daughter who is used to having custom items. The fit of the masks had the following commentary (Right after praising the fact that people were ready to jump in and sew!)
Elastic behind the ears caused pain PDQ - I mentioned I would be happy to sew buttons onto caps/ headbands for anyone who wants. Ties are wearable. The overall height of the mask matters as hers kept moving up as she looked down at her work with the top edge coming above her eyes.
Regarding the fabric for face masks, there was a report from a test lab that was fantastic! They did a comparison study of different fabrics against the N95? Masks versus being able to breath. You can get fabric combination to equal the masks, but people did not last as the breathing was difficult. Their compromise was cotton knit (heavy T shirt?) gave over 50% of the N95 with user comfort.
If you need to make a face filter and do not have access to the high tech materials - the best is a blend of pillow case material and heavy cotton T shirts. There is another report that comes to the same basic conclusion. It is the happy medium between actually having enough layers that it does filter as well as an N95, but you can't breath through it vs You can breath but it filters so very little.
Later Dorothy wrote:
As with Many people, direction has changed to Sewing for Covid19. The drafting system I was going to highlight is the sleeve form which is on my wall full time. There is much more in the system, under sleeve, front bodice inner & outer plus a back bodice inner & outer.
I have taken down my work from home office and will see how many masks I can complete today/ tomorrow. A finished mask is in the center with a sample of buckram trialed for the nose piece. Buckram, wet, shaped & dried will hold form. I believe I regret pitching coffee bags with The wire closure as it is excellent...
The masks have an opening for an additional filter layer. My daughter works as a CNA and was issued cloth masks at her last shift which caused opinions- elastic behind ears hurts and the one with ties was too long in the face, pushing up from her chin covering her eyes. I modified a pattern for her and will be making for friends & family now there is a decree for everybody to wear them.
Stay Safe and Healthy!
Dorothy
Dorothy's pictures are shown here:

Dianne
Dianne, from south of Denver, shared what she's been doing.
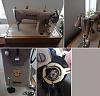
An interesting toy sewing machine set arrived on the day of our March meeting. This is a "Baby Brother" from the 1950s. It is a sturdily-constructed, all metal little machine about 8" wide and 6" tall. The clamp is shaped to fit over the raised rounded section of the machine's base and is padded to prevent scoring the paint. This detail is indicative of the care which was used when designing this toy. Included, besides the clamp, are an instruction booklet, several tiny (3/4" tall) spools of thread, a Brother labeled needle packet HDX1, and the carrying case. Altogether the set in remarkably nice condition except for some staining and lax elastic inside the case.
This machine sews nicely using the hand crank, but is also equipped with a battery-driven motor. Sadly, that doesn't seem functional at this point. The tiny motor uses two batteries which are located in a relatively primitive looking section of the base. After several attempts at getting it to work, without knowing whether the problem was in the battery area, the wiring, the round knob on front which turns the motor on and off, or the motor itself, we gave up.
Other than that, I have found that my trusty Singer 15-91 is happy to free-motion quilt with the feed dogs left in the normal position by putting the stitch length at neutral and using a good darning foot. I've done this with other machines with fairly good results, but years ago and had neglected to attempt it on this machine. The 15-91 accomplishes this stitching very nicely.
Dianne

==== to be continued...
So we're doing something different and creative with the beautiful day. Several days ago, we emailed our members with the thought that it might be an opportunity to have a virtual get-together, with people remotely contributing descriptions and pictures of what they've been working on. It allows people to stay home in comfort and safety. It also allows participation by people who have been unable to physically attend for one reason or another. But we will miss actually seeing people and we look forward to times when our normal meetings may resume.
The idea was well received and despite our temporary new format, this get-together is well attended. We have people from near and far. We have people that have never attended before. So let the virtual meeting come to order and begin!
Leon
Leon, from Kansas, sent this email.
How fun. Count this Kansan in.
Seb
Seb, our newest member and longest distance attendee is from France. We want to warmly welcome him.
In Seb's own words:
I hope you're well and safe!
I read your post about making a virtual Get-Together and I thought I would like to contribute if I may and if I'm not too late.
I've chosen a Singer 191B, while it is a very common machine here, I don't think it is very common on your side of the Atlantic.
The 191B is nothing special, it is merely an evolution of the class 15. It has the vertical oscillating hook but the tension system is facing the operator and there is a variation on the take-up lever. The feed dogs drop when you turn the knob on the botton spool pin. Other than that, like the later 15s it has the reverse stitch. Unlike the 15s there is a plastic part on the hook assembly (see picture).
The one I'm sending you the pictures of is an early model, probably from the early 60s (red S logo). It was made in the French factory of Bonnières-sur-Seine so the dating is impossible since the records were lost.
There are some subsequent later models of the 191B with an oblong stitch length selector and a painted faceplate instead of the chrome striated one.
The early models like mine are to be found in tan or black with the eye and trapezoid decals.
That's it for the 191B.
A bient�t!
Seb
Pictures that Seb sent are shown below:

Paula
Paula, located some distance south of Denver, is working on a new bag and sent a picture. Paula explained:
It's a pattern called Boardwalk Bucket. I'll be sewing on my Juki. I'm still in my tiny little sewing room with no space. I'm hoping to get it done this weekend.
The picture, with her helper, is shown below:

Carol
Carol attended our virtual get-together and offered this:
My daughter's birthday is next week. She has taken up beading so I am making this needle book for her. Also some dryer balls but I think everyone knows what those look like. I plan to put a lot of French knots on this.
Carol
Carol's picture is below:

Dorothy
Dorothy, who is the only sewing professional of our group, wrote:
Hello!
This sounds like a deal! I am remoting to work as I can. I do go in when needed. We maintain a 6' difference at all times.
I have been interested in showing an early design system so I will take photos and have a brief description. I look forward to input from All!
I will be sewing masks custom for my daughter who is used to having custom items. The fit of the masks had the following commentary (Right after praising the fact that people were ready to jump in and sew!)
Elastic behind the ears caused pain PDQ - I mentioned I would be happy to sew buttons onto caps/ headbands for anyone who wants. Ties are wearable. The overall height of the mask matters as hers kept moving up as she looked down at her work with the top edge coming above her eyes.
Regarding the fabric for face masks, there was a report from a test lab that was fantastic! They did a comparison study of different fabrics against the N95? Masks versus being able to breath. You can get fabric combination to equal the masks, but people did not last as the breathing was difficult. Their compromise was cotton knit (heavy T shirt?) gave over 50% of the N95 with user comfort.
If you need to make a face filter and do not have access to the high tech materials - the best is a blend of pillow case material and heavy cotton T shirts. There is another report that comes to the same basic conclusion. It is the happy medium between actually having enough layers that it does filter as well as an N95, but you can't breath through it vs You can breath but it filters so very little.
Later Dorothy wrote:
As with Many people, direction has changed to Sewing for Covid19. The drafting system I was going to highlight is the sleeve form which is on my wall full time. There is much more in the system, under sleeve, front bodice inner & outer plus a back bodice inner & outer.
I have taken down my work from home office and will see how many masks I can complete today/ tomorrow. A finished mask is in the center with a sample of buckram trialed for the nose piece. Buckram, wet, shaped & dried will hold form. I believe I regret pitching coffee bags with The wire closure as it is excellent...
The masks have an opening for an additional filter layer. My daughter works as a CNA and was issued cloth masks at her last shift which caused opinions- elastic behind ears hurts and the one with ties was too long in the face, pushing up from her chin covering her eyes. I modified a pattern for her and will be making for friends & family now there is a decree for everybody to wear them.
Stay Safe and Healthy!
Dorothy
Dorothy's pictures are shown here:

Dianne
Dianne, from south of Denver, shared what she's been doing.
An interesting toy sewing machine set arrived on the day of our March meeting. This is a "Baby Brother" from the 1950s. It is a sturdily-constructed, all metal little machine about 8" wide and 6" tall. The clamp is shaped to fit over the raised rounded section of the machine's base and is padded to prevent scoring the paint. This detail is indicative of the care which was used when designing this toy. Included, besides the clamp, are an instruction booklet, several tiny (3/4" tall) spools of thread, a Brother labeled needle packet HDX1, and the carrying case. Altogether the set in remarkably nice condition except for some staining and lax elastic inside the case.
This machine sews nicely using the hand crank, but is also equipped with a battery-driven motor. Sadly, that doesn't seem functional at this point. The tiny motor uses two batteries which are located in a relatively primitive looking section of the base. After several attempts at getting it to work, without knowing whether the problem was in the battery area, the wiring, the round knob on front which turns the motor on and off, or the motor itself, we gave up.
Other than that, I have found that my trusty Singer 15-91 is happy to free-motion quilt with the feed dogs left in the normal position by putting the stitch length at neutral and using a good darning foot. I've done this with other machines with fairly good results, but years ago and had neglected to attempt it on this machine. The 15-91 accomplishes this stitching very nicely.
Dianne

==== to be continued...
04-06-2020, 06:48 AM
#164
Super Member
Join Date: Mar 2015
Location: Denver, CO
Posts: 4,348
Courtney
Courtney, from the northern part of Colorado, wrote:
Dear All,
I think I have mentioned that each year my local library has a mini quilt show. This year it has been postponed but I think it will soon be canceled. I went ahead and completed my two quilts anyway. At least I will have entries ready for next year. I am calling one quilt "Crayola 4x4x4" and the other "Milk and Quackers."
I know we generally discuss vintage machines but recently I was given a couple sewing tables inserts. They were not cut for any of my machines but with a bit of modifications I have made one to fit my Bernina 125. I am going to use it as a platform. Instead of using legs, I made three L shaped supports that hold the plastic quite securely. I am planning on modifying the second for my Brother 1500.
A couple of months ago I purchased an unopened Quilter's Cruise control for about $30. (A good deal because the retail price was still on the box $599.99) So I have taken this time to think about how I might use it. I have decided to built a quilt frame.
It will be a cross between a regular carriage frame and a Flinn type frame. I have a 6 foot folding table that I will use to hold everything. I have made the carriage system using the wheels from a child's set of roller blades. The carriages seem to be working quite well. I also have the Flinn type frame made up and it seems to be doing okay. I still have to mount the sensors for the carriage motion and build the supports for the frame. I should know how it works by next month.
Stay well!
Courtney
Courtney's pictures are shown below:
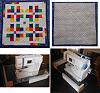
"Crayola 4x4x4" front and back, Bernina 125 machine
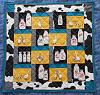
"Milk and Quackers"
Cheryl & Chris
Cheryl and Chris, who live north of Denver, have been working on masks to protect from the Coronavirus. Chris modeled one of them for us.
Cheryl wrote:
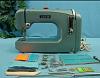
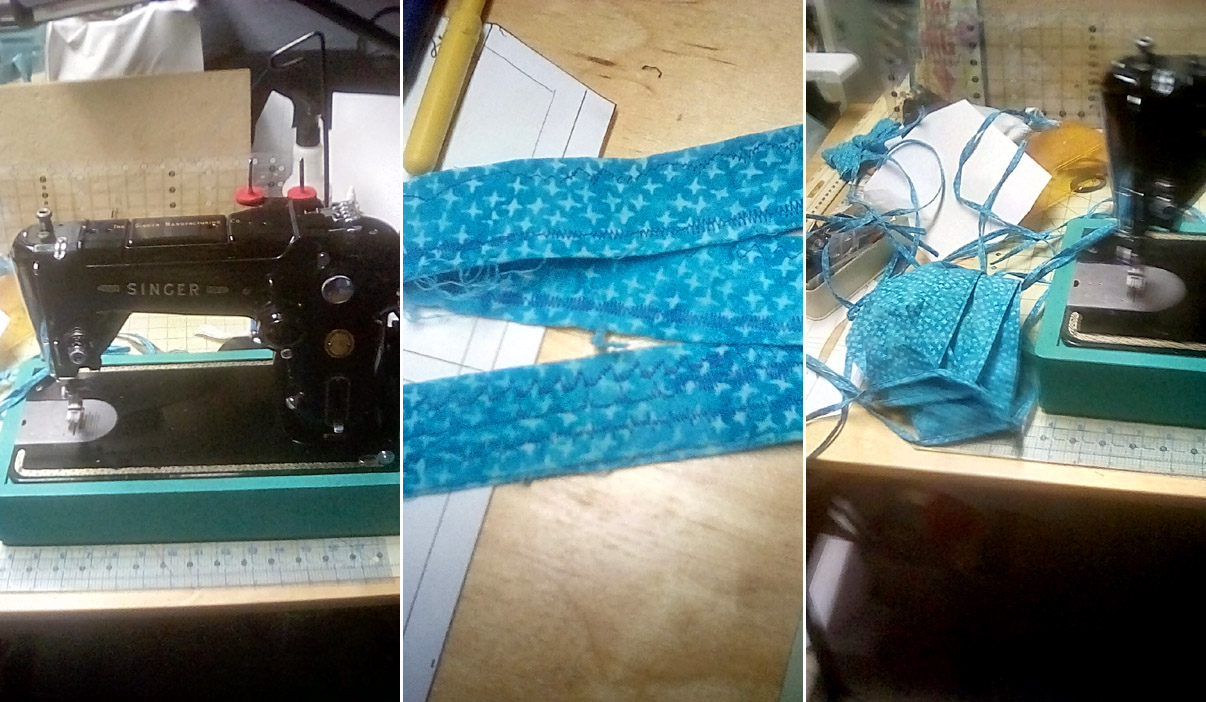
I've been working on masks. These have a pocket for a filter if someone wants to put one in. I switched from elastic to ties since ties are more adjustable. I'm using my Singer 15-91.

Janey & John
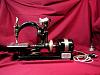
This virtual get-together gave us an opportunity and a reason to take a picture of Janey's latest machine. It's a Willcox & Gibbs, which she got from Courtney of our group. He has more than one of them, thinking highly of their design and operation. He does some of his quilting work with them.
Janey and John:
It is a chain stitch machine, with a motor added. Among its other features, it can do a very short stitch length. They made a special bottom plate, which the relatively small machine bolts to. The motor is attached to the plate as well, with a direct drive to turn the hand wheel, not unlike how many handcranks drive a machine. With no reduction, that a pulley and belt might provide, the needle goes a little faster than one might expect.
===== to be continued...
Courtney, from the northern part of Colorado, wrote:
Dear All,
I think I have mentioned that each year my local library has a mini quilt show. This year it has been postponed but I think it will soon be canceled. I went ahead and completed my two quilts anyway. At least I will have entries ready for next year. I am calling one quilt "Crayola 4x4x4" and the other "Milk and Quackers."
I know we generally discuss vintage machines but recently I was given a couple sewing tables inserts. They were not cut for any of my machines but with a bit of modifications I have made one to fit my Bernina 125. I am going to use it as a platform. Instead of using legs, I made three L shaped supports that hold the plastic quite securely. I am planning on modifying the second for my Brother 1500.
A couple of months ago I purchased an unopened Quilter's Cruise control for about $30. (A good deal because the retail price was still on the box $599.99) So I have taken this time to think about how I might use it. I have decided to built a quilt frame.
It will be a cross between a regular carriage frame and a Flinn type frame. I have a 6 foot folding table that I will use to hold everything. I have made the carriage system using the wheels from a child's set of roller blades. The carriages seem to be working quite well. I also have the Flinn type frame made up and it seems to be doing okay. I still have to mount the sensors for the carriage motion and build the supports for the frame. I should know how it works by next month.
Stay well!
Courtney
Courtney's pictures are shown below:

"Crayola 4x4x4" front and back, Bernina 125 machine

"Milk and Quackers"
Cheryl & Chris
Cheryl and Chris, who live north of Denver, have been working on masks to protect from the Coronavirus. Chris modeled one of them for us.
Cheryl wrote:
I've been working on masks. These have a pocket for a filter if someone wants to put one in. I switched from elastic to ties since ties are more adjustable. I'm using my Singer 15-91.

Janey & John
This virtual get-together gave us an opportunity and a reason to take a picture of Janey's latest machine. It's a Willcox & Gibbs, which she got from Courtney of our group. He has more than one of them, thinking highly of their design and operation. He does some of his quilting work with them.
Janey and John:
It is a chain stitch machine, with a motor added. Among its other features, it can do a very short stitch length. They made a special bottom plate, which the relatively small machine bolts to. The motor is attached to the plate as well, with a direct drive to turn the hand wheel, not unlike how many handcranks drive a machine. With no reduction, that a pulley and belt might provide, the needle goes a little faster than one might expect.

===== to be continued...
04-06-2020, 06:55 AM
#165
Super Member
Join Date: Mar 2015
Location: Denver, CO
Posts: 4,348
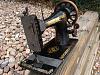
James
James shared with us a machine that he recently acquired.
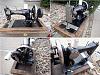
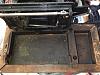
As I mentioned I won on Shopgoodwill a 1907 Singer 28 hand crank machine. It was not well packed and the hand crank broke off. The decal set is "Victorian" and the machine was made in Scotland. The decals are mostly there with most of the wear at the left of the needle. It should display nicely once I clean the old oil and grime obscuring quite a bit of the decals. The 28 is a 3/4 size machine and differs from the newer 128 in the location of the bobbin winder.
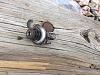
The first thing I did was to check the hand crank action. It moves well and should work very well once I fix the broken attaching bracket. The plan is to use the original JB Weld to bond the broken bits of the cast iron bracket together. I was thinking of using wax for a jig to hold the parts in place while the epoxy cured but removing the wax with heat might affect the epoxy. Instead I plan to use a oil based modeling clay that does not harden to hold the parts together during curing. For the broken thread sections I plan to take apart the hand crank and heavily grease the bolts with tri flow synthetic grease while the epoxy cures. This should allow the bolts to be unscrewed after the epoxy hardens. JB Weld will be used in 2 stages (base bracket to finger bracket then bracket to finger end gear cover). I thought of ordering a reproduction hand crank assembly and replacing the broken bracket part while keeping the rest. However from all the reproduction photos I have seen, the reproduction does not bolt into the finger end gear cover so I would not be able to use the original decals if I decide to go with just fixing the gear cover.
The side plates were mentioned as frozen. I managed to loosen up the front plate and I removed the bullet shuttle that was in backwards preventing the free movement of the hand wheel. I will use super iron out and Brasso to clean up the slide plates. With perhaps vinegar.
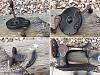
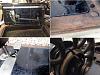
Part of the tension assembly was missing so I bought a complete tension assembly that came out of a 1906 Singer 28 that was parted out on eBay. That will be cleaned up with all the other metal parts such as the grape pattern of the faceplate and the pear shaped inspection plate.
I had someone at work print out the Elna Supermatic pulley pin extraction tool with his personal 3D printer. I still need to get the various bolts and pins that goes with it. As you can see the 3D printed pulley fits nicely in it. The 3D file with instructions for use can now be found at the groups Io Elna group although most of the old Yahoo files have not been transferred yet.
James' pictures are shown below:
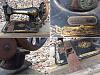
(upper left) The front of the machine, (upper right) The serial number, (lower left) The broken bracket at the machine base, (lower right) The rusty slide plate that I freed up and removed the bobbin shuttle that was in backwards.
(upper left) The hand crank side of the hand crank, (upper right) The finger side of the hand crank showing the damage to the gear cover, (lower left) Broken section that attaches to the finger end cover, (lower right) The back side of the Singer 28.

(upper left) The underside of the Singer 28, (upper right) A 3d printed Elna Supermatic pulley pin extraction tool. There are some pins and bolts that I need to add to it, (lower left) Tool with pulley in it showing the fit, (lower right) Part of the missing tension.
Replacement tension assembly taken from a 1906 Singer 28.
In Closing
None of us have ever been through anything like this. It's unprecedented and a little scary. But it is an inspiration to see people contributing materials and time to produce all of the masks required to get us through this safely. We've seen so many stories of people giving quickly and without reservation in this time of public need.
We don't know exactly what the next month will bring. But, one way or another we plan to meet and we will post our next meeting here, as always.
We wish everyone the best, to stay safe and well. See you next month!
James shared with us a machine that he recently acquired.
As I mentioned I won on Shopgoodwill a 1907 Singer 28 hand crank machine. It was not well packed and the hand crank broke off. The decal set is "Victorian" and the machine was made in Scotland. The decals are mostly there with most of the wear at the left of the needle. It should display nicely once I clean the old oil and grime obscuring quite a bit of the decals. The 28 is a 3/4 size machine and differs from the newer 128 in the location of the bobbin winder.
The first thing I did was to check the hand crank action. It moves well and should work very well once I fix the broken attaching bracket. The plan is to use the original JB Weld to bond the broken bits of the cast iron bracket together. I was thinking of using wax for a jig to hold the parts in place while the epoxy cured but removing the wax with heat might affect the epoxy. Instead I plan to use a oil based modeling clay that does not harden to hold the parts together during curing. For the broken thread sections I plan to take apart the hand crank and heavily grease the bolts with tri flow synthetic grease while the epoxy cures. This should allow the bolts to be unscrewed after the epoxy hardens. JB Weld will be used in 2 stages (base bracket to finger bracket then bracket to finger end gear cover). I thought of ordering a reproduction hand crank assembly and replacing the broken bracket part while keeping the rest. However from all the reproduction photos I have seen, the reproduction does not bolt into the finger end gear cover so I would not be able to use the original decals if I decide to go with just fixing the gear cover.
The side plates were mentioned as frozen. I managed to loosen up the front plate and I removed the bullet shuttle that was in backwards preventing the free movement of the hand wheel. I will use super iron out and Brasso to clean up the slide plates. With perhaps vinegar.
Part of the tension assembly was missing so I bought a complete tension assembly that came out of a 1906 Singer 28 that was parted out on eBay. That will be cleaned up with all the other metal parts such as the grape pattern of the faceplate and the pear shaped inspection plate.
I had someone at work print out the Elna Supermatic pulley pin extraction tool with his personal 3D printer. I still need to get the various bolts and pins that goes with it. As you can see the 3D printed pulley fits nicely in it. The 3D file with instructions for use can now be found at the groups Io Elna group although most of the old Yahoo files have not been transferred yet.
James' pictures are shown below:

(upper left) The front of the machine, (upper right) The serial number, (lower left) The broken bracket at the machine base, (lower right) The rusty slide plate that I freed up and removed the bobbin shuttle that was in backwards.

(upper left) The hand crank side of the hand crank, (upper right) The finger side of the hand crank showing the damage to the gear cover, (lower left) Broken section that attaches to the finger end cover, (lower right) The back side of the Singer 28.

(upper left) The underside of the Singer 28, (upper right) A 3d printed Elna Supermatic pulley pin extraction tool. There are some pins and bolts that I need to add to it, (lower left) Tool with pulley in it showing the fit, (lower right) Part of the missing tension.

Replacement tension assembly taken from a 1906 Singer 28.
In Closing
None of us have ever been through anything like this. It's unprecedented and a little scary. But it is an inspiration to see people contributing materials and time to produce all of the masks required to get us through this safely. We've seen so many stories of people giving quickly and without reservation in this time of public need.
We don't know exactly what the next month will bring. But, one way or another we plan to meet and we will post our next meeting here, as always.
We wish everyone the best, to stay safe and well. See you next month!
04-10-2020, 07:41 AM
#166
Super Member

Join Date: May 2016
Location: near Topeka kansas
Posts: 4,524
What I wanted to share didn't happen, but I thought I'd tell you about yesterday's VSM adventures. A Singer 301 came up on FB marketplace 4 minutes before I saw it. Decent price to I texted and later called him Thought I was going to have tan one. He said it worked. err no. It ran and the needle moved. No bobbin case or bobbin. No thanks (sigh)
But on FB 66 and 99s was guy in Texas with a 99. hmmm Iris has a daughter there that could use it. I connected the two of them and she should get it tomorrow. Then I'll wrench by remote till it is running for her. This should be fun.
But on FB 66 and 99s was guy in Texas with a 99. hmmm Iris has a daughter there that could use it. I connected the two of them and she should get it tomorrow. Then I'll wrench by remote till it is running for her. This should be fun.
Last edited by leonf; 04-10-2020 at 07:43 AM.
05-04-2020, 03:54 AM
#167
Super Member
Join Date: Mar 2015
Location: Denver, CO
Posts: 4,348
We're having our second virtual get-together during this time of social distancing. Restaurants in Colorado are not expected to re-open until later in the month of May and even then there may be some restrictions on people gathering in close groups. So, for now, we're still being safe at a distance. Several people have contributed to this month's get-together, so let's get the virtual meeting started.
Courtney
Courtney has been working on a few things that he shared. He wrote a description of each and included some pictures for all of us.
Hi everyone. Hope you are all staying safe and healthy.
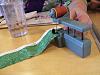
Last month I mentioned I was working on a machine quilting frame. I do have it at least up and running although it is not ready for prime time yet. I have a six foot table that allows about a five foot travel. I have made a Flinn type frame which should allow for most any width. If I have a wider quilt, I envision quilting the first 5 feet then moving the frame and sewing machine back towards the start and then continuing to the end of the quilt. This way I do not have to have a 10 or 12 foot table set up all the time.
I had a piece of Lexan that I bought at a garage sale some time ago. It was just big enough to make the two ends. For rolls I have used 1 inch square oak rods I had. I have two set I can use. One set is about 86 inches long and the second set is about 52 inches long. I drilled a hole length wise into the ends of each rod and then inserted a ¼ inch hanger bolt. For the knobs I pounded a T-nut into a short piece of wood. Right now I am using the 52 inch rods for testing.

I the set up could be run with just operator control but I have a "Quilter's Cruse Control" stitch regulator that attaches to my Singer Studio 16 sewing machine. I have included a couple of pictures. One shows the stitch regulator attached to the machine (top) and the two rotary encoders (bottom). Right now I am a bit concerned that the stitch regulator does not allow full motion of the machine but I have an I idea that I am working on. The other picture shows the sewing machine and quilting frame set up for use. Sorry the pictures are not great but I am doing all of this down in the basement,

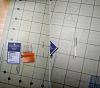
Jeannie Current a woman from Indiana who got my contact info from the local quilt shop, wrote me an email about needing a spool plate for National two spool machine. I looked around and found a couple of spool plates on eBay from other National machines that I thought would work. She bought both and they do work! I have included a before and after picture.
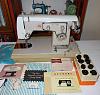
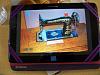
Some months ago at one of our meetings I mentioned a Kenmore model 48 machine I had purchased at a garage sale. It was in a very nice, very cute mid-century modern cabinet, pictures of which I think I have passed around at one of our meetings. I have finally gotten around to refreshing the machine. The machine is in wonderful shape and really only needed a bit of lubrication (see picture). I did replace the foot control with a modern electronic one, although it did have a good quality carbon knee controller. Because of space limitations I have put the machine in a portable case. The machine had barely been used and contains all the instruction books, cams, and accessories. One interesting thing about the machine is that all the accessories are high-shank and I can use them on my big Singer if I want. It is appropriate that I show the machine this month because it weighs 40 pounds and a picture is easier to show off than lugging the real thing to one of our breakfast meeting. Another reason it is appropriate is because it was purchased May 1, 1961. So it is exactly 59 years old this week!
Keep safe,
Courtney
Dianne
Diane sent the following:
We were actually out mineral collecting for two days this week. I'm sure we were at least 10 miles from anybody and had a great time. Here is a short report:
A curious machine sadly became "the one that got away!" In my experience, Adler is not known for making domestic machines, although their name appears on some of the post-war Japanese models. This one struck me as quite unusual and desirable. Unfortunately, someone found it even more desirable than I did, and outbid me.
It is much like a machine Courtney brought to a meeting one time, a sleek machine with both a hand crank and a motor. The controller is a knee bar. Apparently it was made of aluminum, as it was said to weigh about 12 pounds. Sigh. Note that the official name of this Adler Model 25 includes the term Featherweight.
Today a set of New Home attachments arrived. They look like they will fit my treadle, and included a shuttle (always handy to have a spare) and two small bits that I couldn't identify. Cleaning is desperately needed before they can be photographed.
I have mostly been piecing quilt tops for Firehouse Quilts, and next week will start sandwiching and quilting them.
Stay well and safe everyone.
Dianne
Leon
Leon sent a picture (from Kansas) of a machine that he is preparing for display of its internal components. He and Iris sometimes visit fairs and other gatherings to show old sewing machines. He likes old bicycles, too (the ones with big and small wheels called Penny Farthings) and sometimes even wears period clothing from the time. He says:
So the idea is to drill a few more holes and use a sabre saw and rotary files to keep this functional but let it's innards be seen as Merry Cranks go take it out to play. I've been collecting the steel sawdust with a strong magnet. Looks like the stitch length lever is getting magnetized. There are normally no holes in this area and certainly not 1/2" ones.

************* to be continued...
Courtney
Courtney has been working on a few things that he shared. He wrote a description of each and included some pictures for all of us.
Hi everyone. Hope you are all staying safe and healthy.
Last month I mentioned I was working on a machine quilting frame. I do have it at least up and running although it is not ready for prime time yet. I have a six foot table that allows about a five foot travel. I have made a Flinn type frame which should allow for most any width. If I have a wider quilt, I envision quilting the first 5 feet then moving the frame and sewing machine back towards the start and then continuing to the end of the quilt. This way I do not have to have a 10 or 12 foot table set up all the time.
I had a piece of Lexan that I bought at a garage sale some time ago. It was just big enough to make the two ends. For rolls I have used 1 inch square oak rods I had. I have two set I can use. One set is about 86 inches long and the second set is about 52 inches long. I drilled a hole length wise into the ends of each rod and then inserted a ¼ inch hanger bolt. For the knobs I pounded a T-nut into a short piece of wood. Right now I am using the 52 inch rods for testing.

I the set up could be run with just operator control but I have a "Quilter's Cruse Control" stitch regulator that attaches to my Singer Studio 16 sewing machine. I have included a couple of pictures. One shows the stitch regulator attached to the machine (top) and the two rotary encoders (bottom). Right now I am a bit concerned that the stitch regulator does not allow full motion of the machine but I have an I idea that I am working on. The other picture shows the sewing machine and quilting frame set up for use. Sorry the pictures are not great but I am doing all of this down in the basement,

Jeannie Current a woman from Indiana who got my contact info from the local quilt shop, wrote me an email about needing a spool plate for National two spool machine. I looked around and found a couple of spool plates on eBay from other National machines that I thought would work. She bought both and they do work! I have included a before and after picture.

Some months ago at one of our meetings I mentioned a Kenmore model 48 machine I had purchased at a garage sale. It was in a very nice, very cute mid-century modern cabinet, pictures of which I think I have passed around at one of our meetings. I have finally gotten around to refreshing the machine. The machine is in wonderful shape and really only needed a bit of lubrication (see picture). I did replace the foot control with a modern electronic one, although it did have a good quality carbon knee controller. Because of space limitations I have put the machine in a portable case. The machine had barely been used and contains all the instruction books, cams, and accessories. One interesting thing about the machine is that all the accessories are high-shank and I can use them on my big Singer if I want. It is appropriate that I show the machine this month because it weighs 40 pounds and a picture is easier to show off than lugging the real thing to one of our breakfast meeting. Another reason it is appropriate is because it was purchased May 1, 1961. So it is exactly 59 years old this week!
Keep safe,
Courtney
Dianne
Diane sent the following:
We were actually out mineral collecting for two days this week. I'm sure we were at least 10 miles from anybody and had a great time. Here is a short report:
A curious machine sadly became "the one that got away!" In my experience, Adler is not known for making domestic machines, although their name appears on some of the post-war Japanese models. This one struck me as quite unusual and desirable. Unfortunately, someone found it even more desirable than I did, and outbid me.

It is much like a machine Courtney brought to a meeting one time, a sleek machine with both a hand crank and a motor. The controller is a knee bar. Apparently it was made of aluminum, as it was said to weigh about 12 pounds. Sigh. Note that the official name of this Adler Model 25 includes the term Featherweight.
Today a set of New Home attachments arrived. They look like they will fit my treadle, and included a shuttle (always handy to have a spare) and two small bits that I couldn't identify. Cleaning is desperately needed before they can be photographed.
I have mostly been piecing quilt tops for Firehouse Quilts, and next week will start sandwiching and quilting them.
Stay well and safe everyone.
Dianne
Leon
Leon sent a picture (from Kansas) of a machine that he is preparing for display of its internal components. He and Iris sometimes visit fairs and other gatherings to show old sewing machines. He likes old bicycles, too (the ones with big and small wheels called Penny Farthings) and sometimes even wears period clothing from the time. He says:
So the idea is to drill a few more holes and use a sabre saw and rotary files to keep this functional but let it's innards be seen as Merry Cranks go take it out to play. I've been collecting the steel sawdust with a strong magnet. Looks like the stitch length lever is getting magnetized. There are normally no holes in this area and certainly not 1/2" ones.

************* to be continued...
05-04-2020, 04:23 AM
#168
Super Member
Join Date: Mar 2015
Location: Denver, CO
Posts: 4,348
Dorothy
Dorothy has been busy sewing masks and sent some pictures of what she's doing. She says:
Hello!
Safer at home and the garbage disposal goes out. It is always an adventure!
I have been sewing the needed masks for family & friends mostly on a modern machine as it moves PDQ!
My next lot of masks are for my Niece who has a Salon for Men which she is hoping to start up with clients May 1. She requested Blue masks.
I moved to my 319W to sew these. It is a nice machine with the possible exception of the foot pedal. I am not a fan of the knob and button foot pedal, so eventually will get an electronic pedal for this machine. I think I have 20 cams. Attached a photo of some which are delightful!

This is the machine that takes a 206 x 13 needle available in 12 or 14 from Schmetz. I had heard a rumor the Industrial needle DB x 1 would work so I tried it- ( box of 100 size 12 Ball Points left over from my Pfaff Hobbyloc serger). They work! Very pleased!
The butt is round, smaller in diameter, and longer than the 206 x13. Overall length and distance to eye are the same.
Have a Great month!
Dorothy
Seb
Seb, our newest member and better at distancing than any of us (from France), sent an interesting sewing machine manual. He writes:
Hello, I've been busy all morning and I'm able to send you my contribution...
This is the instruction manual which my grandmother got in 1956 with her Singer 15B75 (aluminum body cast in Clydebank, Scotland but assembled in Bonni�res, France)
This booklet is rather unique: it not only has the regular instructions for good use of both the machine and attachments but also many many instructions about sewing tools, dressmaking, free-motion machine embroidery. It gives a lovely insight at culture in the 1950s, tastes, but also the place of women in society. To illustrate this, I have translated the preface and forewords (pages 4 & 5). One nice bonus in this booklet was the detachable measurement card insert; I love that it advises women to check their measurements every six months! On this card, there is also a historical note: a mention of Singer Sewing Centers being present in most cities in Metropolitan France and Northern Africa, hinting at France's colonial past.

I enclose (possibly as a Google Docs link) a picture of my grandma's machine, a picture of the cover, of the measurement card, my translation of the preface and forewords ...

Seb's translation follows here:
"Madam,
You have become the proud owner of a SINGER sewing machine, the most technologically advanced of all existing sewing machines.
French-made, heir to a century of experience and technique, well-tested and approved by women in the whole world, your new SINGER has many joys in store for you.
This booklet was made to help you becoming familiar with your SINGER while revealing to you all its secrets and all its resources.
It also contains such practical tips about cutting, darning and embroidery you will find useful.
We therefore hope to contribute to better serve you in this noble task, Women's privilege: Sewing.
The SINGER Company"
-----------
"Since Antique Times, sewing has always been woman's own way of expressing herself. Throughout the centuries, progress in sewing has accompanied progress of civilization.
By putting sewing machines within the reach of everyone as early as 1851, SINGER has rendered the world a service beyond appreciation.
Ever since, SINGER has been devoted to researching ways to improve family sewing and expanding its scope.
The special attachments, of the most varied kind, will today allow a beginner to accomplish sewing projects with a precision and a finish that would in the past have required several years of practice.
During the cutting and sewing lessons, a beginner learns to make a dress, starting with the fabric and her own personal measurements ; she does it herself under the wise guidance of the instructor, thus avoiding trial and error and many difficulties as well.
Darning and embroidery lessons teach ladies and young girls alike that a sewing machine is not made to stitch seams and hems only.
The practical knowledge accumulated by SINGER throughout years of research has been condensed in this booklet and in the book � Darning and Embroidery � of which you will find a few extracts thereafter, right after the instruction manual of your SINGER and just before some useful practical tips.
In Singer Sewing Centers, instructors are at your disposal to teach you to make your own dress yourself in 8 lessons. You will thus learn, through experience to dress elegantly and thriftily."
------------
Thank you for organizing another virtual Get-Together and stay safe!
Seb
In an additional email Seb wrote regarding his mask making:
I've settled on the pleated ones: they're quick to make and comfortable-ish to wear. I'm mostly using the treadle 201 so there should not be a problem. To please my 6 year old niece I used the Featherweight (birthday present from my sister) during a WhatsApp video conversation she asked me if I used the "baby machine Mummy got you for your birthday" So I did... At some point the machine refused to sew over the thick of the pleats, I was astonished a Featherweight would refuse to sew 5 layers but it turned out the stop motion knob was slightly unscrewed... A firm rescrewing did the trick.
************* to be continued....
Dorothy has been busy sewing masks and sent some pictures of what she's doing. She says:
Hello!
Safer at home and the garbage disposal goes out. It is always an adventure!
I have been sewing the needed masks for family & friends mostly on a modern machine as it moves PDQ!
My next lot of masks are for my Niece who has a Salon for Men which she is hoping to start up with clients May 1. She requested Blue masks.
I moved to my 319W to sew these. It is a nice machine with the possible exception of the foot pedal. I am not a fan of the knob and button foot pedal, so eventually will get an electronic pedal for this machine. I think I have 20 cams. Attached a photo of some which are delightful!
This is the machine that takes a 206 x 13 needle available in 12 or 14 from Schmetz. I had heard a rumor the Industrial needle DB x 1 would work so I tried it- ( box of 100 size 12 Ball Points left over from my Pfaff Hobbyloc serger). They work! Very pleased!
The butt is round, smaller in diameter, and longer than the 206 x13. Overall length and distance to eye are the same.

Have a Great month!
Dorothy
Seb
Seb, our newest member and better at distancing than any of us (from France), sent an interesting sewing machine manual. He writes:
Hello, I've been busy all morning and I'm able to send you my contribution...
This is the instruction manual which my grandmother got in 1956 with her Singer 15B75 (aluminum body cast in Clydebank, Scotland but assembled in Bonni�res, France)
This booklet is rather unique: it not only has the regular instructions for good use of both the machine and attachments but also many many instructions about sewing tools, dressmaking, free-motion machine embroidery. It gives a lovely insight at culture in the 1950s, tastes, but also the place of women in society. To illustrate this, I have translated the preface and forewords (pages 4 & 5). One nice bonus in this booklet was the detachable measurement card insert; I love that it advises women to check their measurements every six months! On this card, there is also a historical note: a mention of Singer Sewing Centers being present in most cities in Metropolitan France and Northern Africa, hinting at France's colonial past.

I enclose (possibly as a Google Docs link) a picture of my grandma's machine, a picture of the cover, of the measurement card, my translation of the preface and forewords ...


Seb's translation follows here:
"Madam,
You have become the proud owner of a SINGER sewing machine, the most technologically advanced of all existing sewing machines.
French-made, heir to a century of experience and technique, well-tested and approved by women in the whole world, your new SINGER has many joys in store for you.
This booklet was made to help you becoming familiar with your SINGER while revealing to you all its secrets and all its resources.
It also contains such practical tips about cutting, darning and embroidery you will find useful.
We therefore hope to contribute to better serve you in this noble task, Women's privilege: Sewing.
The SINGER Company"
-----------
"Since Antique Times, sewing has always been woman's own way of expressing herself. Throughout the centuries, progress in sewing has accompanied progress of civilization.
By putting sewing machines within the reach of everyone as early as 1851, SINGER has rendered the world a service beyond appreciation.
Ever since, SINGER has been devoted to researching ways to improve family sewing and expanding its scope.
The special attachments, of the most varied kind, will today allow a beginner to accomplish sewing projects with a precision and a finish that would in the past have required several years of practice.
During the cutting and sewing lessons, a beginner learns to make a dress, starting with the fabric and her own personal measurements ; she does it herself under the wise guidance of the instructor, thus avoiding trial and error and many difficulties as well.
Darning and embroidery lessons teach ladies and young girls alike that a sewing machine is not made to stitch seams and hems only.
The practical knowledge accumulated by SINGER throughout years of research has been condensed in this booklet and in the book � Darning and Embroidery � of which you will find a few extracts thereafter, right after the instruction manual of your SINGER and just before some useful practical tips.
In Singer Sewing Centers, instructors are at your disposal to teach you to make your own dress yourself in 8 lessons. You will thus learn, through experience to dress elegantly and thriftily."
------------
Thank you for organizing another virtual Get-Together and stay safe!
Seb
In an additional email Seb wrote regarding his mask making:
I've settled on the pleated ones: they're quick to make and comfortable-ish to wear. I'm mostly using the treadle 201 so there should not be a problem. To please my 6 year old niece I used the Featherweight (birthday present from my sister) during a WhatsApp video conversation she asked me if I used the "baby machine Mummy got you for your birthday" So I did... At some point the machine refused to sew over the thick of the pleats, I was astonished a Featherweight would refuse to sew 5 layers but it turned out the stop motion knob was slightly unscrewed... A firm rescrewing did the trick.
************* to be continued....
05-04-2020, 04:33 AM
#169
Super Member
Join Date: Mar 2015
Location: Denver, CO
Posts: 4,348
James
James sent pictures of two machines that he is working on. He writes:
I am still working on the 1907 Singer 28. I finally managed to take the hand crank assembly completely apart for preparations to JB Weld the broken sections together. I had to get a mechanic at work to loosen the main bolt for the larger gear for me as it was really locked in tight.
I took the slide plates, needle plate and the decorative plates off the machine to clean the rust off of them. Turns out that they will turn black if you leave them in Super Iron Out too long! So I had to use some Brasso to clean the black off. This is what the machine currently looks like now. I still need to clean the winder and stitch length knob along with the wheel. Although that light rust on the wheel has a nice look, leave it or not?
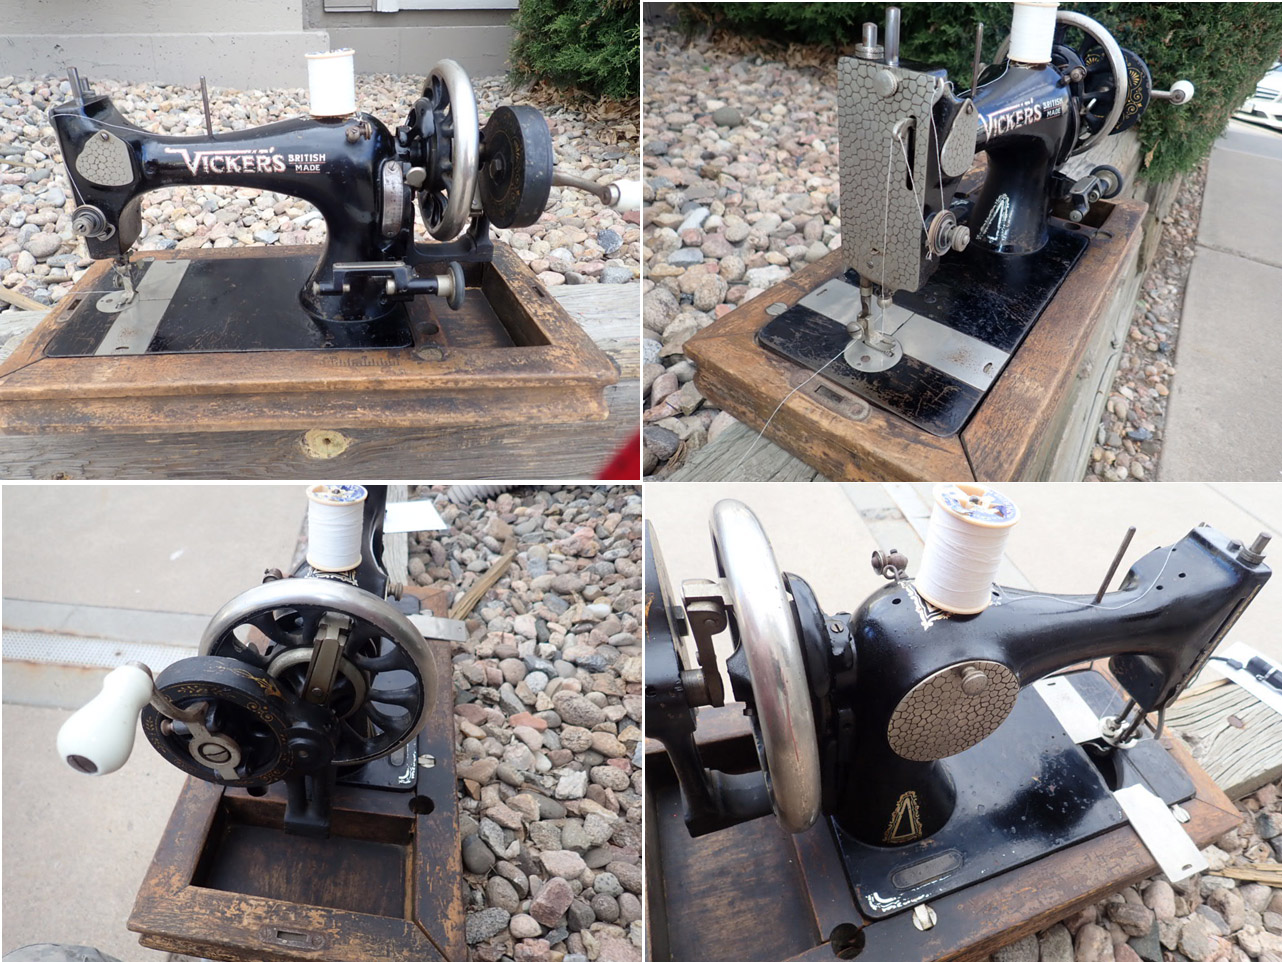
Earlier this week I picked up a new acquisition to my collection. Not often seen in the USA this is a Vickers VS sewing machine decal type 5 which is a copy of a Frister and Rossmann copy of a Singer 28. I believe it dates from the late 1920s to early 1930s. It uses a standard 15 needle and has short shank feet.
The parts are not interchangeable between the Singer and Vickers although the Vickers can use some of the Frister and Rossmann stuff like the shuttle and bobbin. I have already ordered a replacement shuttle and bobbin since it was missing. I sent an inquiry for a replacement bobbin winder since some pieces are missing. I can still wind the bobbin if I use my fingers to locate the thread while winding as the holder is still in place. The main difference is that it has a reverse and a different hand crank design compared to the Singer 28. Access to the shuttle is via the rear slide plate not the front. I tried my Singer 28 shuttle and it fits in the cage perfectly but it hits the bottom of the slide plate so correct length but different thickness.
The bobbin winder is very interesting since the design does not use the typical heart shaped cam gear. Instead it uses the curve of a missing plate to regulate the winding of the spool. The Vickers spools have a little hole at one end that fits into a prong at the right end of the winder.
After I oiled the machine, the crank moves smoothly and well although you can definitely feel the change when the shuttle changes directions at either the top or the bottom of the arc. The needle is disabled for winding via a tab notch at the hand wheel. The handle for the hand crank can be folded out of the way via a pull knob as seen in the rear shot of the machine.
Also notice the little divot hole at the base front next to the winder. That is for a pincushion. There are two round holes under the hand wheel for base drop in conversion to a treadle table.
I will need to clamp and glue and refinish the base since the glue has failed at the mitered corners where there was a biscuit joining the two corners. The area to the right of the hand wheel was a storage bin with a wood knob handle. I should be able to restore things pretty well aside from the long gone center decal in the base, even UV shows no trace as it wore off a good portion of the japanning in that area. Making a pincushion should be pretty easy as well as a lid for the storage bin. The wood top is a different story as I believe it was a curved bentwood top. I may end up just with a rectangular top using a sliding door latch the same size as the latch hardware on the base.
Can't wait until I get that shuttle with two bobbins so I can sew on this thing!
James
John & Janey
Janey has spent much time researching mask styles and has sewn some of the better ones, pictures of which are shown below: These were the first ones made based on the Olson Mask.

Closing
We'll have to see how the month of May goes and decide how we will do our next get together. We will post again next month. Until then, everyone please stay safe and well.
James sent pictures of two machines that he is working on. He writes:
I am still working on the 1907 Singer 28. I finally managed to take the hand crank assembly completely apart for preparations to JB Weld the broken sections together. I had to get a mechanic at work to loosen the main bolt for the larger gear for me as it was really locked in tight.
I took the slide plates, needle plate and the decorative plates off the machine to clean the rust off of them. Turns out that they will turn black if you leave them in Super Iron Out too long! So I had to use some Brasso to clean the black off. This is what the machine currently looks like now. I still need to clean the winder and stitch length knob along with the wheel. Although that light rust on the wheel has a nice look, leave it or not?

Earlier this week I picked up a new acquisition to my collection. Not often seen in the USA this is a Vickers VS sewing machine decal type 5 which is a copy of a Frister and Rossmann copy of a Singer 28. I believe it dates from the late 1920s to early 1930s. It uses a standard 15 needle and has short shank feet.
The parts are not interchangeable between the Singer and Vickers although the Vickers can use some of the Frister and Rossmann stuff like the shuttle and bobbin. I have already ordered a replacement shuttle and bobbin since it was missing. I sent an inquiry for a replacement bobbin winder since some pieces are missing. I can still wind the bobbin if I use my fingers to locate the thread while winding as the holder is still in place. The main difference is that it has a reverse and a different hand crank design compared to the Singer 28. Access to the shuttle is via the rear slide plate not the front. I tried my Singer 28 shuttle and it fits in the cage perfectly but it hits the bottom of the slide plate so correct length but different thickness.
The bobbin winder is very interesting since the design does not use the typical heart shaped cam gear. Instead it uses the curve of a missing plate to regulate the winding of the spool. The Vickers spools have a little hole at one end that fits into a prong at the right end of the winder.
After I oiled the machine, the crank moves smoothly and well although you can definitely feel the change when the shuttle changes directions at either the top or the bottom of the arc. The needle is disabled for winding via a tab notch at the hand wheel. The handle for the hand crank can be folded out of the way via a pull knob as seen in the rear shot of the machine.

Also notice the little divot hole at the base front next to the winder. That is for a pincushion. There are two round holes under the hand wheel for base drop in conversion to a treadle table.
I will need to clamp and glue and refinish the base since the glue has failed at the mitered corners where there was a biscuit joining the two corners. The area to the right of the hand wheel was a storage bin with a wood knob handle. I should be able to restore things pretty well aside from the long gone center decal in the base, even UV shows no trace as it wore off a good portion of the japanning in that area. Making a pincushion should be pretty easy as well as a lid for the storage bin. The wood top is a different story as I believe it was a curved bentwood top. I may end up just with a rectangular top using a sliding door latch the same size as the latch hardware on the base.

Can't wait until I get that shuttle with two bobbins so I can sew on this thing!
James
John & Janey
Janey has spent much time researching mask styles and has sewn some of the better ones, pictures of which are shown below: These were the first ones made based on the Olson Mask.

Closing
We'll have to see how the month of May goes and decide how we will do our next get together. We will post again next month. Until then, everyone please stay safe and well.
05-04-2020, 07:36 AM
#170
Super Member
Join Date: May 2016
Location: near Topeka kansas
Posts: 4,524
Dianne, the Adler is a German machine. Adler means Eagle in German. And of course, Irene Adler was the woman whom Sherlock Holmes admired and was challenged by. .
Jig saw work started on the cut away 99. Maybe it will be done by a (hopefully) October gig.. Two demo gigs have been cancelled, but I approve.
Big thunderstorm today. high winds, hail power out to thousands in Topeka. Good day for hand cranks..
Jig saw work started on the cut away 99. Maybe it will be done by a (hopefully) October gig.. Two demo gigs have been cancelled, but I approve.
Big thunderstorm today. high winds, hail power out to thousands in Topeka. Good day for hand cranks..

Thread
Thread Starter
Forum
Replies
Last Post
sewcrazygirl
General Chit-Chat (non-quilting talk)
10
04-21-2011 08:51 PM
