
Harris 9 Troubleshooting
 08-15-2021, 10:36 AM
#1
Member
Thread Starter
Join Date: Aug 2021
Location: Scotland
Posts: 4
I just got my hands on a Harris 9 machine that until today, has been working perfectly. All of a sudden, when I crank the handle, the bobbin mechanism and needle arm no longer move. The crank handle moves freely and isn't sticking at all, so I'm guessing that something has become loose or disengaged. Neither move regardless of whether the bobbin winder is engaged. All the tutorials on troubleshooting I can find seem to focus on seized mechanisms, whereas I'm having the opposite problem  I believe my machine was manufactured by Stoewer. Could anyone maybe suggest what's happened to my machine? I did some lovely top stitching with it earlier today so it's a total mystery to me!
I believe my machine was manufactured by Stoewer. Could anyone maybe suggest what's happened to my machine? I did some lovely top stitching with it earlier today so it's a total mystery to me!
 08-15-2021, 10:56 AM
#2
Super Member

Join Date: Mar 2015
Location: Denver, CO
Posts: 4,350
Welcome to QB. Can you move the hand wheel by hand - without trying to use the hand crank? I'm not sure I'm completely understanding. Is the hand crank engaged properly? Maybe thread is jammed somewhere?
We like pictures. In order to post pictures on Quilting Board, you will probably need to reduce or compress the picture to a file size that is smaller than 2MB. How to post images can be found at https://www.quiltingboard.com/attach...020-01-17-.pdf
Don't forget to scroll over to the far right to find and click on the "Upload" button.
I have found that only the big red "Reply" button or "Quote" work to give me the paper clip icon to work for adding pictures.
https://www.quiltingboard.com/attach...p-location.jpg
Some additional info regarding reducing images at post #4 and images for the scroll and upload button can be found at #5 of quilt block ID?
Or simply - Make sure pictures are smaller than 2MB
Click on red "Reply" button
Click on the paper clip icon
Click browse - choose picture/s. (only 5 allowed per post)
Once they show up as being loaded, Scroll over to the right side and click on "Upload"
After the pictures show up as being attached, you can close that window and go back to the screen to finish posting your post.
Janey - Neat people never make the exciting discoveries I do.
08-15-2021, 12:47 PM
#3
Member
Thread Starter
Join Date: Aug 2021
Location: Scotland
Posts: 4
Thank you for the reply 
In the photos I've uploaded, I've highlighted the arm that has stopped moving when I turn the crank, the handle itself, and the bobbin shuttle. When I turn the machine over to look at the mechanism underneath, nothing moves when I turn the crank handle either. The handle is not seized - it turns smoothly, doesn't wobble and still turns the bobbin winder when it's engaged. The bobbin shuttle arm has stopped moving when the handle is turned too. The feeder dogs appear to be fine and not choked with thread or fabric. Everything was working perfectly until this afternoon and I can't think of any sound I heard or weird movement the machine made before this started to happen This is my first vintage hand crank machine and despite it looking so simple, it has me stumped!
In the photos I've uploaded, I've highlighted the arm that has stopped moving when I turn the crank, the handle itself, and the bobbin shuttle. When I turn the machine over to look at the mechanism underneath, nothing moves when I turn the crank handle either. The handle is not seized - it turns smoothly, doesn't wobble and still turns the bobbin winder when it's engaged. The bobbin shuttle arm has stopped moving when the handle is turned too. The feeder dogs appear to be fine and not choked with thread or fabric. Everything was working perfectly until this afternoon and I can't think of any sound I heard or weird movement the machine made before this started to happen
This is my first vintage hand crank machine and despite it looking so simple, it has me stumped!
08-15-2021, 01:18 PM
#4
Super Member
Join Date: Mar 2015
Location: Denver, CO
Posts: 4,350
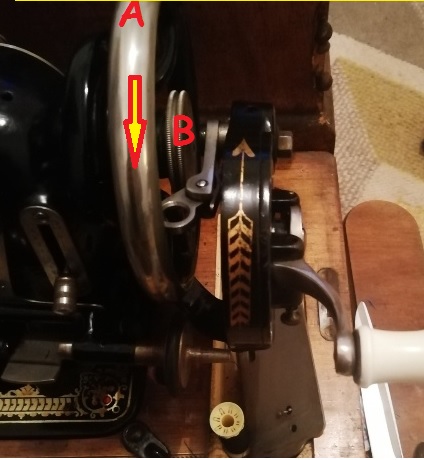
From what I can see, it looks like the bobbin winder runs off the hand wheel. So it sounds like if you can turn the hand crank and push the bobbin winder against the balance/hand wheel that it turns. If that is the case, it may be that what is called a stop motion clutch is disengaged.
I'm guessing that the part that I have labeled "A" rotates in the direction of the arrow when you turn the hand crank. If that is the case, then hold on to part "A" to hold it still and turn the knob labeled "B" the opposite direction, and make sure it is tight.
Janey - Neat people never make the exciting discoveries I do.

 08-16-2021, 03:53 AM
#8
Member
Thread Starter
Join Date: Aug 2021
Location: Scotland
Posts: 4
Sigh... New day, new problem... Today it's the bobbin. The thread isn't picking up at all, and only the top thread is sewing. I followed The Masquerade's video for fitting the bobbin in the shuttle when I got the machine and it worked fine. I had to change the bobbin since the one that came loaded came to its end. I've made sure the bobbin runs counter clockwise, pulled the thread through the guides and picked it up as usual. I've also made sure the the needle is threaded left-to-right, and tried different tensions on both the shuttle and the thread guide. I'm used to using round bobbins - this is the first shuttle I've had.
08-16-2021, 06:31 AM
#9
Senior Member
Join Date: Apr 2020
Location: South of St Louis
Posts: 835
You have a great looking machine, and welcome to the Board. To clarify, the bobbin thread is being picked up and pulled up through the needle hole, and when sewing no stitches are forming? If that's the case it sounds to me as though the pointed nose of the shuttle isn't grabbing the loop formed by the needle thread on the upstroke. If you changed the needle and it is not oriented correctly it won't form a loop, you can try rotating the needle 180deg (if you have the flat of the needle shank to the left turn it to the right, if to the right turn it to the left) and see if that helps. If your upper (needle) tension is too tight this could affect the loop formation, you've already adjusted the upper tension, make sure it's looser as you're working on this.
08-16-2021, 07:16 AM
#10
Super Member
Join Date: Mar 2015
Location: Denver, CO
Posts: 4,350
That was my initial thought, but the only thing that was changed was the bobbin, that is until he tried adjusting the tensions. It looks like Mixie followed this video - https://www.youtube.com/watch?v=EGRlXhc7Erk
I wouldn't have adjusted the tensions, until it was actually making stitches. Is it a similar size thread that had been used previously? It sounds to me that something isn't quite threaded correctly. Until I reread the post and found the video, I thought that perhaps the bobbin might have been turned over. I have always thought that the direction of the thread was to go into the slot so that it kind of made a 180 turn around the slit. James had a machine that when I tried that, it would not even pick up the thread.
I remember a thread/post that talked about needle tension, but can't find it. From what I remember, one would thread the machine and put the presser foot down and slightly pull on the needle thread until it just started to bend the needle. If the thread just pulled through easily, the tension was too loose. If it started to bend the needle right away, the tension was too tight. Another thought is that when threading the top thread, make sure that the presser foot is up so that the thread goes between the tension discs. Of course, that might not apply to the early 27s as it didn't have the pin that releases the discs, you just have to make sure the thread goes in between the discs which can be accomplished by pulling up on both sides.
I would try rethreading everything. (After putting tensions back where they were.) It seems odd that you can pick up the bobbin thread, but it will not catch when actually sewing. One other tip is to hold on to both thread tails when starting to sew.
Janey - Neat people never make the exciting discoveries I do.
Not affiliated with off-site link(s)
