
Sad Kenmore 117-552
 03-09-2023, 04:04 PM
#1
Member
Thread Starter
Join Date: Nov 2021
Location: Yellow Springs, Ohio
Posts: 51
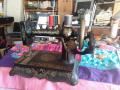
Yesterday a friend gave me this machine. It had been sitting out in the rain for months. I applied kero, oil, and got it turning. Downloaded the manual. Threaded it as best as I could following the manual. The upper thread tension device is a nightmare, and threading it isn't possible the way it is shown in the manual, so I had to use tweezers, needle nose pliers and 20 minutes to get the thread in the way it is shown in the manual. I tried a few stitches by turning the hand wheel (away from me, CW as the manual suggests) and get massive loops underneath.
So I decided to take my life in my hands and put a plug on the wire. Risking fire or blown fuses, the motor actually ran without the drive wheel on. So I put it on, took the thread out, and ran it empty. It struggles to run, needs help starting, and hammers pretty bad when the needle bar comes to the top. Loud.
Is anyone versed in these machines? Is it worth trying to revive? Any one interested in parts?
Last edited by Joe Ayres; 03-09-2023 at 04:07 PM.
 03-09-2023, 06:29 PM
#2
Super Member

Join Date: Mar 2015
Location: Denver, CO
Posts: 4,305
That is so sad. It looks like at one time it was one of the nicer cabinets. There have been some woodworkers that have re-laminated some of these old cabinets. However, the laminate available now is generally thinner than what was on these cabinets.
The machine itself looks to be in fairly decent condition.
Yes, they can be a little fiddly and not the best instructions and diagrams. I had to read the instructions several times, but once you get it to click - both figuratively & actually - it really isn't that hard. It seems that after you go down and back up, if you take the end piece of thread and hold thread above and below the whole assembly and pull toward the front of the machine it will pull it into the little spring. Clear as mud, probably. I'm not sure I explained that right. There is a picture of my White threaded with crochet thread to make it more visible Need help But I think once it is place, it will probably sew better.
Besides probably needing some good oiling it will probably need the friction pulley replaced. They are available.
https://www.ebay.com/itm/Sewing-mach...2/383702102739 What happens is the motor is sitting on the hand wheel when stored in the cabinet and it develops a flat spot that shouldn't be there. Some have put something between the machine and motor to make sure the pulley isn't touching the hand wheel when the machine is stored.
Janey - Neat people never make the exciting discoveries I do.
Not affiliated with off-site link(s)
The machine itself looks to be in fairly decent condition.
...The upper thread tension device is a nightmare, and threading it isn't possible the way it is shown in the manual, so I had to use tweezers, needle nose pliers and 20 minutes to get the thread in the way it is shown in the manual. I tried a few stitches by turning the hand wheel (away from me, CW as the manual suggests) and get massive loops underneath....
...So I decided to take my life in my hands and put a plug on the wire. Risking fire or blown fuses, the motor actually ran without the drive wheel on. So I put it on, took the thread out, and ran it empty. It struggles to run, needs help starting, and hammers pretty bad when the needle bar comes to the top. Loud. ....
https://www.ebay.com/itm/Sewing-mach...2/383702102739 What happens is the motor is sitting on the hand wheel when stored in the cabinet and it develops a flat spot that shouldn't be there. Some have put something between the machine and motor to make sure the pulley isn't touching the hand wheel when the machine is stored.
Janey - Neat people never make the exciting discoveries I do.
Not affiliated with off-site link(s)
Last edited by OurWorkbench; 03-09-2023 at 06:31 PM.
03-10-2023, 09:59 AM
#3
Senior Member
Join Date: Apr 2020
Location: South of St Louis
Posts: 824
I have had a half a dozen or so of these 117 series machines, and in my opinion they're worth saving...the machine that is, I've not seen a table that bad and it would be scrapped if here.
Because of the finish, I have used degreasers to clean the machines, after removing what I am comfortable removing, has worked fine as long as I don't scrub too hard. You'll want to service the motor, not just changing the drive wheel, but they clean up pretty easily. The nose piece is held on with two bolts and is worth removing to clean up inside, takes some lining up with a needle when you put it back on before tightening it up.
Once you learn the trick to threading it's pretty easy, I learned using a White Rotary manual as White made these machines for Sears.
If you decide to part it out, please message me.
03-10-2023, 12:36 PM
#5
Member
Thread Starter
Join Date: Nov 2021
Location: Yellow Springs, Ohio
Posts: 51
Note the spring. There is no opening in the triangle that is at the head of the spring. (5) I have tried to get the thread into it, no luck. I finally got it through there with tweezers, pliers and an awl. What confuses me is how the thread is supposed to go around the hook (4) at the bottom under the spring, and go up through the spring at all! I assumed the spring was bent closed, and even tried to open it a little without success. I didn't want to break anything!
Joe Jr, If I decide to get rid of the machine, do you want it?
Joe Jr, If I decide to get rid of the machine, do you want it?
Last edited by Joe Ayres; 03-10-2023 at 12:41 PM. Reason: Wasn't finished editing it
03-10-2023, 12:56 PM
#6
Senior Member
Join Date: Apr 2020
Location: South of St Louis
Posts: 824
Here are two pictures, the first is with the thread around hook #4 (from the threading diagram) before pulling it up into the check spring.
While holding the thread from the top, so you don't pull more off the spool, pull up and over to the right slightly on the thread, it will snap into the triangle on the check spring and then go over the upper hook (obscured by the wire guard in the second photo), then follow the remaining steps in the threading instructions.
I am messaging you separately.
03-10-2023, 01:15 PM
#7
Member
Thread Starter
Join Date: Nov 2021
Location: Yellow Springs, Ohio
Posts: 51
It looks to me from your pictures that the triangle has a gap at the top, narrow, but maybe the thread would fit through there. The triangle on the machine I have does not have a gap, and no matter how hard I tried to get a thread to snap in, it wouldn't. I had to thread it through there manually.. It should go into the eye of the triangle, right?
03-10-2023, 01:39 PM
#8
Senior Member
Join Date: Apr 2020
Location: South of St Louis
Posts: 824
Yes, the thread should "snap" into the eye of the triangle on the check spring when you pull upwards on the thread. If you're comfortable doing so, you can try opening up the top of the triangle just a bit to make a gap for the thread.
03-12-2023, 09:08 AM
#9
Super Member

Join Date: May 2016
Location: near Topeka kansas
Posts: 4,524
you have not mentioned taking off the faceplate assembly and oiling the needlebar and presser bar. It is a tricky job and getting it back together is not fun. There is a connecting rod that is not tied down and is tricky to align when you put it back together. but if it is noisy, it would probably be a good idea to open and oil. Have a camera ready. I used tweezers to thread min the first time or two.
03-21-2023, 10:34 AM
#10
Member
Thread Starter
Join Date: Nov 2021
Location: Yellow Springs, Ohio
Posts: 51
you have not mentioned taking off the faceplate assembly and oiling the needlebar and presser bar. It is a tricky job and getting it back together is not fun. There is a connecting rod that is not tied down and is tricky to align when you put it back together. but if it is noisy, it would probably be a good idea to open and oil. Have a camera ready. I used tweezers to thread min the first time or two.
