
Here are the Options
 09-26-2010, 01:41 PM
#1
Senior Member
Thread Starter

Join Date: Jul 2010
Location: WV, USA
Posts: 748
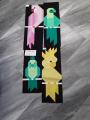
Okay, I've really been stuck lately on my french braid table runner. I really wanted to put a border on it, but I just can't wrap my mind around how to do it! I'm afraid to mess it up if I try...
So here are my options and I wanted to see what you guys thought (I'll post pics).
1.) Attempt to put a border on it like I originally planned and probably mess it up.
2.) Bind it as is with the darker colored fabric.
3.) Cut off the points on the ends so it makes a rectangle and then put a border on it.
Your thoughts?
Option #3
[ATTACH=CONFIG]102082[/ATTACH]
What I have now...(top and bottom are straight though like in image below)
[ATTACH=CONFIG]102083[/ATTACH]


 09-26-2010, 01:51 PM
#5
Senior Member
Thread Starter
Join Date: Jul 2010
Location: WV, USA
Posts: 748
Originally Posted by grma33
beautiful You have to lay your ruler across 1/4 above where they meet and cut off points to get a straight edge.
Gale
Gale

 09-27-2010, 07:19 AM
#10
Junior Member
Join Date: Jan 2010
Location: North Carolina
Posts: 193
As you have trimmmed off the points and want to put a border on it I would proceed as follows:
(I am going to attempt to add pictures along with my instructions but as I have never done this before I am not sure if it will work. Also, I have used difference colors in the border so you can see each step better.
1. Cut two strips of fabric (however wide you want the border to be) a little longer than the long sides of the table runner and then sew them on. Now trim the ends of the border fabric by aligning the ruler along the edge of the fabric on the angled ends of the border. See picture - 1
2. Cut two more border strips. One for one side only of each end being sure to include the border already added in the measure. (I would cut this a couple of inches longer than my measurement.) Sew one on each end opposite each other. Trim on long side by laying ruler along the edge of the first border added. Trim point end, if necessary, by laying ruler along the edge of fabric on the opposite side of the point. See picture - 2
3. Measure the last side on the end including the borders already added, again adding extra for insurance. After you have sewn them on. Trim off excess as necessary.
4. Bind or finish as desired.
I hope this is what you were looking for and than I have made it clear.
Picture 1
[ATTACH=CONFIG]111030[/ATTACH]
Picture 2
[ATTACH=CONFIG]111031[/ATTACH]
Picture 3
[ATTACH=CONFIG]111032[/ATTACH]

Thread
Thread Starter
Forum
Replies
Last Post
mzzzquilts
Links and Resources
20
04-13-2012 04:02 PM
