
Singer Stylist 457 Instruction Book-free???
 01-12-2012, 07:29 AM
#21
Member

Join Date: Jan 2012
Location: Worship Dance Leader @ Saltillo Mexico
Posts: 20
Well, you did great with the diagnostics and it looks like the upper black gear is damaged to the point that it would not engage when the white gear turns (it is supposed to turn when the white gear turns). Just make sure that if you hand turn the bottom right sprocket (the gear holding the timing belt) it then turns the timing belt and then bottom left sprocket turns the hook-loop mechanism that you pointed out in your photo. This way we will make sure everything else is working fine.
You can buy the damaged gear at many places selling singer spare parts. Here is one for $6 on ebay http://www.ebay.com/itm/Singer-Verti...item3a6efa8db7
I will separately post for you the steps to replace the gear and the steps to adjust the "needle-hook timing" which sounds complex but it just means we need to adjust the exact turn position of the bobbin part to catch the needle thread as it comes down.
Do not hesitate to ask me any questions. Have a great day!
Last edited by belem; 01-12-2012 at 07:35 AM.
 01-12-2012, 08:23 AM
#22
Member
Join Date: Jan 2012
Location: Worship Dance Leader @ Saltillo Mexico
Posts: 20
[h=1]Guide to replace the BLACK PLASTIC GEAR on TOP for Singer Stylist 457
[/h]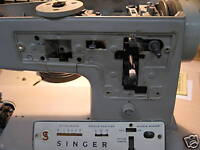

[/h]
STEP 1: Remove the top cover, as well as the left side cover. Remove also the bottom covers. You will have to remove the front cover. Keep all screws in a small container for re-installation. Remember these machines were built on the 1960's so treat all parts gently. You will have access to the black gear once the face plate is removed.After this, you are now ready to remove the broken gear.
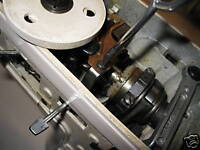
STEP 2: REMOVING THE BROKEN GEAR. First, you will have to remove the timing belt tensioner and the timing belt underneath. Then, by inserting a long flat screwdriver in the illustrated opening, you will be able to remove the gear set screw. Note that I also removed the needle position lever which is retained by one screw, to gain access when removing the old gear and to reinstall the new one. This lever serves to adjust the center position of the needle.
Once the gear set screw is removed, you will have to pull the vertical shaft underneath. The broken gear will slip out of the shaft
. Do not remove the entire shaft. Pulling it approximately 2 inches is enough to release the black top gear.

. Do not remove the entire shaft. Pulling it approximately 2 inches is enough to release the black top gear.
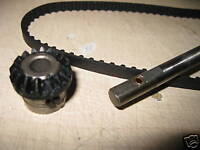
You are now ready to install the new gear. If necessary replace its set screw with the old one.
Be sure also to clean the bigger (white color) gear which match the top gear. Check for any debris between the teeth.
Be sure also to clean the bigger (white color) gear which match the top gear. Check for any debris between the teeth.
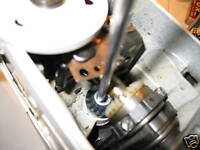
STEP 3: INSTALLING THE NEW GEAR. Reinsert the vertical shaft so it is flush with the gear surface. With your long screwdriver, slip the new gear in it, and put your screwdriver blade in contact with the gear location (on top of the vertical shaft). Slip the gear to its original position while inserting the shaft slowly. This method is recommended instead of trying to place the gear with your fingers. The gear can fall at the back of the mechanism or fall down in the motor.
Hold now the gear with your fingers on one hand, and with the other hand, push the vertical shaft in place. Be sure the flat side of the shaft comes in contact with the gear set screw. Tighten the set screw firmly when the vertical shaft is completely inserted.
You are now done with the first part. Second part is placing back the timing belt and adjusting the needle-hook timing.
You are now done with the first part. Second part is placing back the timing belt and adjusting the needle-hook timing.
01-12-2012, 11:18 AM
#23
Super Member
Thread Starter
Join Date: Jul 2010
Location: East Arkansas
Posts: 2,534
Well, I checked and and sprockets/gears that the timing belt is on was frozen but I was able to get them turning again and I can see that when I turn it the needle-hook turns!!! So it looks like all I need is the black gear which I will order right away AND I'll try to talk someone who is mechanical to install it. I know, I know, it's simple for you but it scares me to just read the instructions. Guess I shouldn't be since I've only spent $5 on it. What could go wrong?
01-12-2012, 10:59 PM
#25
Member
Join Date: Jan 2012
Location: Worship Dance Leader @ Saltillo Mexico
Posts: 20
Well, I checked and and sprockets/gears that the timing belt is on was frozen but I was able to get them turning again and I can see that when I turn it the needle-hook turns!!! So it looks like all I need is the black gear which I will order right away AND I'll try to talk someone who is mechanical to install it. I know, I know, it's simple for you but it scares me to just read the instructions. Guess I shouldn't be since I've only spent $5 on it. What could go wrong?
In a nutshell, the instructions read "take all covers off, remove the belt and then unscrew the black gear". God so far has blessed you with a great gift for your friend and the talent to diagnose what is wrong so I would keep trusting Him to guide you through the rest of the process.
I will post for you the remaining part which is synchronizing the needle with the hook after you install the new black gear and BEFORE you power up the machine again.
Don't worry too much, worst thing can happen is breaking the needle if you power up the machine before synchronizing it with the loop mechanism. Best thing can happen is that you will save a repair fee around 100 dollars plus the satisfaction that you are now one of the few that are brave enough to do this kind of repair. I will also post for you the lubrication procedure so your machine will now be good as new. For this you will need a tube of sewing machine oil and another one of sewing machine lubricant (grease) which should be available at places even like Walmart. The oil must simply be the sewing machine type and the lubricant (grease) simply should be silicon type and not petroleum type.
Congratulations again on your progress so far!

Blessings!
01-13-2012, 11:31 AM
#26
Member
Join Date: Jan 2012
Location: Worship Dance Leader @ Saltillo Mexico
Posts: 20
STEP 4: INSTALLING THE TIMING BELT. Check for severe cracks or missing teeth and replace if necessary. Place the timing belt around the 2 sprockets (left and right gears) and then install the belt tensioner but do not tighten too much the screw yet. Now turn the white plastic belly in the belt tensioner to adjust the timing belt so it is not too tight or too loose (you should be able to depress it about 1/2"). Now finish tightening the screw holding the belt tensioner just so the white plastic belly does not turn.
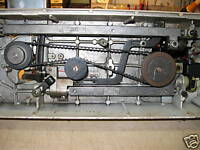
STEP 5: THE NEEDLE POSITION. First just loosen (do not remove) the 2 little screws in the left sprocket body. You need a small hexagonal screwdriver tip but you may try a narrow enough flat screwdriver to loosen them. The goal is to be able to move the rotating hook freely in order to synchronize the rotating hook with the needle position. In other words, we now need the rotating hook NOT to move while we turn the hand wheel and move the needle to its exact position.


When you see the upper timing mark flush (even) with the machine body the needle is at its lowest position. Make sure the rotating hook tip is still facing the back of the machine and in front of the needle or otherwise hand turn the rotating hook as necessary.
We are now just 3/32 of an inch from synchronizing the needle. Fix your eyes on the timing marks (grooves) and continue turning the hand wheel VERY SLOWLY TOWARDS YOU so the needle and the needle bar raise 3/32 of an inch which is when the upper timing mark disappears and the lower timing mark is flush with the machine body. Make sure the rotary hook tip point is still in front of the needle. Now very carefully (so nothing moves out of position) tighten the bottom sprocket little screws. Re-check the hook tip point and timing mark position. Test the setting by making a few revolutions of the hand wheel to be sure the needle does not hit any part of the rotating hook.
THE ROTATING HOOK AND NEEDLE ARE NOW SYNCHRONIZED !!!
We are now ready to lubricate the machine, reassemble the panels and do a real sewing test.
DO NOT lower the needle yet as it could hit the rotating hook. Just position the needle by turning the hand wheel TOWARDS YOU so the needle comes slightly over the needle plate opening.
Move and center the needle position lever and make sure the needle is also set in the center position. If the lever does not seem to work fine loose the lever mounting screw so you can freely pull or push the needle position lever to set the needle in the center and then re-tighten the lever mounting screw.
STEP 6: SYNCHRONIZING NEEDLE AND ROTATING HOOK. Turn the rotating hook by hand so the hook or sharp tip point in the rotating hook wall faces the back of the machine. Then, turn the hand wheel SLOWLY TOWARDS YOU so the needle goes completely down. You should be able to see the upper and lower timing marks (grooves) appear on the needle bar when the needle is all the way down.
We are now just 3/32 of an inch from synchronizing the needle. Fix your eyes on the timing marks (grooves) and continue turning the hand wheel VERY SLOWLY TOWARDS YOU so the needle and the needle bar raise 3/32 of an inch which is when the upper timing mark disappears and the lower timing mark is flush with the machine body. Make sure the rotary hook tip point is still in front of the needle. Now very carefully (so nothing moves out of position) tighten the bottom sprocket little screws. Re-check the hook tip point and timing mark position. Test the setting by making a few revolutions of the hand wheel to be sure the needle does not hit any part of the rotating hook.
THE ROTATING HOOK AND NEEDLE ARE NOW SYNCHRONIZED !!!
We are now ready to lubricate the machine, reassemble the panels and do a real sewing test.
01-13-2012, 12:10 PM
#27
Member
Join Date: Jan 2012
Location: Worship Dance Leader @ Saltillo Mexico
Posts: 20
Cleaning and Lubricating is covered on pages 53 to 57 of the Singer 457 Stylist Manual
[ATTACH=CONFIG]302801[/ATTACH][ATTACH=CONFIG]302802[/ATTACH][ATTACH=CONFIG]302804[/ATTACH][ATTACH=CONFIG]302805[/ATTACH][ATTACH=CONFIG]302806[/ATTACH]
[ATTACH=CONFIG]302801[/ATTACH][ATTACH=CONFIG]302802[/ATTACH][ATTACH=CONFIG]302804[/ATTACH][ATTACH=CONFIG]302805[/ATTACH][ATTACH=CONFIG]302806[/ATTACH]
Last edited by belem; 01-13-2012 at 12:30 PM.
01-14-2012, 07:05 AM
#28
Member
Join Date: Jan 2012
Location: Worship Dance Leader @ Saltillo Mexico
Posts: 20
If you are on Firefox (don't know if it works on Internet Explorer), you can enlarge any "page" by holding down the control key and using the scroll key on your mouse. One direction makes it bigger, the other direction makes it smaller. I've never tried to memorize which way is which. I just try it and see what size the text changes to! http://www.singerco.com/uploads/down...aab08a72c8.pdf
[ATTACH=CONFIG]302986[/ATTACH] [ATTACH=CONFIG]302987[/ATTACH]
After downloading the file simply open it by double-clicking it. In this case the manual is a PDF file so it will open with Adobe Reader which will easily allow you to change the page view size from its top menu.
[ATTACH=CONFIG]302988[/ATTACH]
Blessings!
Last edited by belem; 01-14-2012 at 07:07 AM.
01-19-2012, 03:49 PM
#29
Super Member
Thread Starter
Join Date: Jul 2010
Location: East Arkansas
Posts: 2,534
belem HELP! I'm at a standstill. Can't loosen gear set screw. Also what's the point of removing the left side cover do I pull/remove anything from there? I sent you an e-mail but you may not have received it if I'm not on your approved list.
01-20-2012, 11:16 AM
#30
Member
Join Date: Jan 2012
Location: Worship Dance Leader @ Saltillo Mexico
Posts: 20
Originally Posted by misseva
Well, I have the gear BUT I'm having a hard time finding the timing belt tensioner..
[ATTACH=CONFIG]304671[/ATTACH]
I will be today keeping an eye on your posts so you can finish repairing your vintage machine. Be patient. Nothing is easy the first time...
Blessings!

Thread
Thread Starter
Forum
Replies
Last Post
hobbykat1955
For Vintage & Antique Machine Enthusiasts
6
07-03-2019 04:00 PM
