
Journeys with Dear Jane: Baby Janes in the making and complete
 06-10-2014, 04:16 PM
#321
Super Member
Join Date: Mar 2010
Location: Antlers Oklahoma
Posts: 1,658
HI EVERYONE, I did the BJ with the first group. But in reading and looking I got my book out and started to look again.Guess what I had made some blocks in various blues and put in the pages. So guess I am going to do this one with you too. I still dont have acamera but do have a cell phone to learn how to post pics.Surely one of my computer literate friends will come to my rescue. lol Hope so. lol
 06-11-2014, 08:02 AM
#322
Senior Member
Thread Starter

Join Date: Oct 2010
Location: Agoura Hills, CA
Posts: 926
Welcome back, Jolo!
I found that taking pictures with my cell to post online here is one of the easiest ways to get my pics posted.
Take the picture and email it to yourself - or easier yet - in your message text box, put your email address in the recipient box, attach your photo and send it!
Next step?? open it up in your email, save it to your picture file [make sure it doesn't end up in a temporary folder - that is when I get frustrated looking for it!!] Once you open it in your email, there should be something on the screen linking you to microsoft office where you can edit. I crop the excess background, I rotate it if needed, then I resize. If you have pre-defined resize available, you can resize to web-small, then "save as" on the upper left of your screen under "file" and give it a name. I simply give it the name of the block...."dja12" dear jane A12 - and leave everything in lower case because it's the easiest.
AND - I save as - to a "Dear Jane" folder I have created in my picture file... I started doing this about midway through the first group and that is why my initial pictures are unavailable to me
I re-sized the pics a second time to a very small 40x40 pixels to paste onto my block chart provided in the DJ software [web-small is around 400-600 pixels] and failed to save the larger version. When you re-size down, you can't size it back up and keep the resolution [or at least not that I'm technically capable or aware of!]
hope this helps - if not I'll take a little more time to delineate the steps
Gus
Last edited by Cre8tvlwyr; 06-11-2014 at 08:08 AM.
06-12-2014, 07:56 AM
#324
Super Member

Join Date: Jul 2011
Location: Neuquen - Argentina
Posts: 2,288
Hello ladies, I know I haven't posted here for a LONG time - but I am excited to tell you I have finished piecing my Christmas Baby Jane this afternoon. Here is the link to my design wall and I have added the tiny picture at the very top of the page - which was taken this afternoon. If you click on it - the photo will enlarge.
http://www.dotsbjwall.talktalk.net/
A friend with a longarm machine is going to baste it for me - as my back won't allow me to scramble around trying to do it !!
I started my DJ back in May 2007 - can't believe I have achieved my goal. !!
http://www.dotsbjwall.talktalk.net/
A friend with a longarm machine is going to baste it for me - as my back won't allow me to scramble around trying to do it !!
I started my DJ back in May 2007 - can't believe I have achieved my goal. !!
06-12-2014, 08:00 AM
#325
Super Member
Join Date: Jul 2011
Location: Neuquen - Argentina
Posts: 2,288
Hello to all!
I made 2 blocks more to My Dear Jean: H-9 and H-10. Those would be my Week # 39.
I am taking small steps to achieve this great goal!
I show photos of each one, then a together and scheme with all my pictures of blocks and triangles finished.
I hope they will be of your liking!
Have a nice weekend! A hug to each one!
06-12-2014, 08:45 AM
#326
Super Member

Join Date: Feb 2011
Location: central North Dakota
Posts: 1,398
Hello, everyone, I am finally back. It has been a crazy month for me. I had my 13 yoa granddaughter here, and she sewed up a queen size quilt for her bed. So, I sort of got behind in my tris and posting. Now you are going to get 6 pictures, if my computer hangs in there. Some mistakes on probably every one, but I am the only one who will notice.
The first one is RS 5
[ATTACH=CONFIG]478850[/ATTACH]
Because I have only completed 5 rows, now I am doing the left side and here is #1
[ATTACH=CONFIG]478851[/ATTACH]
The next one is from scraps of the quilt that my granddaughter made. She was always concerned that she would not have blocks in my DJ. She will be excited to see that she does have one.
[ATTACH=CONFIG]478852[/ATTACH]
The next one is LS #3
[ATTACH=CONFIG]478853[/ATTACH]
And onto LS #4
[ATTACH=CONFIG]478854[/ATTACH]
And to finish up, here is LS #5
[ATTACH=CONFIG]478855[/ATTACH]
And now I will share with you that my DJ is going to become triplets. I have 3 daughters, and at first none of them were too impressed with the DJ, but now that the tris and kites are going on, they are really seeing the beauty of the quilt and each of them has put DIBS on the quilt. So, what I am going to do, is to complete this unit of 5 rows with the bottom row of tris and the bottom corner kites, and then back it with the fabric of their choice, and it will become a bed runner and be reversible if they want to. So that means that I will do 3 units of top tris and bottom tris and 3 sets of corner kites. Since there are only 14 rows, for the 15th row, I am going to take 1 or 2 blocks from each of the other rows. Got my work cut out for me. And considering that it has taken me 3 years to come to this point, it means that I really have to get the lead out, but with being fully retired now, I think I can do it. Wish me luck. The LS tris are not quilted, so please forgive the basting thread, but I did want to get these posted.
Last edited by spartan quilter; 06-12-2014 at 08:52 AM.
06-20-2014, 04:07 PM
#328
Junior Member

Join Date: Feb 2010
Location: Yellville, Arkansas
Posts: 102
I haven't had a lot of time in the past year or so to work on my DJ much less follow the thread but I just happened to come on to the QB this evening and found you. Hooray! The Man upstairs is telling me to get busy because I "just" happened on the FB Dear Jane group last night and that made me ache to begin again. I have about 25 blocks finished from the 2012 journey and would like to join this thread and get back to work on it. I will surely do better this time around. I think I can catch up with the schedule due to the fact that some of my blocks are already done. Thank you very much, Gus.
07-02-2014, 09:05 AM
#329
Senior Member
Thread Starter
Join Date: Oct 2010
Location: Agoura Hills, CA
Posts: 926
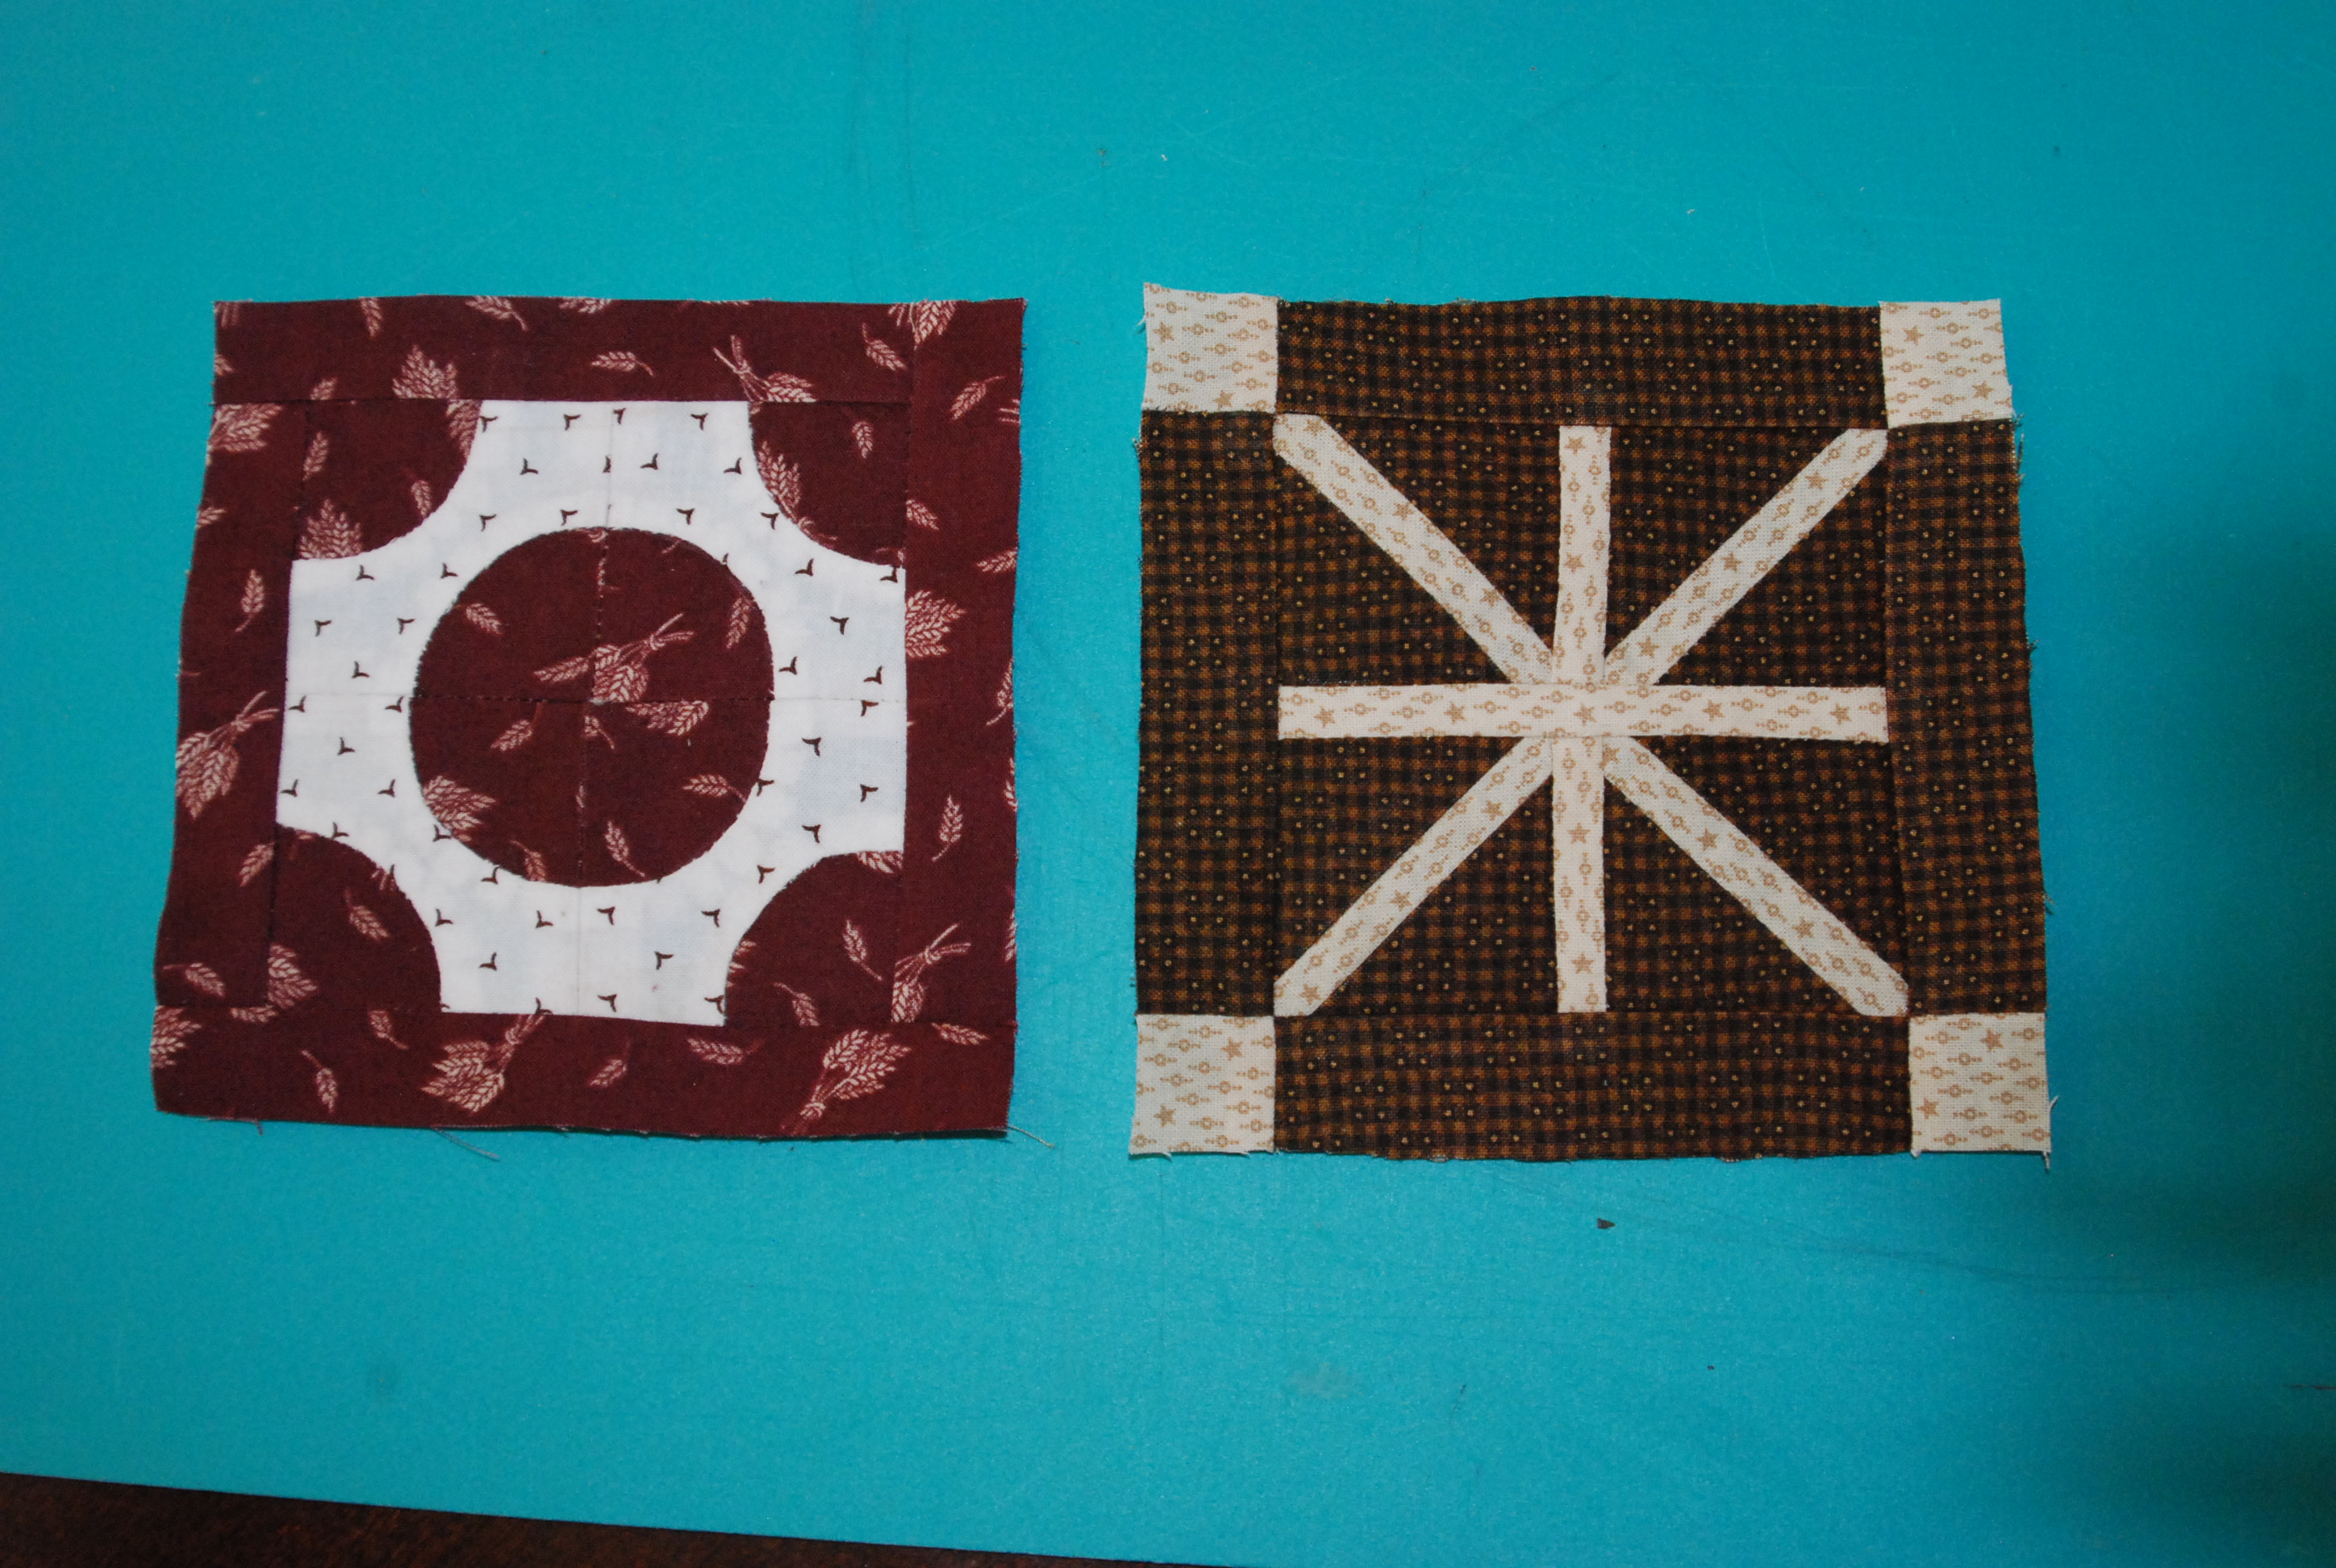
Ladies!!!! this board has been stagnant for a while not really knowing what to say, I decided to look both at the old thread and the schedule I have down for approximately this point... so here are some "cut and pasted" posts...
completed C11 and D1...
A small word of warning when you do C11 ....ahem.... make sure you piece the four squares in such a way that you end up with a circle [first time I had a cross....] when I checked the thatquilt.com site just now for comparison I noticed I did it almost the same way. I cut four dark "generous" 2 1/2" squares - the site says 3" but you really only will need 2 3/8 since they finish 1 7/8" - then I made a template of the "bone shape" and marked four on light 'background' fabric using washable fabric marker. I marked the bones on each square for placement and used it to needle-turn applique my bones. I pressed my blocks and trimmed to 2 3/8" squares. When complete, I sewed the squares together by machine and also added the final strips as one long strip per side [my strips were 1" wide.] when I finished and pressed I trimmed block using my Dear Jane ruler to 5" square.
D1 is not PP'd I simply cut four 2 3/8" squares of dark fabric in half once diagonally. All light strips measure 1/4" - I cut a long strip 3/4" wide and very carefully stitched 1/4" seams matching four triangle bases to one side of my strip and leaving ~ 1/8-1/4" space between points of triangles. I then carefully placed the remaining four triangles directly across the first set on the other side of strip and attached them. I pressed the seams to the dark fabric and carefully trimmed the squares - placing the diagonal marking on my ruler midway down the center of the strip. Trimming squares to 2 1/8" I added another 3/4" light strip in between two squares with points meeting at the bottom. Pressed sections and added one more strip between the top and bottom parts. I ended up matching the inner corners of diagonals and taking a few hand stitches before stitching by machine.... difficult to match those d.....m corners!! The four dark outer border pieces need to measure 4x1 and corner squares finish 1/2" so are cut 1" squares. I sewed dark rectangles to two sides and light squares to one end of remaining rectangles by machine. I attached the remaining borders with squares to within 1/4" next square and added the remaining squares by hand.
not really knowing what to say, I decided to look both at the old thread and the schedule I have down for approximately this point... so here are some "cut and pasted" posts...completed C11 and D1...
A small word of warning when you do C11 ....ahem.... make sure you piece the four squares in such a way that you end up with a circle [first time I had a cross....] when I checked the thatquilt.com site just now for comparison I noticed I did it almost the same way. I cut four dark "generous" 2 1/2" squares - the site says 3" but you really only will need 2 3/8 since they finish 1 7/8" - then I made a template of the "bone shape" and marked four on light 'background' fabric using washable fabric marker. I marked the bones on each square for placement and used it to needle-turn applique my bones. I pressed my blocks and trimmed to 2 3/8" squares. When complete, I sewed the squares together by machine and also added the final strips as one long strip per side [my strips were 1" wide.] when I finished and pressed I trimmed block using my Dear Jane ruler to 5" square.
D1 is not PP'd I simply cut four 2 3/8" squares of dark fabric in half once diagonally. All light strips measure 1/4" - I cut a long strip 3/4" wide and very carefully stitched 1/4" seams matching four triangle bases to one side of my strip and leaving ~ 1/8-1/4" space between points of triangles. I then carefully placed the remaining four triangles directly across the first set on the other side of strip and attached them. I pressed the seams to the dark fabric and carefully trimmed the squares - placing the diagonal marking on my ruler midway down the center of the strip. Trimming squares to 2 1/8" I added another 3/4" light strip in between two squares with points meeting at the bottom. Pressed sections and added one more strip between the top and bottom parts. I ended up matching the inner corners of diagonals and taking a few hand stitches before stitching by machine.... difficult to match those d.....m corners!! The four dark outer border pieces need to measure 4x1 and corner squares finish 1/2" so are cut 1" squares. I sewed dark rectangles to two sides and light squares to one end of remaining rectangles by machine. I attached the remaining borders with squares to within 1/4" next square and added the remaining squares by hand.


Thread
Thread Starter
Forum
Replies
Last Post
Auntie V
Main
13
05-13-2014 09:24 AM
