
Mystery Quilt Thread final clues, page 8, mystery 95% solved, page 9

 07-19-2008, 09:36 AM
#82
Super Member

Join Date: Apr 2008
Location: Torrox, Andalucia, Southern Spain
Posts: 9,525
Hi Cordelia, I really want todo this, but haven�t got sufficient materials. So start without me and as we go along I will catch up. Sorry if this creates a problem, or would you prefer I dropped out completely. No problem.
Elle
Elle
07-19-2008, 11:50 AM
#83
Senior Member

Join Date: Jun 2007
Location: New Zealand
Posts: 933
Hi Cordelia :D , been meaning to post on here for a while, but with everything that's been going on, haven't got round to it. I would like to join in too. I luv doing mystery quilts especially with a group, it's such alot of fun :thumbup: . It's very nice of you to take the trouble to organise something like this as it's alot of work. I probably won't be able to keep up all the time, but that's alright, the thread's not going anywhere, I'll just catch up where I can. I know it's a bit of a pain, but could you just say how much of the larger amounts of fabric are for borders as fabric is quite costly here and I like to leave things like borders to be figured out later :wink:
Silly me I just read back, should have done that first :lol: , I think if I get it right the fabric needed without borders is 2 1/8 yards?
Silly me I just read back, should have done that first :lol: , I think if I get it right the fabric needed without borders is 2 1/8 yards?
 07-19-2008, 08:49 PM
#85
Senior Member
Thread Starter
Join Date: Mar 2008
Location: Maryland/D.C.
Posts: 677
Hi, everyone. It's like 12:30 here EST. I'm sorry I'm on so late.
Don't anyone feel pressured. I'll post the clues and you can all watch. It's quite an investment.
A couple of you are wondering about the borders.
First, the green is used in the quilt and for the border.
To be honest, because I enlarged this to a lap quilt size, I haven't done it and am doing it ahead of you all so if there's a glitch, I'll catch it first.
For both the winter version and the traditional version, the border alone is calculated at 1 1/2 yards.
So, the three yards difference can be made up in your stash. And then there's the applique piece. I would recommend forest greens, pine greens, textured greens, no aqua, no emerald green for it to look right. It doesn't have to be all the same green fabric either. You can use different greens.
The border will look best if it's in the same "family" of green used in the quilt.
To make it look Christmasy, paint on glitter paint you get in the craft store.
The same with the winter version. The winter version uses more of the blue in the quilt. The four yards difference in that version can be made up with whatever blue fabrics you have. For it to look right, I'd stay away from blue green, turquoise, or purple tones. Medium to dark blues would be the best choice. Textured and blue on blue batiks would be outstanding. I wouldn't use a blue print unless it was all blue.
The blue fabrics in this quilt will look best if they're in the same family of blue as the border.
07-19-2008, 10:20 PM
#86
Senior Member
Thread Starter
Join Date: Mar 2008
Location: Maryland/D.C.
Posts: 677
STEP 1: Cut 4.5" squares!
I'm going to post an image of the sample fabric and tell you how many 4.5" squares you need. If you didn't buy the Hoffman fabrics I posted, and substituted them, so we don't affect the yardages, make sure you don't mix and match substitute fabrics for any particular Hoffman fabric.
Winter version:
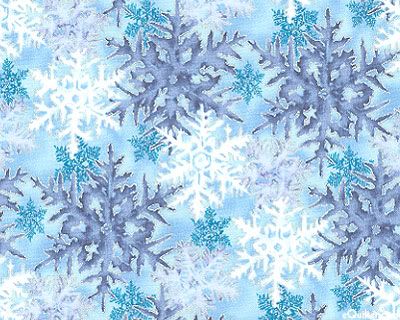
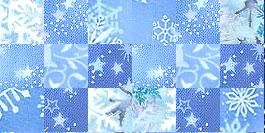
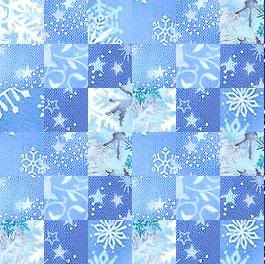
1. Cut eight 4.5" squares of this (light blue snowflake pattern) fabric (or the one you substituted for it.)

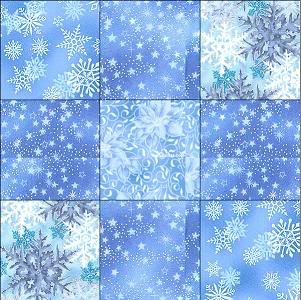
2. Cut sixteen 4.5" squares of this (light blue star dusty print) fabric (or the one you substituted for it.)

3. Cut eight 4.5" squares of this (light/medium snowflake print) fabric (or the one you substituted for it.)
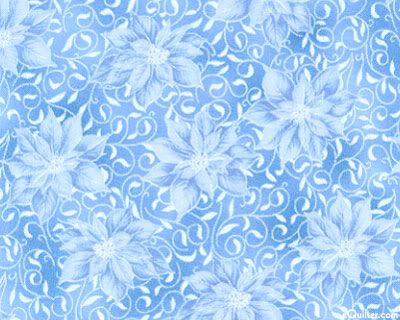
4. Cut four 4.5" squares of this (light blue pointsetta print) fabric (or the one you substituted for it.)
You should have 36 4.5" squares now.
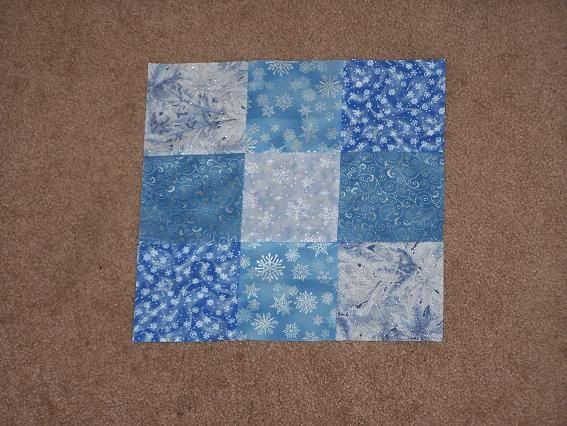
STEP 2: Sew four 9 patch squares.
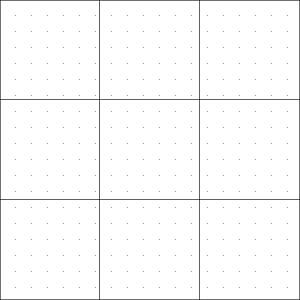
Mix and match all your textures/shades in the 9 patches.
Example:
You should have four 9 patch squares measuring 12.5" each.
Here's mine: (I substituted fabrics and it doesn't look as nice ...)
STEP 3:
Sew two 9 patches together.
Sew the two rows together.
Your piece should measure 24.5".
Here's mine. BUT, I have way too much contrast in my piece. It will look better if you use the similar shades, but different patterns on them to avoid all this contrast. I'm going to redo mine for less contrast. But, if you like contrast, that's fine too.

That's it for now!
I'm going to post an image of the sample fabric and tell you how many 4.5" squares you need. If you didn't buy the Hoffman fabrics I posted, and substituted them, so we don't affect the yardages, make sure you don't mix and match substitute fabrics for any particular Hoffman fabric.
Winter version:
1. Cut eight 4.5" squares of this (light blue snowflake pattern) fabric (or the one you substituted for it.)
2. Cut sixteen 4.5" squares of this (light blue star dusty print) fabric (or the one you substituted for it.)
3. Cut eight 4.5" squares of this (light/medium snowflake print) fabric (or the one you substituted for it.)
4. Cut four 4.5" squares of this (light blue pointsetta print) fabric (or the one you substituted for it.)
You should have 36 4.5" squares now.
STEP 2: Sew four 9 patch squares.
Mix and match all your textures/shades in the 9 patches.
Example:
You should have four 9 patch squares measuring 12.5" each.
Here's mine: (I substituted fabrics and it doesn't look as nice ...)
STEP 3:
Sew two 9 patches together.
Sew the two rows together.
Your piece should measure 24.5".
Here's mine. BUT, I have way too much contrast in my piece. It will look better if you use the similar shades, but different patterns on them to avoid all this contrast. I'm going to redo mine for less contrast. But, if you like contrast, that's fine too.
That's it for now!
07-19-2008, 10:49 PM
#87
Senior Member
Thread Starter
Join Date: Mar 2008
Location: Maryland/D.C.
Posts: 677
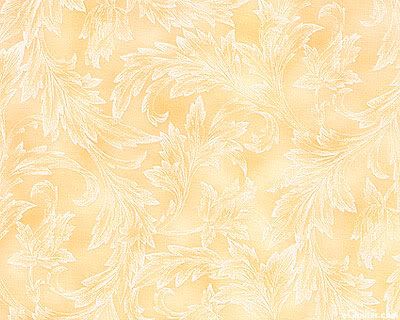
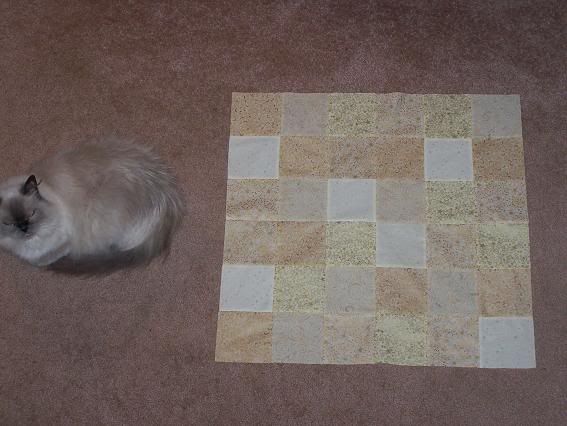
Traditional version: You're going to do exact same thing as the winter version, only I'm going to post the fabric examples: Follow the directions in the winter version post.
STEP 1:
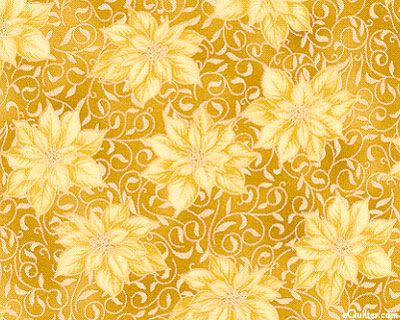
1. Cut four 4.5" (gold pointsetta print) fabric (or substitute you have for it.)
2. Cut eight 4.5" (medium beige pointsetta print w/gold) fabric (or substitute you have for it.)

3. Cut eight 4.5" (medium beige print) fabric (or substitute you have for it.)
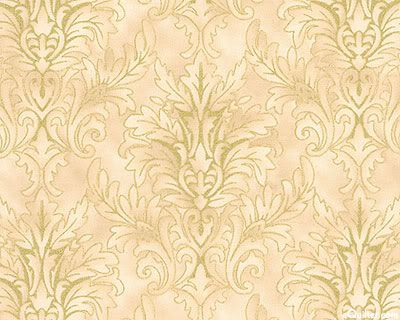
4. Cut eight 4.5" (medium beige filigree/pearl print) fabric (or substitute you have for it.)
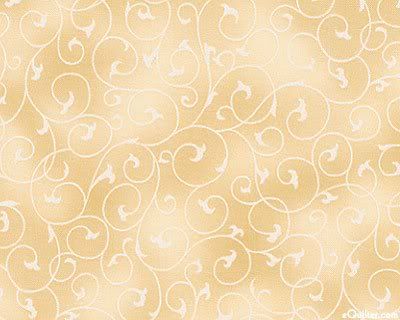
5. Cut eight 4.5" (medium beige pearl print) fabric (or substitute you have for it.)
STEP 2: Sew your 9 patch same as the winter version directions. Must measure 12.5".

Here's mine: (Again, a little too much contrast. You want similar tones, but different shades and textures. Not too much contrast -- unless you like a lot of contrast.)
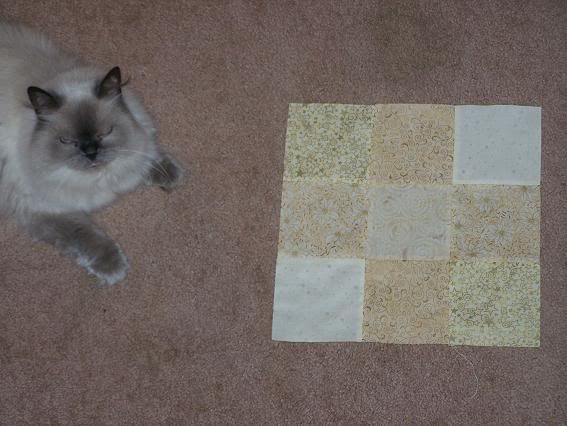
STEP 3: Sew your 9 patches together for your center. (Must measure 24.5".)

Here's mine: (The feline is Miss Suzie.)
STEP 1:
1. Cut four 4.5" (gold pointsetta print) fabric (or substitute you have for it.)
2. Cut eight 4.5" (medium beige pointsetta print w/gold) fabric (or substitute you have for it.)
3. Cut eight 4.5" (medium beige print) fabric (or substitute you have for it.)
4. Cut eight 4.5" (medium beige filigree/pearl print) fabric (or substitute you have for it.)
5. Cut eight 4.5" (medium beige pearl print) fabric (or substitute you have for it.)
STEP 2: Sew your 9 patch same as the winter version directions. Must measure 12.5".
Here's mine: (Again, a little too much contrast. You want similar tones, but different shades and textures. Not too much contrast -- unless you like a lot of contrast.)
STEP 3: Sew your 9 patches together for your center. (Must measure 24.5".)
Here's mine: (The feline is Miss Suzie.)
07-27-2008, 05:34 PM
#88
Senior Member
Thread Starter
Join Date: Mar 2008
Location: Maryland/D.C.
Posts: 677
Everybody, I accidently deleted two blocks from the Winter version and redid them.
But, I may have redone them slightly different. I'm sorry. It was an accident.
It really shouldn't have affected the yardage estimate. But, I've printed the yardage estimate again.
It would help if I put in the link.
For traditional yardage estimate:
http://www.box.net/shared/tdxalryo8c
For winter yardage estimate:
http://www.box.net/shared/tckhvfvso4
07-31-2008, 07:01 AM
#89
Senior Member
Thread Starter
Join Date: Mar 2008
Location: Maryland/D.C.
Posts: 677
Well, my mother has fallen in love with the winter version of the mystery quilt. (I let her look at them.)
BUT, she says it's too hard and complicated! (sighs.)
The first clue was easy.
Before I post the second clue, I wanted to do them and make sure there's no unforeseen complications.
The next clue can either be paper piecing or you can rotary cut and piece. But, because I don't want you to worry about measuring and seam allowance variances, I've designed the rest of it to be paper pieced. It will be more precise if you paper piece them.
I'll provide rotary cutting directions and the paper piece template. You can decide which way you want to do them. (I haven't rotary cut and pieced, so I can't vouch for how accurate it will turn out. I'm paper piecing.)
Please make a scrap note of this and keep it with your blocks so you can refer to it without having to come in here.
VERY IMPORTANT IF YOU PAPER PIECE:
When I post the foundation piece templates for you to download and print, you MUST CHECK the following:
Download the file at the link I post. It will be the block template for you to print. It will be a PDF document.
There is a printer button icon in the PDF document you'll use to print. A print menu will open up where you will choose how many copies to print, etc.
There is an option that you MUST check. In that print menu there is a section called Page Handling. It has a spot where you choose how many copies to print. Under that is an option called PAGE SCALING. It will probably say: Shrink to printable area. CHANGE THAT option to NONE. Make sure you check this section every single time before you print anything.
I overlooked that the first time I printed a block and it shrunk the template. I was perplexed and it took me some time before I realized the problem. The blocks have to be a precise size. Before you use any printed template, just to be sure, make sure you measure the dimensions of the block on the paper with your ruler.
I'll post the next clue tomorrow morning with the links. Keep a note with you about the page scaling print option. The name of the pdf document has the dimensions the template MUST BE. Please measure it with your ruler before you do it. If it measures different, then check the page scaling option again. I don't know if it defaults to "shrink to printable area." You DON'T want the shrink option. It must be set to NONE.
I'm sorry for all the bold emphasis. I just don't want anyone to miss this and make a bunch of blocks that won't fit and waste time and fabric. I'll keep reminding about this, so don't be offended. I know you're all experienced quilters, but this was a computer issue. That darn print option threw me for a loop and I couldn't figure out the problem at first. It took me a while before I even thought to check the print settings.
07-31-2008, 06:40 PM
#90
Senior Member

Join Date: Feb 2008
Posts: 879
Well I can't speak for anyone else but I sure would've messed it up so thanks for the warning!! I just wanna see a little bit of how it goes together. I'm not sure my fabrics are correct so I'm gonna wait until about step 3 to get a better idea if I can use the fabrics i picked out. Thanks for doing this! It's so exciting!!

Thread
Thread Starter
Forum
Replies
Last Post
cacarte
Links and Resources
0
03-05-2010 06:40 PM
cacarte
Links and Resources
0
03-04-2010 03:04 PM
