
2020 Fabric Moratorium
 03-31-2020, 04:15 PM
#411
Super Member

Join Date: Dec 2010
Location: Portage, Michigan
Posts: 9,588
I am so fortunate to have a good supply of batting and plenty of fabric. So I have been just clicking delete on all of the ads and offers for fabric. I am preparing for a virtual quilt retreat this coming week-end. Guild retreat was cancelled. I have set aside the time and will mimic the happenings that usually occur at the retreat. Ah..... three days of sewing with no online class time and limited e-mail. Yippee! Oh, and to the point, all my quilt plans for my at home retreat are from my stash right down to the batting and backing. Looking forward to Friday at 10 am.
 03-31-2020, 05:31 PM
#413
Senior Member
Join Date: Apr 2019
Posts: 847
I'm 100% with Vasilisa. I don't want to shop online and I'm a fabric fondler anyway.
8 fat quarters and borders from scrap/stash/ hmm I think this needs something lets root around...no, not that one but...oooh I'd forgotten about that! Its perfect!
Its not perfect - but I don't think the nonquilters will notice
8 fat quarters and borders from scrap/stash/ hmm I think this needs something lets root around...no, not that one but...oooh I'd forgotten about that! Its perfect!
Its not perfect - but I don't think the nonquilters will notice
04-01-2020, 08:26 AM
#414
Super Member
Join Date: Aug 2018
Location: Peoria, IL -- Midwest Transplant
Posts: 7,314
Still making progress. I have to finish pressing some of the first round of the triangle combinations and put on the second sides of all the square/triangle units. These are slightly large and will need to be trimmed before combing but it gives a better idea of the block I'm making.
The center blocks were fussy cut, or at least semi-fussy, not to the extent of exact positioning I would do with a one-block wonder but loosely centered and up/down along the diagonal.
The setting triangles I would normally cut as squares first and then along the diagonal. Because of the lines, I had to cut long strips along the length of the yardage and cut nesting triangles that way -- but I like the way it works with the lines in the Minion pieces even though it is a lot darker/different than my original idea where I wanted "grey" as a noticeable color in addition to yellow and black.
04-01-2020, 04:23 PM
#415
Super Member
Join Date: Dec 2010
Location: Portage, Michigan
Posts: 9,588
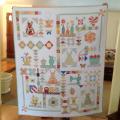
Here is the finished top that I posted in an unfinished state earlier in another thread. I am calling it Black Diamonds. It finished at 60 x 75. Not yet quilted but will go to my LA next week. The small black squares were from the 2019 Birthday Swap plus a few more I cut from my stash to complete the top. I was thrilled to find the light white with black cat print fabric for the outer sashing on hand but even more surprised to discover that it was a 108 wide-back! No need to make extra squares to stretch the back to be wide enough. So, in the end, the top, batting and back all came from stash! Yeah! 
 04-02-2020, 05:25 AM
#420
Super Member
Join Date: Aug 2018
Location: Peoria, IL -- Midwest Transplant
Posts: 7,314
Love that Cat Fabric, WMUTeach! Nice finish.
I got my "candy kiss" units made yesterday. I do the "cut large and trim down" methods whenever I can. For this project the center square was the fussy cut 4" square and had to be precise, I cut all the triangles a bit bigger than needed. When it came time to trim, two problems popped up quickly -- one is this is just the sort of thing I have problems seeing!
And then I knew (because I designed it) that it was supposed to finish at 5.5 x 10.5 (I really like having rulers that work) but the Omnigrip square I was using doesn't have lines that cross from the corners, it has one line that is corner to corner on the full size, and another that is on the diagonal for the 10" size. Anyway, tape to the rescue once again -- it would have been really frustrating yesterday to try and "see" these to trim them.
Another comment about my construction methods, pressing open is pretty straight-forward but the usual "rule" is to sew things with the smaller piece on top, with open seams you go with which ever side has more seams so you can catch those leading edges. My next step, is ready to go, with the grey bars pinned on and ready to be sewn.
So shot one shows the taped ruler, and shot two is a trimmed one on top and the untrimmed on the bottom. I had about a quarter inch all 4 sides to take off.
