
Sylvia Bridal Sampler BOW
 05-18-2018, 01:33 PM
#1861
Super Member

Join Date: Jul 2013
Location: South Dakota
Posts: 8,145
I figure as long as my SBS is still in process, I've got an excuse for hanging around. I'm kind of surprised the moderators have not told us to keep the discussions more on track, and not turn this into a sort of "private" club. Though we may be OK as long as we stay on quilting, and don't get too far off on personal topics (and I mean those that should be private, not sharing pictures of the countryside).
I got in trouble many times on the Vintage Sewing Machines section. I don't think the moderators liked that there were a lot of people who hung out there with little or no interest in Quilting. Most are gone to a new board and I visit, but my heart is more into quilting than old machines, so I spend most of my time here.
Back on topic - I bought the "Dance of the Dragonflies" pattern and want to do it turned edge machine applique. My plan is to cut the black for the wings, and reverse applique it on top of the colored parts. Not sure though, becuase that has ton of inside corners which I find much harder than outside corners. Or I could give up that idea and do it raw edge with a narrow satin stitch. Can't do any work on it until I decide which way to go.
 05-18-2018, 01:39 PM
#1862
Super Member
Join Date: Jul 2013
Location: South Dakota
Posts: 8,145
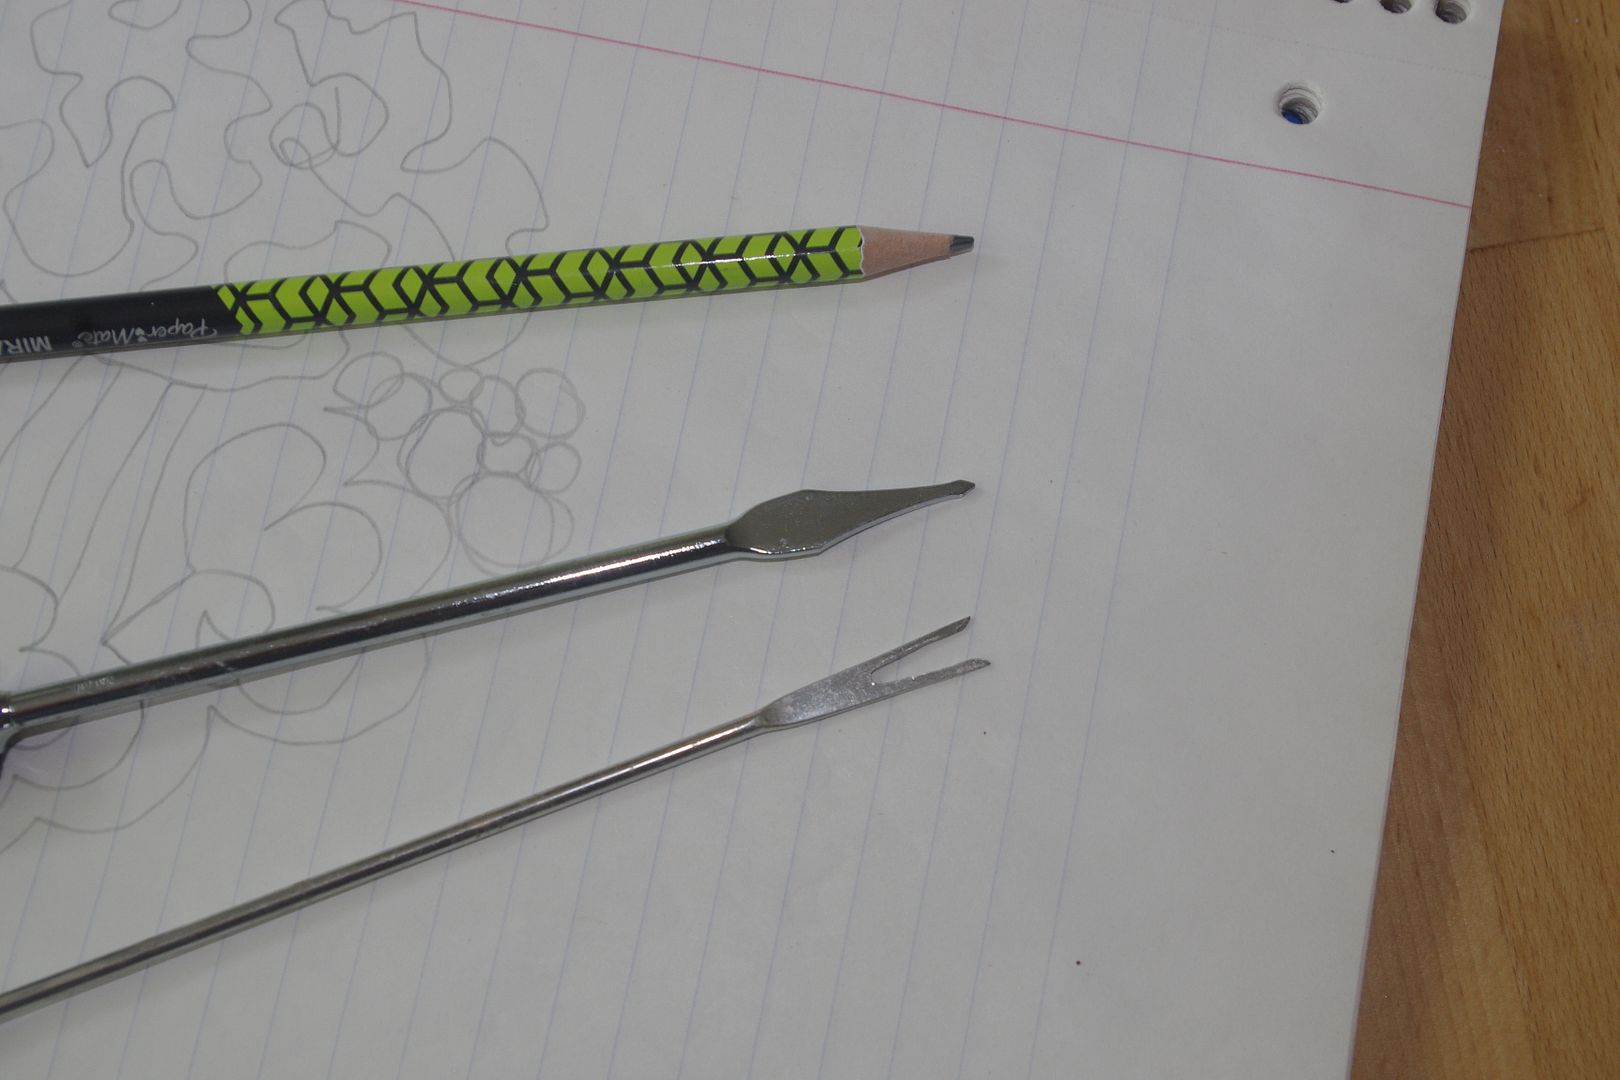
Here is what I'm planning on using for the applique. I have a couple of glue pens. I bought one and then when digging through some starter kits I bought with my embroidery machine, found another.
For those of you that own the tools, are these similar in size? One is a small fondue fork, the other is from my candy making tools.
For those of you that own the tools, are these similar in size? One is a small fondue fork, the other is from my candy making tools.
05-18-2018, 02:06 PM
#1863
Super Member
Thread Starter
Join Date: Mar 2011
Location: The Netherlands
Posts: 6,063
I was thinking the same about not being on track. If there's one thread that turned into a private club it's the Pony Club one.
Here's a pic of the tools:
[ATTACH=CONFIG]594588[/ATTACH]
Here's a pic of the tools:
[ATTACH=CONFIG]594588[/ATTACH]
05-18-2018, 02:10 PM
#1864
Super Member
Thread Starter
Join Date: Mar 2011
Location: The Netherlands
Posts: 6,063
[QUOTE=Macybaby;8060510]Anael, I think that is for raw edge. When I do that, I trace the line on the fusible, but cut the fusible a bit larger. Then I iron it on to the fabric and cut fabric and fusible on the raw edge. This way you get a much cleaner edge than if you cut the fusible exact and then ironed it on and cut the fabric at the edge of the fusible.
.That makes sense. Thanks Cathy!
.That makes sense. Thanks Cathy!
05-18-2018, 04:41 PM
#1865
Super Member
Join Date: Dec 2017
Location: Southwest Idaho
Posts: 5,999
Anael....for your first attempt with this new method, your applique looks great!! Pointy pointy!! Points and curves takes practice. For inside curves, you need to clip around the curve but not all the way to the stabilizer edge. Just enough to give the fabric some give and smoothed edge through the curve. This is no different than what is done with hand applique. For points, I fold the edges on top of each other and then clip the little dog ear off. Some times, if the piece allows, I tuck the dog ear in but that will leave some build so I just clip it off from the back. The point is still turned edge all sides so you are good.
Here are are some pics of the back of my pieces. The first one is a leaf and shows the folded edge after dog ear cut off. The second shows you an inside curve (concave) where I just snipped the inner point of the Y. As you can see, For small pieces, I cut to about an 1/8" seem allowance to reduce bulk along the edge that gathered fabric can cause. When doing circles, grab the fabric a little at a time to avoid points. Then when circle complete, go around again and smooth out the gathers along the back. The beveled edge works best with curves.
Cathy, one of the tools has a beveled edge. This helps with smoothing out edge. The opposite end that is basically like knitting needles is used for points to manipulate the fabric..and any more tiny detail tuck work. The youtubes shows details. The one with a fork look, is used to hold your piece is place as you turn the edge with the beveled tool. Anything, including fingers, can be used for this but it works best with small pieces and you avoid the glued fingertips.
Hope this helps!
05-18-2018, 05:07 PM
#1866
Super Member
Join Date: Dec 2017
Location: Southwest Idaho
Posts: 5,999
Anael.....I'd go with Cathy's explanation of the PDF. Here is the rule with Appliquick turned edge. Cut stabilizer the size of desired finished piece, fuse to fabric, cut fabric around stabilizer 1/8" to 1/4" seam allowance. Voila! This makes it easy because you can trace patterns directly on stabilizer. One catch....when you do this, your piece will be the opposite direction when you fuse to fabric. To avoid this, I trace with the shiny/fuse side facing up. Does that make sense?
edited to add: I love the green monster!!! That is a cool way to use a churn dash block. Very creative. Thank you for sharing.
edited to add: I love the green monster!!! That is a cool way to use a churn dash block. Very creative. Thank you for sharing.
Last edited by Teen; 05-18-2018 at 05:19 PM.
05-18-2018, 05:29 PM
#1867
Super Member
Join Date: Dec 2017
Location: Southwest Idaho
Posts: 5,999
Suz.....My avatar is one of the blocks from the pattern I'll be using. I made a pillow to audition the pattern before I went to the expense of purchasing the fabrics. It is called Baltimore Garden by Barbara Burnham. The floral's are pretty basic, not really dense in floral's etc. I chose this pattern because of the history of the original quilt that Barbara found in an attic. The actual name of this pattern is called "MEC Remembered". MEC are the initials of the original maker in 1848 found on the original quilt. Barbara, painstakingly, recreated this pattern and used the originals colors to do it. That is what I am going to do, too. Others have used different colors. I just really like the simplicity of this quilt and the history behind it. Good luck...
My SBS quilt top is done! Just clipping threads and getting it ready for LA. This weekend is sandwich time!
My SBS quilt top is done! Just clipping threads and getting it ready for LA. This weekend is sandwich time!
05-18-2018, 08:57 PM
#1868
Super Member
Thread Starter
Join Date: Mar 2011
Location: The Netherlands
Posts: 6,063
Thank you Teen for the explanation and pictures. I didn't know you can clip the dog ears off, that's what bothered me the most. I can practice a bit more as I have to make 25 teardrop shapes. I did use the shiny side up when tracing the pattern. That's what I saw in the youtube video.
Haha, the Green Monster. The inside blocks are 6" finished. I really like the idea, I just don't like the green colour! It's so.......green!
Haha, the Green Monster. The inside blocks are 6" finished. I really like the idea, I just don't like the green colour! It's so.......green!
05-19-2018, 08:01 AM
#1870
Senior Member
Join Date: Aug 2010
Posts: 430
Suz.....My avatar is one of the blocks from the pattern I'll be using. I made a pillow to audition the pattern before I went to the expense of purchasing the fabrics. It is called Baltimore Garden by Barbara Burnham. The floral's are pretty basic, not really dense in floral's etc. I chose this pattern because of the history of the original quilt that Barbara found in an attic. The actual name of this pattern is called "MEC Remembered". MEC are the initials of the original maker in 1848 found on the original quilt. Barbara, painstakingly, recreated this pattern and used the originals colors to do it. That is what I am going to do, too. Others have used different colors. I just really like the simplicity of this quilt and the history behind it. Good luck...
My SBS quilt top is done! Just clipping threads and getting it ready for LA. This weekend is sandwich time!
My SBS quilt top is done! Just clipping threads and getting it ready for LA. This weekend is sandwich time!

Thread
Thread Starter
Forum
Replies
Last Post
