
2012-2013 Dear Jane Stickle 2d Cyber Party Pictures and Discussion
 01-29-2012, 05:42 PM
#231
Senior Member
Thread Starter

Join Date: Oct 2010
Location: Agoura Hills, CA
Posts: 926
I went out of town a couple of days and just got back to this thread ... there have been so many many wonderful blocks posted since I left...WOW. Yep Tyme - love the way you did your A-1 and also perfect circles!!
Are you using Karen Kay Buckley's "perfect circles" as well?? There are so many ways of making circles. I think the key is to have something firm or sturdy to be able to put a perfect crease in your fabric - whether you use an iron or your fingernail [I've done both.] Pearl Periera puts a pattern on a type of freezer paper and irons it to another piece of freezer paper [marking to the inside] before cutting it - that way the ink doesn't run and you have a stiffer template. My friend, Rita Verroca laminates her pattern pieces. You can run a thread around a circle to make a yo-yo shape and needle-turn gathered side down.
Another hint for cutting flying geese - a waste-free method that is my favorite - Patti Anderson has copy written these directions so I will simply direct you to her instructions
http://www.patchpieces.com/files/flyinggeese.pdf
Since I just got home - and I haven't done the three blocks yet myself - I will end now. I was given a list of blocks, which like A1 need to be "mirrored" if you want to have your blocks look like Jane. I will post these shortly.
Gus
 01-29-2012, 05:57 PM
#232
Super Member

Join Date: Aug 2011
Location: Sparks, NV
Posts: 1,243
Judy, I like your drawing for the A1 block. It looks spot-on ! I tried drawing it up in EQ but could not figure out how to post it so I took a picture of what was on the screen so it is a bit distorted. The question I have is that when I looked at the foundation piecing of it, it looked like a nightmare to get together. How are you putting yours together?
01-29-2012, 06:19 PM
#233
Super Member

Join Date: Jul 2011
Location: Neuquen - Argentina
Posts: 2,288
Thank you Linda. Yes, I like how it looks too. I also noticed the piecing nastiness for the foundation piecing! I have not done the actual printing of the block yet for foundation piecing but when I saw how difficult it looked I was wondering if Nancy's view (post #218) of making triangles would simplify the construction? I might do a "file > print > Block" rather than "file > print > Foundation Pattern" and then cut the block up myself into 8 triangles like Nancy showed and then the 4 triangle corners; that might be easier for me. Let me know how yours goes since I'm sure you'll be stitching before I am!
A big hug!
01-29-2012, 06:21 PM
#234
Super Member
Join Date: Jul 2011
Location: Neuquen - Argentina
Posts: 2,288
Week three!
I was really dreading the one with the reverse applique as I have never done that before. It looked a lot harder than it actually was. I enjoyed doing it. Great to learn a new technique!
I love all the variations in color everyone is putting up. Makes me want to start about 10 more Dear Janes!
I was really dreading the one with the reverse applique as I have never done that before. It looked a lot harder than it actually was. I enjoyed doing it. Great to learn a new technique!
I love all the variations in color everyone is putting up. Makes me want to start about 10 more Dear Janes!
I love your blocks! Looking great!
Thank for sharing A1 new idea! I love it! I think I'll try it!
A big hug!
01-29-2012, 07:15 PM
#235
Senior Member
Thread Starter
Join Date: Oct 2010
Location: Agoura Hills, CA
Posts: 926
Echoemb - what do you mean "points not coming out" in A1?? Tyme has it exactly right! I looked at the flicker pics that Nancy linked us to and compared the original DJ with both Thatquilt.com and the DJ software. The original was very wonky - no perfect triangles nor do all of them come to points - this adds character! love it
Now that I read everything I missed..... I see this was originally "motomom's" idea - I don't see her on my list she has created a separate couple of DJ threads with some interesting stuff too.
Thanks to both - you are totally right!
Now that I read everything I missed..... I see this was originally "motomom's" idea - I don't see her on my list she has created a separate couple of DJ threads with some interesting stuff too.
Thanks to both - you are totally right!
Last edited by Cre8tvlwyr; 01-29-2012 at 07:21 PM.
01-30-2012, 02:12 AM
#236
Power Poster

Join Date: Mar 2011
Location: western NY formerly MN, FL, NC, SC
Posts: 51,430
Another hint for cutting flying geese - a waste-free method that is my favorite - Patti Anderson has copy written these directions so I will simply direct you to her instructions
http://www.patchpieces.com/files/flyinggeese.pdf
Gus
http://www.patchpieces.com/files/flyinggeese.pdf
Gus
Welcome home.
01-30-2012, 03:22 AM
#237
Super Member
Join Date: Jul 2010
Location: England, U.K.
Posts: 1,588
I know we are a long way from finishing - well there may be a few of us getting nearer !!!! ---- but I found this link re the scallop edges so thought I would post it now - 'cos I know I will forget further down the way.
http://lindafranz.com/section/scallops/38
Worth keeping I think for future reference.
Regards,
DottyD.
http://lindafranz.com/section/scallops/38
Worth keeping I think for future reference.
Regards,
DottyD.
01-30-2012, 05:14 AM
#238
Power Poster
Join Date: Mar 2011
Location: western NY formerly MN, FL, NC, SC
Posts: 51,430
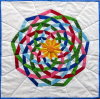
OK gals.... I drafted the orig A1 at 4.5" block in EQ5 and wanted to find an easier way to construct it.
[ATTACH=CONFIG]307439[/ATTACH]
First, I worked on the center square on point discussed earlier. Sew 2 - 2"x12.5" strips together and press open. I don't have a 45 degree triangle ruler. So I used my 45 degree angle on my straight ruler. Mind you, this does not have the tip cut off like some triangle rulers, so the tip is included in the strip measurements. I cut 8 triangles alternating turning upside down. I sewed them together to make this
[ATTACH=CONFIG]307437[/ATTACH]
I then used my block printout and cut out the center square on point. I trimmed this back to that size making sure to add the seam allowances. So the overall trim size comes to 3 7/8" square. My block came out just a hair small, so you might want this trim to be 4" square.
[ATTACH=CONFIG]307440[/ATTACH]
This is now my final block, which is a tad small. When I redo it, I will make the corner squares 1.75" and the tiny triangle 1.25" instead of the 1 3/8 in this block... it seems a tad large on this block. The setting triangles should be cut from 2.25" squares cut corner to corner.
[ATTACH=CONFIG]307442[/ATTACH]
Last edited by QuiltnNan; 01-30-2012 at 05:27 AM.
01-30-2012, 05:49 AM
#239
Super Member

Join Date: Dec 2009
Location: NY
Posts: 1,501
QuiltnNan, thanks so much for showing how you have made this block! I am planning on attempting this way. I like the circular look of this one. I tell ya, this group is awesome! I would never have been able to find out how to do this one on my own. You guys are great!
01-30-2012, 06:37 AM
#240
Senior Member

Join Date: Sep 2009
Location: Where it's warm & sunny all the time :-)
Posts: 610
Is anyone thinking about redrafting some blocks? Some have that little border around the edge, and I'm contemplating sizing things up enough to eliminate it. For example BR1, it would be easy to extend the interior seams to the edge. But on the other hand that little strip eliminates exterior bias. Thoughts?
RE using different fabrics.....each of my blocks is a different fabric. For the triangles I chose mid-tones of those used in the blocks so the borders would look visually balanced. The corners are all reddish patterns. Cornerstones and binding will be another coordinating red.
Went back through all the blocks this weekend and cut out the BF behind appliqued pieces. I'm strongly considering hand quilting and this will eliminate a layer. Now back to putting on sashings.
Your blocks are all looking soooo good! Keep up the great work, ladies!!
PS: If you haven't already, you might want to check out www.thatquilt.com as a reference for constructing blocks. I don't care for her freezer paper method but many times used her sequences of construction.
Last edited by KR; 01-30-2012 at 06:44 AM.

Thread
Thread Starter
Forum
Replies
Last Post
kluedesigns
Blocks of the Month and Week
6167
02-19-2013 08:53 AM
Cre8tvlwyr
Blocks of the Month and Week
875
01-14-2012 09:00 PM
Janstar
Blocks of the Month and Week
52
10-30-2011 04:23 PM
sandpat
Blocks of the Month and Week
35
12-12-2010 09:54 AM
Lacelady
Blocks of the Month and Week
89
06-17-2010 06:40 AM
