
Elisabrat's Medallion Style Quilt Along!
 02-22-2014, 06:40 PM
#981
Super Member
Join Date: Dec 2010
Location: Wisconsin
Posts: 2,122
Elisabrat, I hope you are feeling better.
I finally found a few minutes to work on my quilt again. HELP!!! This sure has been a struggle for me. I cut my borders as suggested. Got some blocks made. Now my border is 3/4" longer than my quilt. Maybe if I had used a full quarter inch seam instead of a scant? I have used the scant on all seams. I have 11 seams on the border. Should I go just a hair bigger on each one?
I finally found a few minutes to work on my quilt again. HELP!!! This sure has been a struggle for me. I cut my borders as suggested. Got some blocks made. Now my border is 3/4" longer than my quilt. Maybe if I had used a full quarter inch seam instead of a scant? I have used the scant on all seams. I have 11 seams on the border. Should I go just a hair bigger on each one?
Last edited by Pam H; 02-22-2014 at 06:42 PM.
 02-22-2014, 07:31 PM
#982
Super Member
Join Date: Oct 2013
Location: Centralia, WA, USA
Posts: 4,890
You don't need to go much bigger at all. If my math is correct you only need to adjust your seam allowance by 1/32" to be nearly perfect. My eyes are bad enough these days I can barely see 1/32".
Rodney
Rodney
02-22-2014, 09:52 PM
#984
Super Member
Join Date: Jan 2011
Location: Wyoming in the summer, Florida in the winter
Posts: 7,583
If your center was the correct measurement then it should match perfectly Pam. I very seldom sew a scant 1/4"...if a pattern calls for it I adjust so I have a true 1/4" seam. Think I've seen to many other quilts that those scant 1/4"s were less than that and the minute you wash them those seams start to shred. On all the rounds that I have given I have sewn them the full 1/4" seam, I'm pretty sure Linda has too because she is really trying to get better at those, she got a new pressure foot and all. 11 seams can make a bunch of difference.
02-23-2014, 07:35 AM
#985
Super Member

Join Date: Jan 2011
Location: Olympic Pen., WA
Posts: 1,167
Well, I'm back from our trip to Texas and now will be sewing friendship stars like mad trying to catch up. I'm so glad the next round will be an easy one. The quilts are looking very amazing. Great jobs everyone. That last note about full 1/4 inch seams came just in time so thanks for asking Pam. I would have been using scant.
Elizabrat, so sorry about your arm. Hope you're doing better. Must be frustrating if it interferes with your sewing.
You folks in Texas probably know about this shop, but there is a quilt store in Kerrville that is so much fun it is worth a trip in itself. It is in an old house and the rooms seem to go on forever. Here's their website: http://www.creations-online.com/home.aspx
Also, I saw an idea somewhere on the trip about another approach to medallion quilts. It was off center and would be an idea for anyone who wanted to cut down on numbers of stars. I'll draw a picture to show what I mean.
[ATTACH=CONFIG]463902[/ATTACH]
02-23-2014, 07:36 AM
#986
Super Member
Thread Starter

Join Date: Oct 2009
Location: Cody, Wyoming
Posts: 6,344
Once again I believe Jan is correct. One a scant quarter inch if taken up just a tiny notch towards that quarter inch you will find will take up a bunch of that 3/4 inch you have left over. Then on the last two one on each end you.. wing it if its a tad too big you trim it to fit just have fun with it. Its not rocket science 1 and 2 its not rocket science. So you breath first off (an excellent plan on a daily basis) then you decide if you trim it down just a bit on all the seams is it enough to get it to 'fit? if its too big just trim it slightly more on each side so they are the same on the end and your golden. If you end up too short you then have to rethink the ends and maybe leave them as be to make them fit? its all about juggling. One one round you will find it fits perfectly on the next there might be an off by a smidgeon size and how you make it fit it is your call. Larger then trim slightly down or smaller and go slighter on the inseam. I believe this round however is one that a 2.5., 3.5 or 4.5 inch trim worked (one not all of them). divide the top round the large number by the smaller number: say 36 x 2 or 36 x 3 or 36 x 4 do you see? if you can take the bigger number and divide it by one of the smaller numbers you then have a round that should in theory fit. I like the smaller round even though it gave me a lot more work. If you want a big round then if the 4.5 round goes use that one.. just think it through bit by bit. you can do it! if not you can write me and we can do it (hopefully lol). THIS IS FUN sigh.. truly it is. please write me ok if you are stuck? I will try to help (gulp). I know a couple minds should be all it takes to figure this out. once you have it.. omg you have it for all the rounds. and I did go with the easy type round because of this.. ok lets see what you have done!
if its a tad too big you trim it to fit just have fun with it. Its not rocket science 1 and 2 its not rocket science. So you breath first off (an excellent plan on a daily basis) then you decide if you trim it down just a bit on all the seams is it enough to get it to 'fit? if its too big just trim it slightly more on each side so they are the same on the end and your golden. If you end up too short you then have to rethink the ends and maybe leave them as be to make them fit? its all about juggling. One one round you will find it fits perfectly on the next there might be an off by a smidgeon size and how you make it fit it is your call. Larger then trim slightly down or smaller and go slighter on the inseam. I believe this round however is one that a 2.5., 3.5 or 4.5 inch trim worked (one not all of them). divide the top round the large number by the smaller number: say 36 x 2 or 36 x 3 or 36 x 4 do you see? if you can take the bigger number and divide it by one of the smaller numbers you then have a round that should in theory fit. I like the smaller round even though it gave me a lot more work. If you want a big round then if the 4.5 round goes use that one.. just think it through bit by bit. you can do it! if not you can write me and we can do it (hopefully lol). THIS IS FUN sigh.. truly it is. please write me ok if you are stuck? I will try to help (gulp). I know a couple minds should be all it takes to figure this out. once you have it.. omg you have it for all the rounds. and I did go with the easy type round because of this.. ok lets see what you have done!
02-24-2014, 03:28 PM
#987
Super Member
Thread Starter
Join Date: Oct 2009
Location: Cody, Wyoming
Posts: 6,344
think that the problem with Oksewnsew is cleared up and she will be sewing a round right along with us. I am dying to show you next months round it is simple in time/effort. I think however it is fun and colorful. I have been plotting all day long the next months increment but figure one at a time so lucky me I can take a bit of time with it and have fun. That is what its all about. Learning and fun all in the same time frame. and boy do I have lots of learning to do. Jabas delicious cake is here but I missed her husband by a mere 10 minutes or so.. darn it! hope to have a piece of it left at least by tomorrow.. we will have to see. If not I sure know how to do it next round and will deliver one way or another a delicious chocolate cake with whipped chocolate and sour cream frosting and German chocolate filling with strawberries.. it really is good
and will deliver one way or another a delicious chocolate cake with whipped chocolate and sour cream frosting and German chocolate filling with strawberries.. it really is good
02-24-2014, 03:45 PM
#988
Super Member
Join Date: Jan 2011
Location: Wyoming in the summer, Florida in the winter
Posts: 7,583
Brat, you stay out of my cake...you have your own. Am so looking forward to it, if it wasn't snowing so hard I'd drive to your house and get it tonight!!!
To a wonderful lady named Dotty, again thank you so much for your thoughtfulness, it is greatly appreciated!
To a wonderful lady named Dotty, again thank you so much for your thoughtfulness, it is greatly appreciated!
02-24-2014, 07:17 PM
#989
Super Member
Join Date: Oct 2013
Location: Centralia, WA, USA
Posts: 4,890
I finally nailed down what I'm doing for round 2. I went with Elizabrat's blocks of 4 HSTs arranged as pinwheels. I couldn't decide on colors so I didn't I'm using pretty much ever solid colored fabric I have. It'll probably end up looking like a clown puked on it. I'm still in the cutting and sewing stage.
Rodney
Rodney
02-24-2014, 08:02 PM
#990
Super Member
Join Date: Jan 2012
Location: NE Missouri
Posts: 6,418
I am so excited!! First of all, Brat, hope you are better. Sounds like you have something good to help you heal with that cake.
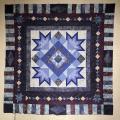
I had posted this picture with the hourglass block[ATTACH=CONFIG]464361[/ATTACH]and Jan suggested another border between the center and the block. So I auditioned 7 or 8 pieces of green that I had and all of it seemed to dull it down and make it not pop. I kept at it until I decided this light border brightened it up considerably and added 2 finished inches. I thought it was maybe too wide and prominent, but fortunately decided not to cut down until I figured out what I was doing next. Then I decided that the 6" hourglass block was too big and so decided to go with 4". Cut the strips and started in. Made 7 and auditioned them around the light border. Then I decided they were not big enough and I didn't like the look they created. So I ripped them apart and reconfirgured them into this block:[ATTACH=CONFIG]464363[/ATTACH]
Then I decided that 4" wasn't big enough so hit upon idea of sitting them on point so they would have more "presence". So this is what I ended up with. I sure hope you like it. I really do and I learned a ton of stuff. First of all, to those who might think I am a mathematical genius to make this work out, let me assure you this isn't the case, but every once in a while I receive dumb luck. Turned out I had only to trim 1/2 inch total from light border for them to fit perfectly. Then I learned about the corners. Put 4 blocks together differently to get the corner to "flow" from the horizontal to the vertical. Then had 1 "y" seam to deal with on each corner. But it did bring out the green, frame the center, make the first row kind of pop and I am ready for the next row. At least that's my story and I am sticking to it. So ta da, here tis the finished product: [ATTACH=CONFIG]464365[/ATTACH]
Hope it passes inspection, because I don't have the heart or strength to rip any more. I am sure learning a lot, so thank all of you. I am thinking that I will do something on the top and bottom to make it rectangular and to get it to the size it needs to be. Maybe even friendship stars. Those hourglass blocks are pretty flexible I discovered.
Last edited by Quilter 65; 02-24-2014 at 08:05 PM.

Thread
Thread Starter
Forum
Replies
Last Post
Quilter 65
Pictures
18
06-06-2014 08:19 AM
Elisabrat
Member Swaps and Round/Row Robins
944
11-14-2013 07:00 AM
Elisabrat
Member Swaps and Round/Row Robins
745
08-01-2013 03:26 AM
