Quilt as you go methods
Subscribe
#31
PaperPrincess , 03-13-2013 05:37 AM
Power Poster
 08-15-2025
Quote:
https://www.youtube.com/watch?v=v7_lwOfZWM8
Except that I think attaching the sashing the other way around is better as I prefer top stitching on the top and not from the back side.
Last week my daughter observed me hand stitching one and said, "Mom, wouldn't it be much faster to sew it on the machine?" When I told her, yes, but it isn't quite as accurate--unless you do it from the top."
So, I did...and it is working out great. I will be using this method more often for a change from quilting big pieces.
This is actually my favorite method too, except, I cut the back binding 1 5/8 rather than 1 1/2. I fold over the back binding, press making sure the binding covers the seam (glue basting would be great here) then SITD from the front. From the front it looks like narrow sashing. On the back, there is a tiny flange, but I don't have a problem with that.Originally Posted by justflyingin
I've made several now--should finish up two more today using 4" blocks--I sewed the 4" squares together in rather large squares (8x8) just to use them up and put together a charity quilt. I followed the video that Leah Day has...https://www.youtube.com/watch?v=v7_lwOfZWM8
Except that I think attaching the sashing the other way around is better as I prefer top stitching on the top and not from the back side.
Last week my daughter observed me hand stitching one and said, "Mom, wouldn't it be much faster to sew it on the machine?" When I told her, yes, but it isn't quite as accurate--unless you do it from the top."
So, I did...and it is working out great. I will be using this method more often for a change from quilting big pieces.
Also, if you are doing smaller blocks, you can join several together using traditional sashing methods to give you a 1/2" finished sashing, quilt that section, then join. You really can't tell from the front where the joins are. i usually use a print on the back to hide the joining strips.
#32

MartiMorga , 03-13-2013 05:48 AM
Super Member
Quote:
http://www.youtube.com/watch?v=I_qyb7XxY4k
I did this method, you do a lot of extra steps and you end up with a "heavier" quilt, also with stiff seams because of the bulk.Originally Posted by Ranchwife
I'm going to start a quilt tomorrow that will be a QAYG. I'm planning on using the method described in this video. I hope it turns out ok. I don't want to have to quilt the whole thing or pay to have it done, so I'm hoping this method works well. In my mind, I don't see why it wouldn't.http://www.youtube.com/watch?v=I_qyb7XxY4k
#33
wow lots of info here Thank you. the quilt I am working on is for a un-sashed QAYG and I was trying to find how to do it. Lots of reading and video watching for me now. Thanks alot!
#34
I dislike this method of quiltmaking! The seams on the backside are often very bulky and give extra work
with the added stips of fabrics to cover them. A few years ago I used a lovely log-cabin quilt-as-you-go pattern
in the traditional way of first joining the blocks together for the quilt top, followed by the next steps of putting the
rest of the quilt together. I cannot imagine why anyone would prefer this method above the traditional way of
making quilts!
#35
justflyingin , 03-13-2013 06:58 AM
Super Member
Quote:
Good idea!Originally Posted by PaperPrincess
Also, if you are doing smaller blocks, you can join several together using traditional sashing methods to give you a 1/2" finished sashing, quilt that section, then join. You really can't tell from the front where the joins are. i usually use a print on the back to hide the joining strips.
#36

I learned to quilt back when Georgia Bonesteel was the rage. I have some of her books, and I am sure they are still in print. If not, get back to me and I will see what I can do. She made it very easy and quite good. Good luck.
Judy
Judy
#37

Quote:
There are also methods to quilt in large sections and then put the large sections in quilt as Your go technique.
The name Boonsteel brings back memories of when I first started quilting. I learned to quilt from a lady in Columbia, SC who followed Boonsteel's method and even improved on it somewhat. I made quite a number of quilts (all hand quilted) and put them together one block at a time. Now I am seriously considering going back to that method because of the arthritis in my hands. I really cannot afford the LA method over and over, and I cannot quilt on a frame because my hands and wrists are about gone. If only I knew where my stored notes were... Well, that is the story of my life. I have enough good notes from the first class I took to make a book. But who can tell where those are now? All I know is that the quilts I made back then and gave to relatives or friends have endured. They did not come apart.Originally Posted by Holice
Check Georgia Boonsteel. She is the queen of Quilt As You Go.There are also methods to quilt in large sections and then put the large sections in quilt as Your go technique.
#38
Quote:
http://www.youtube.com/watch?v=I_qyb7XxY4k
This is it. This video shows the method I used more than 20 years ago, but I did not quilt it with a sewing machine back then. This really does work and the fronts of the quilt never show it is done this way! I can add a few ideas we used in our class that might make the whole business easier. Originally Posted by Ranchwife
I'm going to start a quilt tomorrow that will be a QAYG. I'm planning on using the method described in this video. I hope it turns out ok. I don't want to have to quilt the whole thing or pay to have it done, so I'm hoping this method works well. In my mind, I don't see why it wouldn't.http://www.youtube.com/watch?v=I_qyb7XxY4k
1. When putting the fronts of the blocks together, trim the batting back to where you want to make the seam on each block. Make the seam joining two blocks just like you would if the batting and backing were not there, and then the batting should be butted together. We never sewed through batting at all. We always used a whip stitch to join the two battings together making sure it did not separate after the top blocks were sewn together. Of course the whip stitch could not show on the front.
2. Then turn the blocks over and do what you saw in the last half of this video. You can use the glue or not. I never used glue for mine.
This method encourages speed and it also encourages portability. When I have a project going, I want to be able to carry it with me everywhere I go. QAYG definitely saves the aching back and arthritic wrists and hands. Sure it is nice to sew a complete top together and see your work within a day, but not so nice trying to quilt it later.
#39
QuiltingHaven , 03-13-2013 09:19 AM
Senior Member
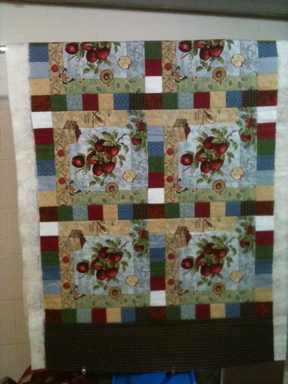
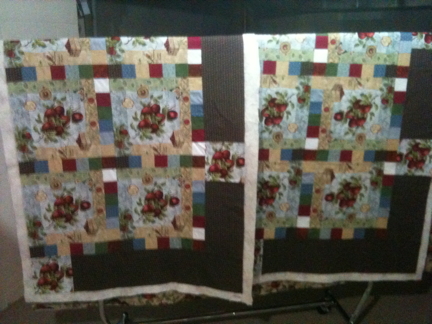
Okay, I am still a rookie at this (just a little over 2 years and retired) and I have found that I like to make the quilts in 3 sections. I love to hand quilt something on all of them but I also like the stitch-in-the ditch around the squares. And I have not yet had the courage to free motion. I always have "evening" quilting that I can do while sitting with the DH "watching" TV. Here are some pictures that might help.

#40
After watching the video I am really curious as to how it goes. Please let me know. It would be nice not to have to pay to have it quilted by someone with a long arm machine. Please keep us updated.