
On Ringo Lake -- Bonnie Hunter Mystery Quilt 2017-18
 01-03-2018, 12:46 PM
#1771
Senior Member

Join Date: May 2013
Location: Windy NE Oregon
Posts: 533
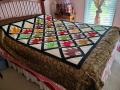
I forget which quilter wanted help with on-point. I have done 5 or 6 of them. The design wall is wonderful, but I have to keep reminding myself that the rows are not straight across. You need to tip your head to the side and look at the rows as such: Row 1 (one block) Row 2 [ATTACH=CONFIG]586516[/ATTACH](three blocks) Row 3 (5 blocks) Row 4 (5 blocks), then three and then one. Put the rows together with the short sashing. Then the long sashing goes on after that. The outer edge triangles are sewed on before the rows are joined. I hope I have been clear. This pic is one of my recent finishes. I'm a turtle stuck in the mud on this BHMQ. I'm still on Allitaire.
 it gets me totally confused.
 01-03-2018, 01:02 PM
#1772
Super Member
Join Date: Apr 2010
Location: Northeastern Indiana
Posts: 2,800
I actually forgot and had to look at the picture. They are in the long sashing. Measuring had to be spot on. I got the original pattern from Rest and Refreshing ...Debbie Thompson McInnis who gave us lots of free patterns and called them block of the week.
One of the tricks is to choose a size of block and then cut the triangles to match. Get those sewed onto the rows before you put the rows together and thus eliminate the Y seams. The corner (4 corners) triangles are a different size. There was a list of what size triangles to cut based on what the block size was. The ones in the pic were 12 inch blocks. I had one triangle that would not fit at all, so I put in a cheater piece.
One of the tricks is to choose a size of block and then cut the triangles to match. Get those sewed onto the rows before you put the rows together and thus eliminate the Y seams. The corner (4 corners) triangles are a different size. There was a list of what size triangles to cut based on what the block size was. The ones in the pic were 12 inch blocks. I had one triangle that would not fit at all, so I put in a cheater piece.
01-03-2018, 01:07 PM
#1773
Super Member

Join Date: Jan 2011
Location: Eastern Washington
Posts: 6,514
I am loving the alternate colors and the alternate settings that are being posted here. Sew biz- your colors just pop! Kass- as always, your alternative layouts are fabu! Sorry, I am forgetting all the posts that I wanted to mention... this is why I need to keep a piece of paper next to my computer.....
I'm still struggling with whether I want to do Bonnie's layout--I am not thrilled with some of my fabric choices in the Melon/Coral family--they ended up being too light in value to my eye, which adds a lot of confusion and makes them appear too washed out for my taste. Here's a photo showing 9 blocks which I put on my design wall before the reveal, so no sashing. I sort of like the secondary pattern and the way the blue glows, which might get lost if I do the sashing....Or, I could do a small version BHs way and then do the rest my way (since I made all the units for the full size). Or perhaps if I took apart the blocks and redid them using more similar units within blocks so that there is more unity within each block, that might help clarify things, and the whole would still be scrappy....
Rob
My pieces are still being assembled. I may have this issue because of the colors I chose as well. Thinking since I have pieces the same and four flying geese, that I will match them up in blocks so they are more cohesive and ground my blocks in the setting. Not sure I like the pieced sashing, like the idea of making it look like the monkey wrench as someone stated earlier. Or I thought to give it a star look in the sashing. Have to wait and see when I get there. Thought I cut enough coral triangles for the flying geese, but nope, 7 short. I did cheat a little, I do not own those rulers, so I used Accuquilt for most of mine. Worked pretty slick seeing how I got almost all of it cut Friday night and then was able to start sewing right away.
01-03-2018, 01:32 PM
#1774
Super Member

Join Date: Jan 2011
Location: Knot Merrill, Southern Indiana
Posts: 5,781
As for setting it on point ... my best advise is when you cut the setting triangles make sure that the edge that will be on the outside of the quilt is cut on the straight of grain (preferable length of fabric, but width of fabric is OK too). In other words, the other two sides of the triangles that will be sewn to the block are cut on the bias. My second piece of advice is that when you sew the setting triangles to the quilt, use lots of pins to insure the bias edge doesn't shift on you. Both of these hints will help reduce or eliminate wavy edges on the outside of the quilt edge.
01-03-2018, 01:43 PM
#1775
Super Member
Join Date: May 2013
Location: Ballwin, MO
Posts: 4,256
Rob, I have the same issue, as I strayed a bit too far from the value indications. I have some darker corals, lighter aquas and lighter browns. I'll try putting lights with lights and darks with darks and see how that looks
Pagzz, that is so lovely!
kele, your colors work so well!
Windblown, I have to go super slow and read the directions several times and keep checking a photo at every step when I do on point. You can do it!
Pagzz, that is so lovely!
kele, your colors work so well!
Windblown, I have to go super slow and read the directions several times and keep checking a photo at every step when I do on point. You can do it!
01-03-2018, 01:45 PM
#1776
Super Member
Join Date: Oct 2015
Location: Va.
Posts: 5,753
I have been also watching some Edyta Sitar. To help you add unity to your block, I do see the muddy, you can do as you said, using more similar units within blocks to ground them more. Then mix them throughout the quilt. That will do what you want.
My pieces are still being assembled. I may have this issue because of the colors I chose as well. Thinking since I have pieces the same and four flying geese, that I will match them up in blocks so they are more cohesive and ground my blocks in the setting. Not sure I like the pieced sashing, like the idea of making it look like the monkey wrench as someone stated earlier. Or I thought to give it a star look in the sashing. Have to wait and see when I get there. Thought I cut enough coral triangles for the flying geese, but nope, 7 short. I did cheat a little, I do not own those rulers, so I used Accuquilt for most of mine. Worked pretty slick seeing how I got almost all of it cut Friday night and then was able to start sewing right away.
My pieces are still being assembled. I may have this issue because of the colors I chose as well. Thinking since I have pieces the same and four flying geese, that I will match them up in blocks so they are more cohesive and ground my blocks in the setting. Not sure I like the pieced sashing, like the idea of making it look like the monkey wrench as someone stated earlier. Or I thought to give it a star look in the sashing. Have to wait and see when I get there. Thought I cut enough coral triangles for the flying geese, but nope, 7 short. I did cheat a little, I do not own those rulers, so I used Accuquilt for most of mine. Worked pretty slick seeing how I got almost all of it cut Friday night and then was able to start sewing right away.
Thanks QM-- I think I will be more careful in putting together the rest of the blocks and do as you suggest to help with unity within blocks, then re-evaluate to decide how I want to set it.
Looking forward to seeing what you do with it. I didn't have the Accuquilt dies in the sizes needed since I tend to make larger blocks, otherwise I would have done the same!
Rob
01-03-2018, 01:52 PM
#1777
Super Member
Join Date: Oct 2015
Location: Va.
Posts: 5,753
Joe's Mom-- that sounds like a good idea and one I will keep in mind for helping with unity in mine, I may also try repeating the same fabrics within blocks as well.
When I first put them up on the design wall this weekend -- my initial thought was that the combination of blue 9 patches and lighter corals and melons looks like an easter basket threw up on it LOL! Thank goodness for the darks that make the secondary patterns, otherwise I'd probably set them all aside to use in other projects!
Rob
When I first put them up on the design wall this weekend -- my initial thought was that the combination of blue 9 patches and lighter corals and melons looks like an easter basket threw up on it LOL!
Thank goodness for the darks that make the secondary patterns, otherwise I'd probably set them all aside to use in other projects! Rob
01-03-2018, 02:04 PM
#1778
Super Member
Thread Starter

Join Date: Aug 2016
Location: Kansas
Posts: 4,488
Crumbs, I am so indecisive as to what to do with my layout! Here's the latest idea... Using Bonnie's layout but instead of scrappy I thought a constant fabric might pull everything together more.
Windblown, I'm nervous about the on point setting too.
Thanks for everyone's tips! I absolutely need to set up my design wall for this one!
Windblown, I'm nervous about the on point setting too.
Thanks for everyone's tips! I absolutely need to set up my design wall for this one!
01-03-2018, 02:32 PM
#1779
Power Poster

Join Date: Oct 2010
Location: Mississippi
Posts: 26,337
With an on point setting I always lay out the setting triangles on either end and sew them on as tho they were whole blocks. Then when you join your rows, everything fits. I do not recommend sewing all the blocks first and then trying to fit in the triangles. It's harder.
I suggest you print the layout picture and keep it handy as you lay your blocks and triangles out to sew them. Sewing each complete row together, including the triangles on the ends, makes joining the rows much simpler.
01-03-2018, 02:36 PM
#1780
Power Poster
Join Date: Oct 2010
Location: Mississippi
Posts: 26,337
Rob, I think your blocks look great. You have more colors which makes it a lot more fun.

Thread
Thread Starter
Forum
Replies
Last Post
Podunk Princess
QuiltingBoard Challenges & Contests
2033
01-11-2022 06:54 PM
