Sewing machine case repair
Subscribe
#61
 10-15-2023
I love to read along and watch what you're doing. You're so nice to do this, so we can all follow the steps you're taking. I'm on the outside, looking in. LOL
#62
Jeanette Frantz , 12-02-2014 05:24 PM
Super Member
Joe, you did a great job on that case! I was given (several years ago) a love seat that was covered in the ugliest orange colored fabric I've ever seen. Then, I acquired (free) new upholstery fabric to recover everything. I stripped that love seat down to the springs and bare wood. The springs were hand tied, and the wood frame was built like a brick outhouse! It took me a long time to complete the job, but I finally finished it, using the old fabric for a pattern. I even made piping for the edges of the cushions. The love seat still looks great. I even bought an air stapler to attach the fabric to the frame. That hand stapler was just too doggone hard to operate. I used my old Singer 328K to sew the upholstery. My ego may get the best of me, but I did a darned good job and I'm proud to have it in my living room! You should be very proud of the jobs you've done on these cases! They're terrific!
Jeanette
Jeanette
#63
To recover the box with fabric I would use decoupage. Cut your fabric to the sizes needed. Spread decoupage on the cover and apply the fabric. Then give it another good coat of decoupage. It would be waterproof by using that as well.
#64

Rebaquilts , 09-24-2020 08:26 AM
Super Member
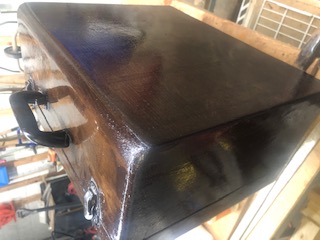
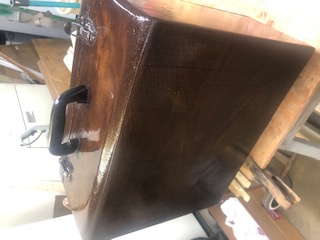
Hi all, I'm glad this thread was started. The first case is a 301 case where the fabric covering was very bad. It also had a layer of what looked to be cardboard on the sides. Once stripped, it showed black discolored areas from water damage. So I stripped all of the fabric and cardboard off, filled some holes, sanded, and glued. Several coats of stain helped mask the water damaged areas, and now I've put on two coats of poly. I'll be decoupaging the insides to add strength and structure. The second one is like the thread starter, the bottom had fallen apart, even the outer fabric layer didn't hold it together. it belongs to a green singer 185j workhorse. Again, I have pulled off the fabric, glued, sanded, stripped, and found water damage on the bottom. I am using a different technique on this one that I found on youtube. You get a tube of the inexpensive oil paint in the artists section at Michaels for $5 and rub it in. Then you use Japan Drier to smear it in really well and dry it quickly. They use this technique with guitars, apparently, as well. I will then use polyurethane to seal it. The green will tie into the green color of the machine and it is turning out really well. I've kept the leather top, but I may use Angelus leather paint to paint the top black or light or deep green rather than the original brown to finish it off. I'll post final pics when I'm done. Thanks for so many posts, this thread is so helpful.

#65

Wow!! I will look back on this post as a marvelous tutorial. I know I would be unable to do this kind of repair and I applauded your fine efforts. I know if I come across a case in bad shape I will send it your way. Thanks for sharing this wonderful accomplishment. Wow!!
#66
Joe, it was nice to read about how you fixed the old case but was hard to see the pictures with the word photobucket right smack in the middle of the picture
#69
"cat"astrophy , 10-13-2021 04:35 AM
Junior Member
A huge thank you J Miller for the tutorial!!! I have an old Singer in case and the case is broken up...NOW I can fix it by following your pictures! Yours looks great!