
Bonnie Hunter's 2019-2020 Frolic Mystery
 01-31-2020, 03:10 AM
#1301
Super Member
Join Date: Aug 2018
Location: Greater Peoria, IL -- just moved!
Posts: 6,064
Loving those neutrals instead of my eye blasting yellows!
Those darn bobbins. Yesterday I was tempting fate with my "It's all fun and games until the bobbin runs out" t-shirt but I didn't jinx myself this time. It helps that I finally found the package of extra bobbins for my Brother and so I can wind extras and not be at the mercy of just one bobbin. Speaking of being at the mercy of... I pulled out one of the new bobbins and was having a terrible time getting the thread through the hole in the top. Now, with my vision issues I often have problems but this was worse than usual. So finally I got out my seam ripper to check -- and sure enough, there was still a little film of plastic still closing over the hole even though you could clearly see where the hole was. Once that was poked out it worked much better.
Today's goal is to finish the extra blocks/setting units and then to pick which blocks stay and which get cut into setting triangles. I've been thinking maybe the thing to do is instead of doing the full blocks first, maybe I should see if I can expand any of the other sets of the setting triangles to make them into two units and then I won't have to worry about slicing any of them. The ones I want to turn into full blocks I want because of colors or other reasons.
I'm so weird, I don't mind having extra orphan blocks at all, but having those left over cut/semi-pieced units bothers me.
 01-31-2020, 02:32 PM
#1302
Super Member
Join Date: Aug 2018
Location: Greater Peoria, IL -- just moved!
Posts: 6,064
Wow, I don't mind saying I had some real cognitive issues trying to put those setting triangles together while making two out of each cut set instead of one. The four corners were easy but I kept trying to make those instead of halves. Took me a long time to get my first set done, but I'm moving along now. So it looks like I won't have to actually cut any of my blocks if I don't want to but that I will have entire blocks left over. But it's going to take me at least another day to get my blocks and setting triangles done.
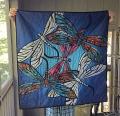
But -- I am done at last with the hand dyes. Here are spread out views and a stacked view in it's original bag next to one of my boxes of fabric. It's basically a box left now. I have the yellows and reds up top in case I want to dive back in there but I should be pretty well done cutting stuff now.
The last two shots are the binding fabric, pre-washing with the goodwill tag that says I spent less than $2.00 almost exactly a year ago, and the washed out but still cool end result.
01-31-2020, 08:06 PM
#1304
Super Member
Join Date: Aug 2011
Location: Asheville, previously Lake Vermilion, Tarpon Springs, Duluth, St Paul, Soudan
Posts: 1,651
IceBlossom, I went backwards from you.
Started putting half blocks together and realized that there was no way I was going to have the luck to get 4 matching aqua geese, 4 matching blue geese, the right aqua HST, etc., so put the sashing together, cut one set of each combo, cut some blue/raspberry HST for the pinwheel and just made another block.
Figure I can get the 4 corner blocks out of the leftovers. The setting and corner triangles try my patience, because you can’t just out the pedal down and sew.
So finally, tomorrow, I can start putting rows together. Then measure for what I call the stop border—the border to bring the quilt center to the right size for the pieced border to fit. If tomorrow can be as productive as today, may almost have a top by the end of the weekend.
02-01-2020, 06:37 AM
#1305
Power Poster

Join Date: Jul 2017
Location: Central Ohio
Posts: 15,176
I need some help.
I have my 25 blocks almost finished. I now realize that the other blocks make the alternating design. Good so far.
My confusion is with those setting blocks. Since we were supposed to make 25 blocks where are the blocks for these other ones? Does anyone follow me here? I have tons of fabric leftover. So do I just make more or what? These instructions are all blurring together!!
02-01-2020, 06:47 AM
#1306
Super Member
Join Date: Aug 2018
Location: Greater Peoria, IL -- just moved!
Posts: 6,064
It is confusing!
The setting triangles are made from those other sets we put together but didn't make pinwheels back in step 6.
The really confusing thing (to me) is we basically cut out a whole entire block and sewed subunits for that block but we are only using a portion of them. It might help to go back a few pages and see what I had left over, I'll try and get a link to that.
I don't want to confuse you further, but it bothered me to have all those unused units and so I figured out what I had to do to get 2 setting triangles from each set of a single block.
Edit: Here is where I started processing the concept and construction of these setting triangles. A step I am still on! But I made life harder on myself than it had to be.
Bonnie Hunter's 2019-2020 Frolic Mystery
Last edited by Iceblossom; 02-01-2020 at 06:49 AM.
02-01-2020, 06:54 AM
#1307
Power Poster
Join Date: Jul 2017
Location: Central Ohio
Posts: 15,176
Iceblossom- thank goodness you were here when I posted!!!!!!! Thanks so much 
I have found that a lot of the mystery has been fun, but not all of it lol
I'm thinking of doing En Provence. It doesn't look nearly as confusing.
Maybe............
I have found that a lot of the mystery has been fun, but not all of it lol
I'm thinking of doing En Provence. It doesn't look nearly as confusing.
Maybe............
02-01-2020, 07:05 AM
#1308
Super Member
Join Date: Oct 2012
Location: West Central Texas
Posts: 2,586
Originally Posted by PiedPiper

I haven't begun the quilt but I have a question about the flying geese. I like to make mine in the 4-at-a-time method (Deb Tucker wing clipper ruler)...but I'm wondering if there's any way to use that method to make the 3-color flying geese? I'm really averse to cutting the pieces out as half-square and quarter-square triangles and then having to attach the bias edges to each other - I always manage to stretch them somehow during that process. ")
Maybe I just have to use the method of two squares on a rectangle, making one unit at a time, although it does tend to be a bit wasteful.
Do any of you awesome ladies have any tips or tricks for those three-color geese?? Thanks!
Maybe I just have to use the method of two squares on a rectangle, making one unit at a time, although it does tend to be a bit wasteful.
Do any of you awesome ladies have any tips or tricks for those three-color geese?? Thanks!
ETA: Oops! I meant sky triangles. Always want to call them wings for some reason.
Last edited by Belfrybat; 02-01-2020 at 07:10 AM.
02-01-2020, 07:09 AM
#1309
Super Member
Join Date: Oct 2012
Location: West Central Texas
Posts: 2,586
Iceblossom - fabulous colour combinations. Wow! I haven't touched this quilt for over a week. Had planned on getting the Cuts and Bolts mystery done, but another quilt intervened. I'll get back to it eventually, but am planning on doing a straight line arrangement and do away with the half blocks.
02-01-2020, 07:10 AM
#1310
Super Member
Join Date: Aug 2018
Location: Greater Peoria, IL -- just moved!
Posts: 6,064
I found it really helped me to first assemble my subunits together and then it went much better when I laid them out on a finished block instead of looking at my block (even though I had it all set up in the same direction and everything). Once I got that first corner unit figured out, laid out the other 3 on it. The corner was the easiest for me. I went ahead and made 4 matching corners because I could easily find the fabric to do that.
Same thing for the half blocks, I had a terrible time until I actually just put the pieces on a finished block. I kept trying to make quarter units. Once you have that weird rough shape to follow, it gets easier.
Kudos to anyone who found it easy the first time! I don't mind using full blocks and trimming when I do a diagonal set, that's going to be really weird to some of you. But for whatever reasons, the twisting and turnings of these simple little HST is twisting my head.

Thread
Thread Starter
Forum
Replies
Last Post
Rhonda
Member Swaps and Round/Row Robins
220
03-21-2020 11:54 PM
barbarakibler23
Member Swaps and Round/Row Robins
1789
02-28-2020 09:08 PM
